Before you is a complete walkthrough of The Last of Us Part I — from the prologue as Sarah to the final credits and the Left Behind DLC. All 12 story chapters are broken down step by step: where to turn, what to pick up, how to survive the encounter with the Bloater in Bill’s school, and what to do with David at the resort.
Warning: this guide contains spoilers. If you’re playing for the first time and want to enjoy the story — use it selectively, opening the relevant chapter as you progress. If your goal is platinum and 100% completion — read it sequentially. All 254 collectibles, passwords for four safes, boss tactics, and a complete DLC Left Behind breakdown are collected here. Estimated time for 100% completion — approximately 22 hours.
Table of Contents
The Last of Us Part I walkthrough
Video walkthrough of the game:
Key Takeaways Before Starting the Walkthrough
-
The story will take approximately 15 hours; a full playthrough with collectibles — around 22 hours.
-
254 collectibles: 30 Firefly Pendants, 13 Comics, 97 Artifacts, 12 Training Manuals, 11 Workbenches, 5 Tool Boxes, and 6 Ellie’s Jokes.
-
Four safes with passwords: 03-43-78, 05-17-21, 22-10-56, 08-21-36 — all covered in a dedicated section.
-
Missed an item? Through the Chapter Select menu you can return to any point at any time — overall progress won’t reset.
-
Enable High Contrast mode in Accessibility settings — collectibles on locations will start to highlight.
-
The Left Behind DLC is included with The Last of Us Part I and is required for platinum.
-
Hidden trophies require specific actions — don’t take Ellie’s hand at the dam, shut off the generator in Pittsburgh without killing anyone, and several others. Full list — in the corresponding section.
General Information About The Last of Us Part I
Release Date, Developer, and Platforms
The Last of Us Part I was released on September 2, 2022 on PlayStation 5. The developer is Naughty Dog, the publisher is Sony Interactive Entertainment. In March 2023, the game arrived on PC via Steam, though the port was met with criticism due to technical issues at launch — most of which were subsequently fixed with patches.
The remake was built from scratch on The Last of Us Part II engine, not as an upgrade of the 2014 Remastered version. This is a fundamental distinction: this is not a cosmetic update, but a complete rebuild of the game on a modern technical foundation.
Differences Between the Remake, Original, and Remastered
The main thing PS5 owners received is DualSense support. Adaptive triggers and haptic feedback work in sync with what’s happening on screen: different feedback when firing a shotgun versus a pistol, the sensation of pulling a bowstring. A small detail that unexpectedly works.
Enemy AI has been reworked — enemies more actively flank, react to sound, and coordinate during skirmishes. Graphics have moved to Part II level: face detail, lighting, and animations are completely overhauled. More than 60 accessibility options have been added — subtitles, audio descriptions, control customization, enhanced listening mode. The accessibility settings are especially useful for hunting collectibles — more on that in the next section.
Story, Duration, and Difficulty Levels
The action takes place in 2033 — 20 years after a Cordyceps fungal pandemic turned most of humanity into the infected. Joel, who lost his daughter on the night the epidemic began, agrees to transport Ellie — a teenage girl who is the only person immune to the fungus — across a destroyed America to Firefly scientists.

The story takes approximately 15 hours to complete. A full playthrough with collectibles stretches to 22+ hours depending on playstyle.
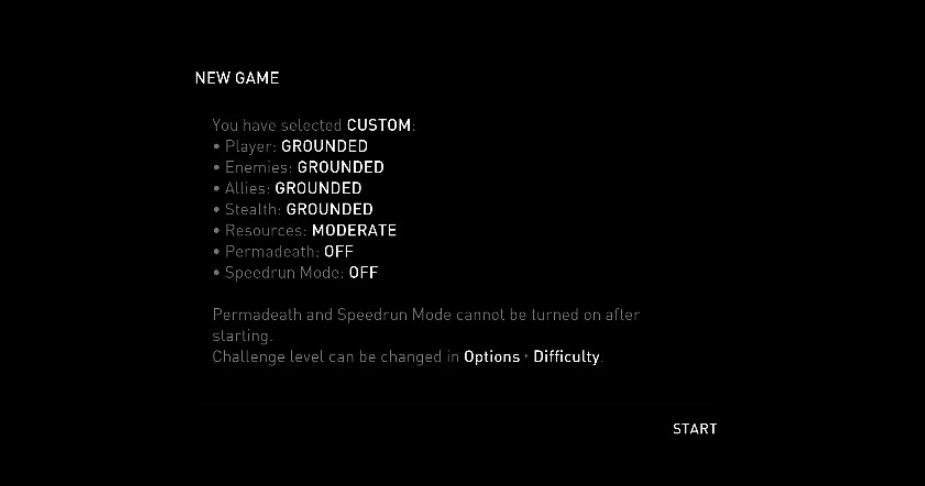
There are six difficulty levels: Easy, Normal, Hard, Survivor, Realistic, and Grounded. On Survivor, HUD hints are disabled and resources are significantly rarer. Realistic and Grounded unlock after the first playthrough. Two graphics modes — Resolution (4K/30fps) and Performance (1080p/60fps) — can be switched at any time from the menu.
Connection to The Last of Us Part II
The ending of The Last of Us Part I directly launches the events of the sequel. Without understanding what happened in the Firefly laboratory, many scenes in Part II lose their meaning and emotional weight. It is strongly recommended to complete the first part before starting the sequel — otherwise half of the characters’ motivations will remain off-screen.
Before Starting the Walkthrough: Settings and Tips
Useful Accessibility Settings for Finding Collectibles
Before starting, check Options → Accessibility. Two settings are critically important for collectible hunters.
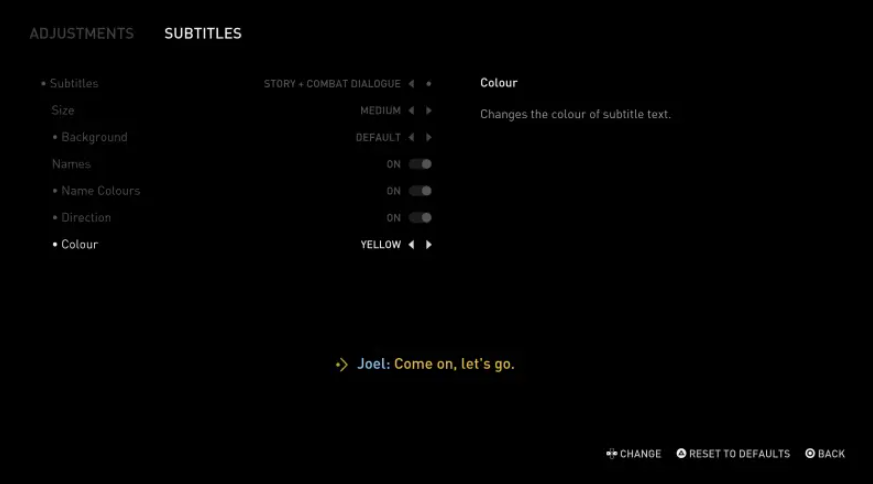
First — High Contrast (Option 1). Activates highlighting of interactive objects and collectibles directly on screen. Missing a Firefly Pendant on a windowsill or a comic under a staircase with this setting is significantly harder.
Second — Enhanced Listening Mode. By default, listening mode shows enemies through walls within a radius of several meters. In the enhanced version, the range increases — recommended settings: 30 meters, 1 second refresh. Useful not only for combat but also for detecting items in hard-to-reach corners of locations.
Both settings are compatible with any difficulty level and do not disable achievements.
How Many Collectibles Are There and Where to Look
In total, The Last of Us Part I has 254 collectibles of eight types:
-
Artifacts — 97 pieces. Notes, journals, letters. Scattered across all locations, often lying in plain sight but easily missed when running.
-
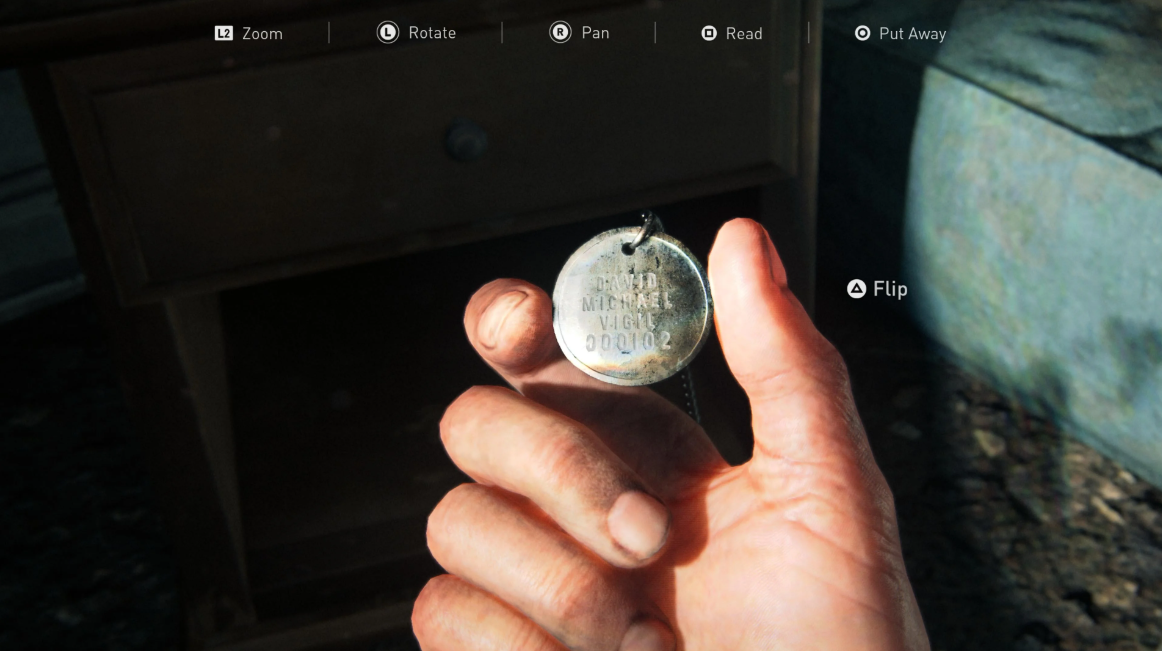
Firefly Pendants — 30 pieces. Metal medallions of fallen organization fighters. The largest category after artifacts.
-
Comics — 13 pieces. Ellie collects them; each one found unlocks a joke in her delivery.
-
Training Manuals — 12 pieces. Give skill points for upgrading Joel.
-
Workbenches — 11 pieces. Weapon modification points.
-
Tool Boxes — 5 boxes. Expand crafting capabilities at workbenches.
-
Ellie’s Jokes — 6 pieces. Unlocked when comics are found.
-
Manuals — part of the artifact category.
How to Return for Missed Items Through Chapter Select
A missed item is not a catastrophe. The main menu has a Chapter Select section: you can load any chapter from the beginning and replay the needed segment. Collectible progress is saved — what you’ve already collected won’t reset. The most important thing is not to overwrite a save over the point with an item you haven’t picked up yet. It’s most convenient to return after completing the entire game — by then you’ll know what’s missing.
Tips for Saving Resources and Stealth
At difficulties above Normal, resources become scarce. A few rules that save materials:
Stealth first. A silent takedown doesn’t spend ammo — only time and patience. Choking takes a few seconds, but the ammo supply stays intact. Use bottles and bricks for distraction: throwing one to the side draws a patrol away, after which you can quietly pass or perform a grab from behind.
Shivs for Clickers. One shiv — one silent Clicker kill without noise or risk. Spending them on Runners is wasteful. Don’t craft Health Kits in advance — only when necessary: ingredients are often more needed for other items.
Types of Enemies in The Last of Us Part I and Tactics Against Them
The Infected: Runners, Stalkers, Clickers, and Bloaters
The Cordyceps fungus infects its host in stages — each stage of infection produces a new type of infected.
Runners — first stage, infection up to 2 days. Good vision, normal hearing. Attack in groups and quickly. In melee they’re dangerous in numbers, but easily eliminated with stealth or one headshot.
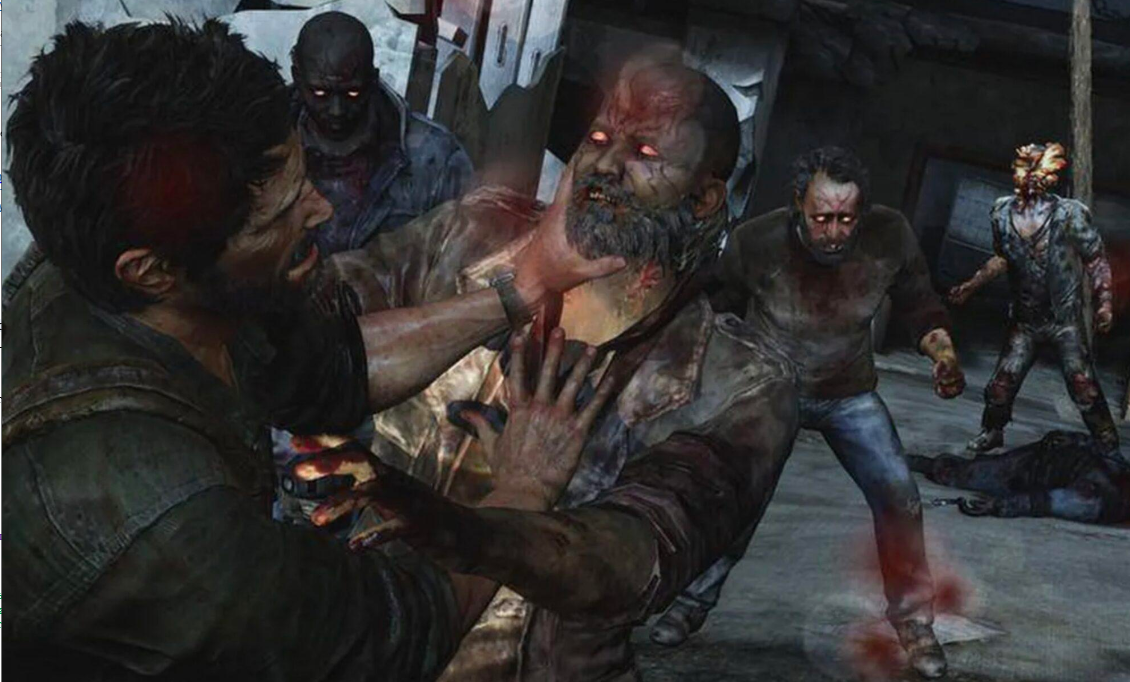
Stalkers — intermediate stage, 2 weeks of infection. Partially blind, orient themselves in space better than Runners. Hide in dark corners, attack from ambush. No gas mask needed — spores aren’t released yet.
Clickers — infection from a month and longer. Completely blind, but detect targets through echolocation — the slightest footstep sound attracts attention. The fungal mass on the head protects against ordinary attacks: a shiv or a point-blank shotgun blast is the optimal method. Move crouched in rooms with Clickers.
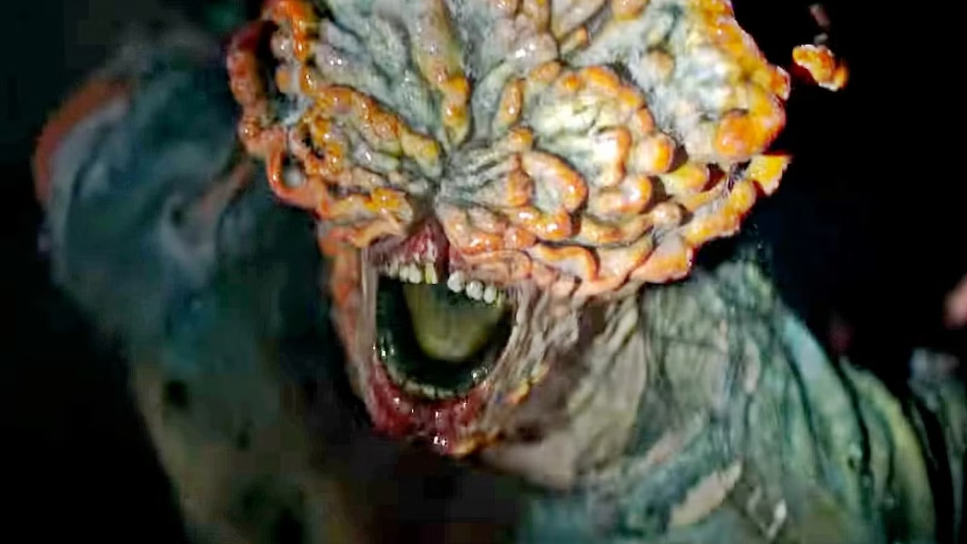
Bloaters — final stage. Covered in dense biomass, can withstand enormous damage. When destroyed, release a cloud of spores — without a gas mask you take continuous damage. Molotov cocktails and explosives are the priority. Shooting the glowing spots on the body deals maximum damage.
Humans: FEDRA Soldiers, Fireflies, Hunters, and Cannibals
Besides the infected, Joel is constantly threatened by humans — and often they are more dangerous.
FEDRA Soldiers guard quarantine zones, act in an organized manner, are armed. Encountered in the early chapters.
Fireflies — a rebel movement seeking a vaccine. Hostile to Joel in open conflict, though their motivation is more complex than it first appears.
Pittsburgh Hunters — bandits who ambush survivors. Act in groups, often use elevated cover.
David’s Cannibals — the most terrifying faction. Encountered in the “Lake Resort” chapter. Organized, armed, and yes — they are exactly what they seem.
Against humans, stealth works better than direct combat at any difficulty. Use cover, lure lone enemies with a bottle throw, don’t engage in a shootout with several at once.
Enemy Summary Table and Optimal Weapons
Chapter 1. Hometown — Prologue as Sarah and Joel
The game doesn’t start with Joel. Control transfers to his daughter Sarah on the night everything collapsed.
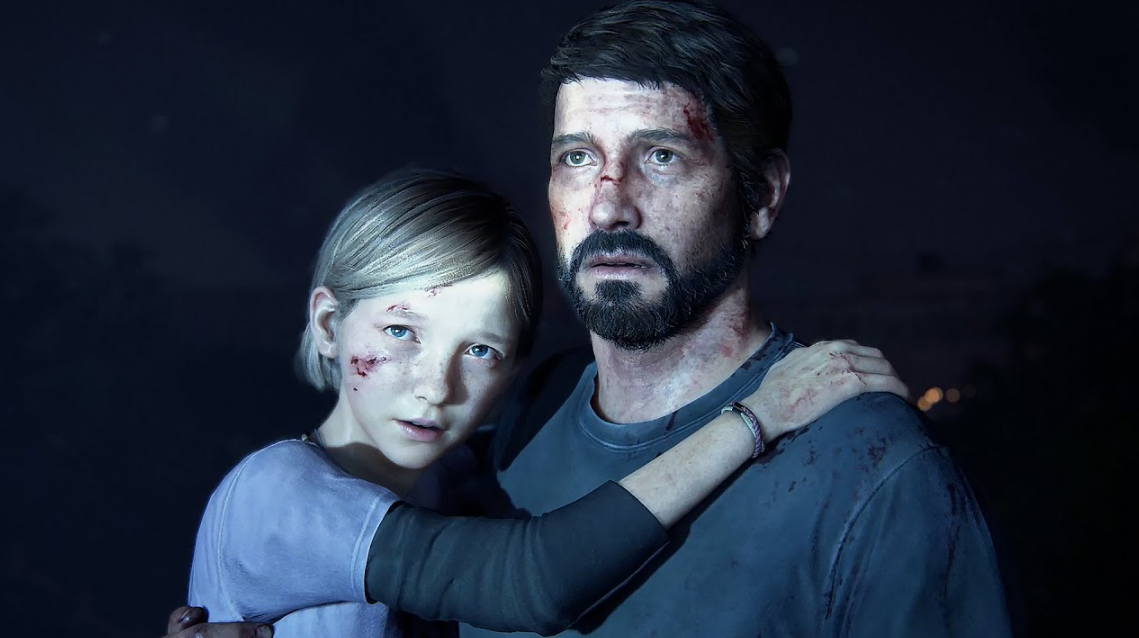
Explore the house before the phone call arrives: a postcard on the kitchen table, a newspaper in the bathroom, the TV in the living room with emergency news, a phone and Joel’s study. These aren’t just set dressing — the last minutes of the family’s normal life before everything changes. Pick up the father’s wristwatch on the bedside table.
After Tommy’s call, the escape begins. Controls are intuitive — the game leads you by the hand, there are no collectibles here. An infected neighbor, a car crash on the road, Tommy at the wheel — events unfold quickly. When Joel runs with Sarah in his arms through the burning theater, at the fork take the alley to the left. Straight ahead is a dead end.
The prologue’s finale is one of the strongest in the genre’s history. A soldier following orders, Joel on the ground, Sarah in his arms. The girl’s death explains everything Joel will do over the next 20 years — and especially what he will do at the game’s ending. This needs to be kept in mind throughout the entire playthrough.
After the prologue, control transfers to Joel — already grown, hardened, living in the Boston Quarantine Zone.
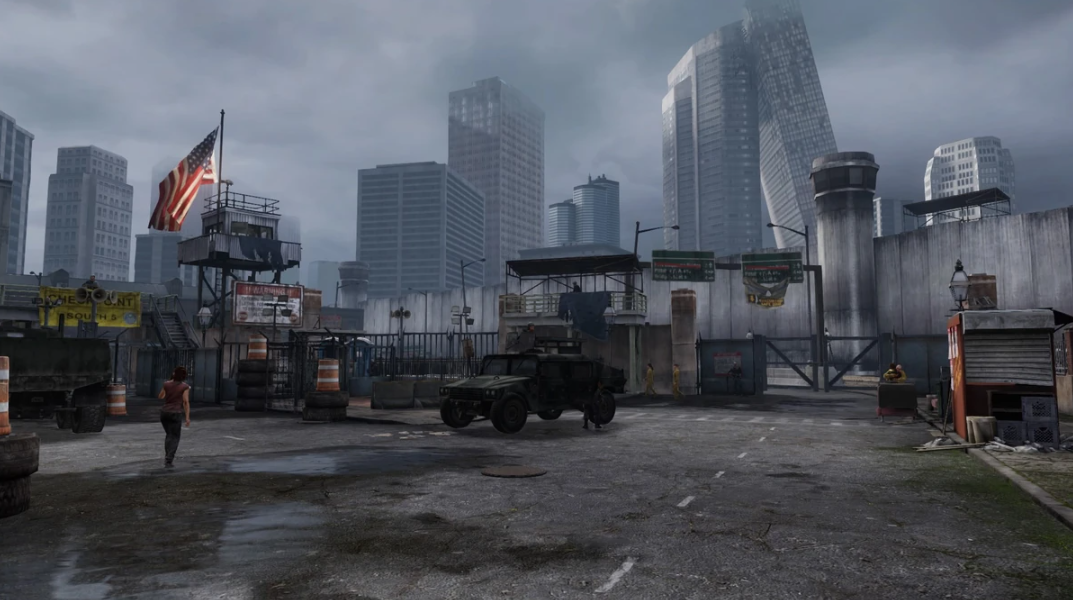
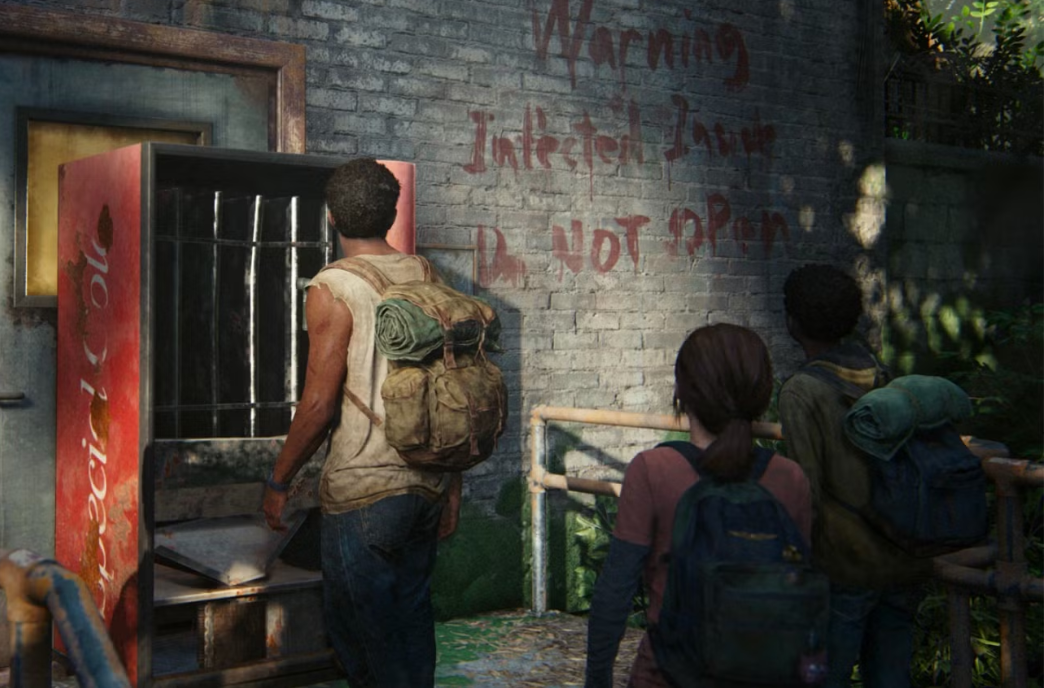
Chapter 2. The Quarantine Zone — Boston, Tess, and Meeting Ellie
20 years later. Boston under FEDRA control, life behind the walls — survival on ration cards and curfew. Joel works with Tess — smuggling, debts, weapons.
Outside the Wall: The Path Through the Spores
The chapter begins with a conversation with Tess about Robert’s debt — he stole weapons and now must answer for it. Ahead is a checkpoint with FEDRA soldiers: passing through it directly isn’t possible. The Fireflies stage a diversion, allowing Joel and Tess to pass through a secret passage.
Outside the wall — spores. Pick up the gas mask (located at the entrance to the building) and move through the infected rooms. The first infected here — choke from behind while it’s turned away. Firefly Pendant #1 — next to a bed with a lit lamp in the first building past the wall. Firefly Pendant #2 — outside, on a tree near the exit from the infected zone. Look up.
Here you’ll also find the first pistol — 9mm, in a Firefly cache. Ammo is limited: conserve it.
The Residential Area and Eliminating Bandits
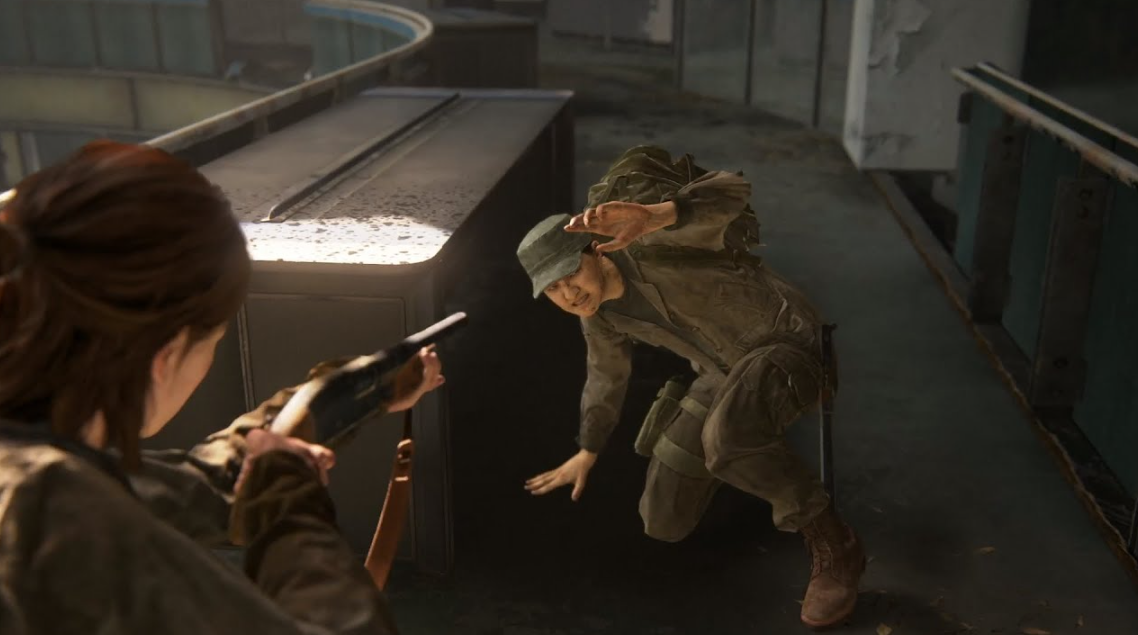
The exit from the infected territory leads to a residential district. A market, a bulletin board with survivor notices, three bandits at a barricade. The three can be taken out with stealth sequentially: one patrols one path, two stand guard — approach from the flank.
Beyond the barricade is a locked door. The key is on one of the bandits. Further ahead you need to raise the gate via a chain on the wall to the right. Ellie helps hold it — just pull.
The Docks: Robert, Marlene, and the Contract for Ellie
Five of Robert’s guards at the docks. You can clear them with stealth or start a gunfight — there’s enough ammo here for both approaches. Note #1 — on the right railing near the blue containers. Note #2 — behind the blue containers under the awning.
Robert’s interrogation ends quickly and harshly — Tess doesn’t mince words. The wounded Marlene appears with an unexpected offer: deliver Ellie to a safe place in exchange for weapons. Ellie turns out to have been bitten — but alive three weeks after the bite. That’s immunity.
After agreeing to the deal — escape from FEDRA soldiers across several rooftops and attics. Firefly Pendant #3 lies near the body of a fallen Firefly fighter in the courtyard after the shootout. Don’t run past it.
Chapter 3. The Outskirts — Escaping the City and First Encounter with Clickers
Joel, Tess, and Ellie make their way out of Boston. Ellie reveals details of her immunity: the bite was two days ago — and she’s alive. A mutated fungus that doesn’t react to her blood. The only hope for a vaccine — Firefly scientists.
Escaping the Military and the Scan
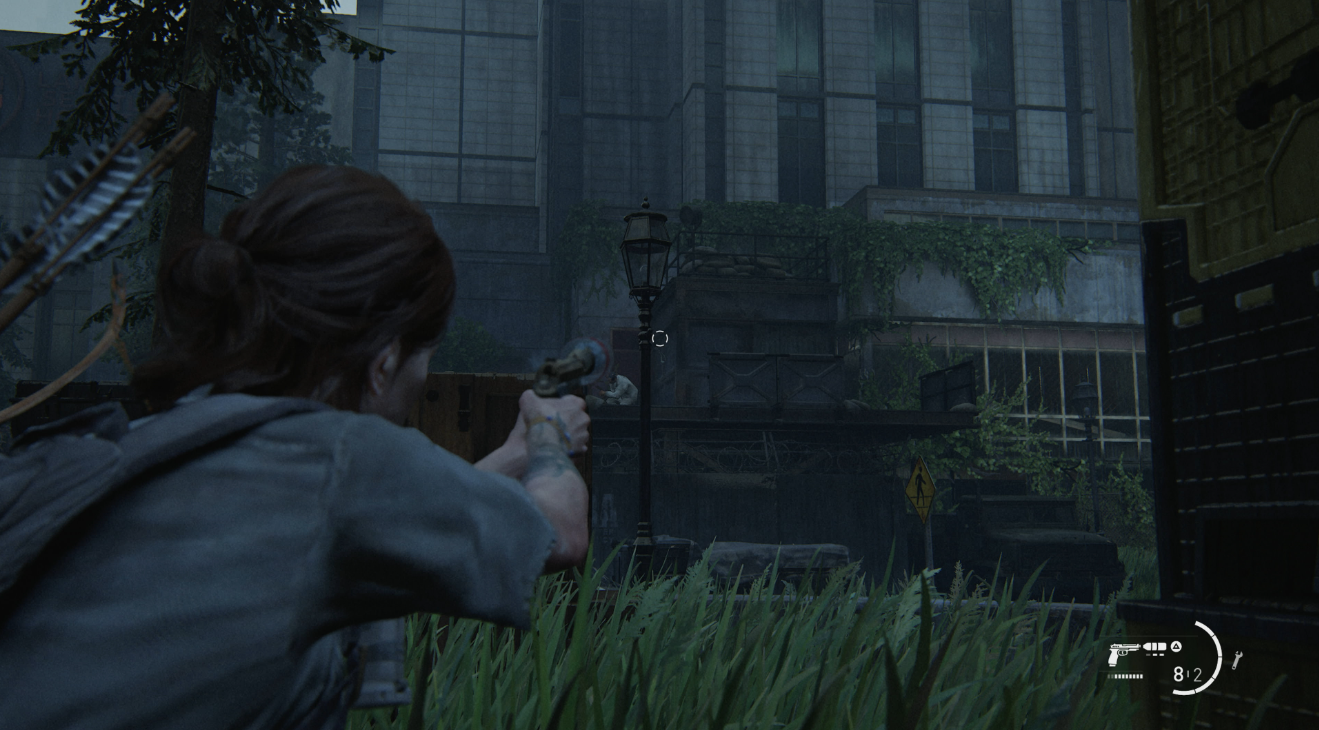
At night the trio makes their way through military cordons. Patrols with flashlights walk predictable routes — study the rhythm and move between them. Chokes from cover are preferable to gunshots here: noise will attract more soldiers. The generator at the exit from the military zone needs to be started to raise the elevator — it’s the only way up.
The Goldstone Building and Clickers
The first encounter with Clickers happens right here. Move quietly — literally, don’t run. A shiv (1) goes toward silently killing the Clicker at the blocked door: there’s no getting past without it. Climb floor by floor, picking up the revolver and a health kit along the way.
There are several Clickers in the building. The optimal route — go around the perimeter, staying against the walls, killing only those that block the only path.
The Metro Station, Museum, and Capitol
A Molotov cocktail here becomes a tactical instrument for the first time: throw it into the center of a room with Clickers, then quickly pass through while they burn and focus on the source of fire.
Safe #1 — in the metro station building. Password 03-43-78 is written in Note #13, which lies behind the shop counter at the entrance. Inside the safe — 50 parts. Workbench #1 — in the museum, the first in the game. Also here — Firefly Pendant #5 on a windowsill.
The chapter’s finale — the Capitol. Tess is infected. She holds back the FEDRA soldiers, giving Joel and Ellie time to escape. A lighter, a pool of gasoline, an explosion. Tess is gone — and this is only the beginning of the journey.
Chapter 4. Bill’s Town — A Car to Escape Boston
Bill is one of the most colorful characters in the game. A paranoid loner who mined an entire town and outlived all his neighbors. He has a car. Joel doesn’t. A deal needs to be made.
The American Town and Bill’s Traps
From the very first steps, the town greets you with traps: tripwires, snare loops, improvised mines. Move slowly and watch your step — a snare loop will hurl Joel upside down and attract the infected.
In an abandoned shop you’ll find “The Turning” arcade machine — a reference that fans will appreciate. Nearby — Safe #2 with password 05-17-21 (the hint is written on the wall next to it). Inside: 50 parts, 3 ammo, 5 pills. A bit further Bill gives a bow with arrows — the best tool for a quiet playthrough over the next several hours.
Bill’s Stash and the Cemetery
The bar with the chessboard — Bill’s home. Here: a pump shotgun, a nail bomb, Tool Box #1, and Workbench #2. Before moving on, upgrade your weapons — things are about to heat up.
In the cemetery — 10 Firefly Pendants are scattered across the entire area. Walk each row of graves. The tree house is visible from a distance — check that too.
Here Bill also finds Frank — his former partner, whom he left to die. Frank’s letter explains everything you need to know about these two — and in the remake, this story received a completely different, unexpected resolution.
The School, the Bloater, and the Chapter’s Finale with the Car
The school is the tensest stretch of the chapter. A crowd of Runners at the entrance: either go around through a window on the ground floor to the right, or stage a noisy clearing — the second option will be costly.
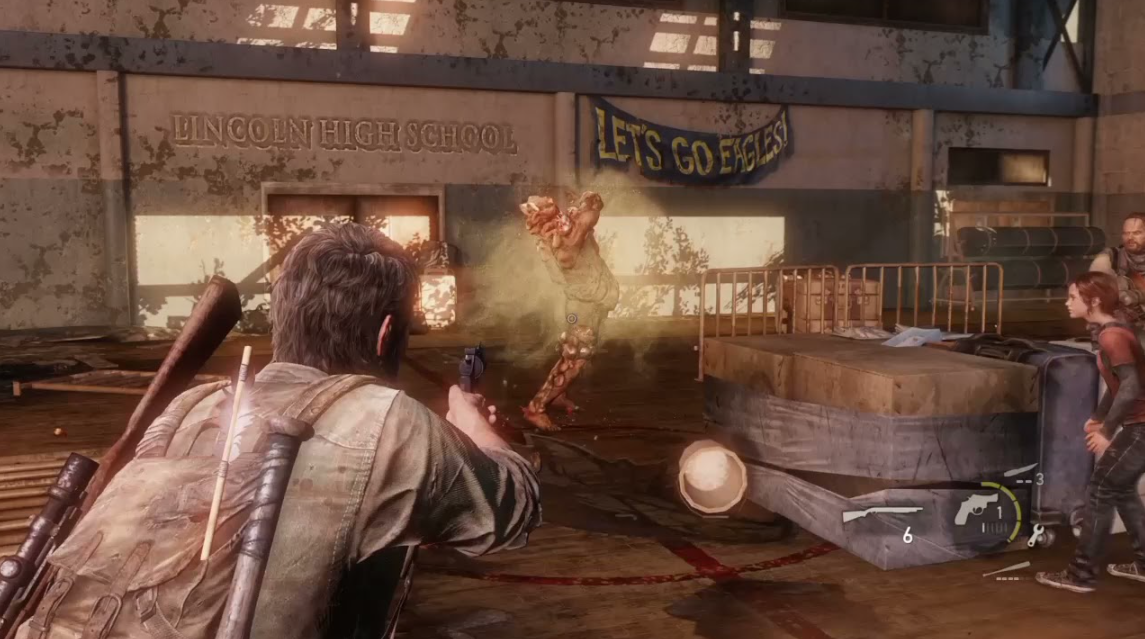
In the gym — a Bloater. The first in the game, and immediately clear why they’re feared. The tactic is covered in detail in the “Boss Tactics” section; briefly: keep your distance, shoot the glowing spots on the body, Molotov cocktails speed the process. After victory — Frank’s car is found, but the battery is dead.
The return path through the city — four waves of zombies while Bill starts the car. Take a position at cover, don’t waste ammo on Runners unnecessarily: the goal isn’t to clear everyone, but to hold out. The car starts. Bill says goodbye. Joel and Ellie head to Pittsburgh.
Chapter 5. Pittsburgh — Hunters and Meeting Henry and Sam
Pittsburgh — a city where survivors united not against the infected, but against all outsiders. Hunters set up ambushes at the entrance, and Joel and Ellie walk straight into a trap.
The Checkpoint and the Financial District
The city entrance — a crash and hand-to-hand combat with two bandits. You’ll handle it quickly. Ahead — a checkpoint with five guards: the best option is to quietly take down the two on the flanks, then deal with the rest in close combat.
In the financial district, Ellie takes a sniper rifle for the first time and covers Joel from above. The mechanic works surprisingly well — Ellie actually helps instead of just standing nearby. Along the way, pick up the city map (Artifact #35) and three of Ellie’s Jokes — they’re scattered in shop windows along the street. You’ll smile.
The Flooded Hotel and Safe 22-10-56
The hotel is the richest location in the chapter for collectibles. Note #38 lies on the 2nd floor near the staircase; it contains the password for Safe #3 — 22-10-56. In the safe: ammo, 50 parts, Training Manual #3.
Flooded basements with Stalkers — an unpleasant surprise. Visibility is almost zero, Stalkers attack from around corners. The flashlight is on by default, but there’s still barely enough light. Find the generator and start it — it lights up the route to the exit. In the basement there’s also Training Manual #4 and a melee weapon. Going up, check the restaurant: a painting on the wall and a piano on the stage — both are interactive and yield artifacts.
Henry’s Hideout and Escaping the Armored Vehicle
The toy store — the hideout of Henry and his younger brother Sam. At night you’ll need to quietly pass the hunters’ checkpoint. A hidden achievement is available here: disable the generator without a single kill. The switch is in the basement of the store to the left of the entrance. Guards disperse after the shutdown — pass through.
Beyond the checkpoint — a bar, then a bridge drop: Henry suggests jumping. An armored vehicle with a machine gun attacks from the water. Jump — it’s the only way out.
Chapter 6. The Suburbs — The Sewer and Parting with Sam
After the river — a ruined suburb. Ahead is a tunnel through the sewer to the outskirts of the city where Henry had hidden Sam.
Firefly Pendant is in the hold of a wrecked ship by the river: go down the stairs inside the hull. The second pendant — a bit further, in an open hatch on the shore.
The sewer splits the group: Henry and Sam go one route, Joel and Ellie — another. They reunite at the exit. In the tunnel — several Runners and one Clicker; resources are sufficient for a quiet playthrough. Use the raft to cross the flooded section — Henry helps raise the gate if you wait for him.
The sewer exit leads to a residential area. A school classroom with a save point, a sniper on the roof: kill it first or go around the building. An armored vehicle with a machine gun blocks the road — throwing a Molotov cocktail at the side disables it in two hits.
An overnight stay in an abandoned house. Sam admits to Ellie that he’s been bitten. Ellie tries to cure him with her infected blood — in vain. In the morning Sam attacks. Henry shoots his brother. A pause. A shot to himself. One of the heaviest scenes in the game — without music, without cuts.
Chapter 7. Tommy’s Dam — The Hydroelectric Station and Jackson
Autumn. Joel searches for his brother — Tommy was once connected to the Fireflies and should know where their lab is. Comic #6 is by a wrecked car on the road to the power station — don’t miss it.
On the river — a bridge with two valves: open both to raise the bridge section and reach the power station. A hidden achievement is available here — “Don’t Take Ellie’s Hand”: when she reaches out to help you cross a beam — step away. Just don’t take it. Sounds odd, but that’s exactly how it unlocks.
In Tommy’s camp — the turbine needs repair. Go down to the generators, fix the breakdown. Training Manual #8 and smoke bombs — in the supply room by the workbench. Workbench #7 — right there. Petting the dog in the camp earns a separate achievement: approach the dog closely and press the interaction button.
Bandits attack the camp — several waves, Maria helps hold the perimeter. After the defense, Ellie steals a horse and rides to the ranch — where a serious conversation about who is responsible for whose life takes place. Tommy agrees to escort them to the University of Colorado.
Chapter 8. The University — Searching for the Fireflies in Colorado
Joel, Ellie, and a horse named Callus arrive at the university campus. The Fireflies have left — need to find out where.
Comic #8 — in a parked jeep at the main gates. Workbench #8 — in the first building to the right. A flamethrower lies next to a forklift in the utility building — one of the rarest items in the game, take it immediately.
Through a grate in the basement — a locked courtyard with three audio recordings from scientists: they explain why the Fireflies moved to Salt Lake City. Listen to all three — it’s both lore and artifacts. Training Manual #9 with health kits — in the lab on the third floor.
One of the ambushing bandits hides on a balcony and jumps on Joel from behind. A quick button prompt saves you from the grab. A fuel canister for breaking through the gates is found in the garage by the loading ramp — roll it to the target gates. Workbench #9 — right behind the gates.
The chapter’s finale: Joel falls onto rebar after a struggle on the balcony. Ellie pulls him out, leads the horse away. The screen goes dark.
Chapter 9. The Lake Resort — Winter, David, and Ellie Alone
Winter. Joel is wounded and unconscious. Control transfers to Ellie — for the first time for an extended period.
Hunting the Deer and the Cabin Attack
Ellie hunts to feed the wounded Joel. A hunter’s backpack with eight items (Artifacts #66–73) lies at a frozen pond to the left of the cabin — don’t miss it before going after the deer.
The wounded deer moves into the forest — finish it before David and James approach. David offers a trade: antibiotics for Joel in exchange for half the kill. The deal is made. Zombies attack the cabin from both sides simultaneously: take position at the window, Molotov cocktails against the Bloater in the passage — three throws and it’s done. A Firefly Pendant and a training manual — in the storage room behind the cabin.
David’s Prisoner: Escape and Boss Fight
David reveals himself as the leader of the cannibals — the very ones whose people Joel killed several chapters ago. Ellie is captured and locked in a cage.
Escape is aided by a trick: faking infection scares the guard, Ellie grabs the knife and exits through the window. Weapons — a knife plus a found revolver. The café-restaurant where the final showdown with David takes place is on fire. Visibility — almost zero.
Tactic: hide behind tables and counters, pick up health kits in the kitchen and at the bar counter. Three stealth strikes move David to the next phase. The final hit — a machete in Ellie’s hands. The scene is brutal. Exactly as it should be.
Silver Lake and Rescuing Ellie
Control returns to Joel. He came to, grabbed a weapon, and heads to the resort. Interrogating two guards (the persuasion method — simple and effective) gives the needed building. Entry through the back door of a large mansion. Joel finds Ellie in the burning building — she already landed the final blow on David herself. A reunion in the snow. Spring will come.
Chapter 10. The Bus Depot — Salt Lake City and the Giraffe
Comic #11 — in the bathroom on the ground floor of the shopping center at the city entrance. Check before moving on.
Training Manual #12 with bombs — in the parking basement. The last workbench (#11) and the last tool box (#5) — in the garage near the exit to the roof. If you’ve been collecting carefully up to this point — here you complete the crafting entirely.
The roof of the multi-story building reveals a view of a herd of giraffes wandering through the overgrown city streets. Ellie smiles genuinely for the first time in a long while. A scene without words, without music — just giraffes and two exhausted people. One of the best moments in gaming, period.

Further — a rushing current through a tunnel, a Firefly trap. A blow to the head. Darkness again.
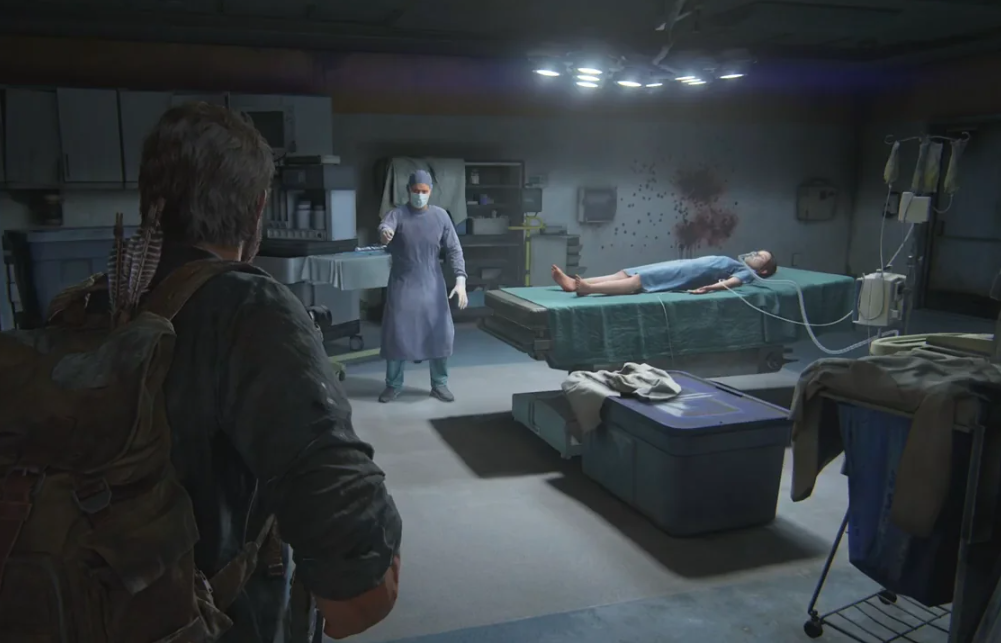
Chapter 11. The Firefly Lab — Joel’s Final Decision
Joel wakes up surrounded by Fireflies. Marlene explains: Ellie is in the operating room, her brain is the source of the mutation, a vaccine can only be created at the cost of her life. The procedure has already begun.
Firefly Pendant #30 — the last one — is near a fighter’s body in the corridor before the operating room. Marlene’s Journal (Artifacts #80–83 — audio recordings) is scattered through the lab corridors.
The corridors are full of Firefly gunmen — they perceive Joel as a threat. The assault rifle in the armory on the second floor resolves the firepower question. The head surgeon — not a boss, just a person with a surgical knife. Joel makes a decision before the operating surgeon can do anything.
Marlene in the basement — unarmed. Joel listens to her arguments. And does what he does. The final monologue in the elevator — his words to Ellie about what happened — is one of the most discussed scenes in gaming history.
Chapter 12. Jackson — The Final Scene and Joel’s Lie to Ellie
Comic #13 — the last one — in an abandoned jeep on the road to Jackson, literally a couple of minutes’ walk from the chapter’s start.
Ellie tells the story of Riley — the first person she saw bitten. About how they decided not to give up and just live while there was life to live. This is the last conversation between two people who built something real between them.
Joel lies. He says the Fireflies found other immune people, that there will be no operation, that everything is fine. Ellie looks at him for a long time. “Swear to me,” she says. Joel swears. She nods. End.
Does Ellie believe him? The game doesn’t answer. Part II will.
DLC Left Behind: Walkthrough of All Chapters with Riley
Left Behind — a prequel and a connecting thread. Two timelines alternate: Ellie’s memories of a night with Riley in the mall, and the present, where Ellie searches for medicine for the wounded Joel.
The Past: The Mall and Adventures with Riley
Riley brings Ellie to an abandoned mall called “Liberty Gardens” — she has a place there in the Firefly squad. While Ellie is angry at her for leaving, Riley orchestrates an entire evening: a Halloween costume shop, a photo booth (the photos save as artifacts), arcade machines with “The Turning” game.
A water pistol fight — one of the best gameplay inserts in the DLC: just running through mall halls with squirt guns. Then dancing to the radio. Then — a bite. Both of them.
Winston — a trader in the corner of the mall — gives a hint about available resources; he can be found several rooms after the photo booth.
The Present: Saving Joel After the Injury
Ellie searches for antibiotics for the dying Joel. Password 35-30-31 — on a note by the archer statue in the central hall. The pharmacist’s kit — in a locked medical room on the second floor.
A generator is needed to open service doors. Fuel for it — in a canister by the wrecked helicopter on the roof. Also there — an extra health kit and several artifacts. The helicopter crashed long ago, but the supplies inside survived.
The DLC’s Finale: David, Hunters, and the Bites
In the finale, the mall is filled with both the infected and David’s hunters. A hidden achievement is available here: lure zombies onto bandits — throw a brick or bottle between the two groups and retreat. They’ll sort each other out.
Barricading the doors in “Liberty Gardens” — the last line of defense. Drag furniture to the doors while enemies break through from outside. Then — return to the present. Ellie injects the antibiotics into Joel. He begins to breathe more steadily. Left Behind ends right where Chapter 4 of the main game begins.
All Collectibles in The Last of Us Part I (Summary Section)
All 30 Firefly Pendants: Full Location List
-
Chapter 2 (Quarantine Zone) — next to a bed with a lamp in the infected building
-
Chapter 2 — on a tree near the exit from the infected zone
-
Chapter 2 — near the body of a Firefly fighter at the docks
-
Chapter 3 (The Outskirts) — in the basement by the generator
-
Chapter 3 — on a windowsill in the museum
-
Chapter 4 (Bill’s Town) — in the cemetery (×10, pendants #6–15)
-
Pendants 7–15. Chapter 4 — cemetery, each row of graves
-
Chapter 5 (Pittsburgh) — in the financial district on a rooftop
-
Chapter 5 — in the flooded hotel basement
-
Chapter 6 (The Suburbs) — in the hold of a wrecked ship
-
Chapter 6 — in an open hatch on the shore
-
Chapter 7 (The Dam) — in the turbine machine room
-
Chapter 8 (The University) — in the lab on the third floor
-
Chapter 9 (The Lake Resort) — in the storage room by the cabin
-
Chapter 10 (The Bus Depot) — in the parking basement
-
Chapter 11 (The Lab) — near a fighter’s body in the corridor
Exact positions for pendants #25–30 — in the infected zones of chapters 3, 5, 8, and the lab finale. Using Enhanced Listening Mode significantly simplifies finding them.
13 Comics and Ellie’s Jokes
Each found comic unlocks one of Ellie’s jokes — Joel reacts with restraint, players don’t.
-
Chapter 2 — in the residential area, on a shelf near the market
-
Chapter 3 — in the Goldstone Building, second floor
-
Chapter 4 — in Bill’s bar on a small table
-
Chapter 5 — in the financial district by the newsstand
-
Chapter 5 — in the hotel, by the piano
-
Chapter 7 — by a wrecked car at the entrance to the dam
-
Chapter 8 — in a jeep at the university gates
-
Chapters 9, 10, 11, 12, and Left Behind — in the residential areas of the locations
Ellie’s Jokes (6 total) unlock automatically when the corresponding comics are found. Read all six — it’s a separate achievement.
Artifacts, Training Manuals, Tool Boxes, and Workbenches
97 Artifacts are scattered throughout the entire game. Most are notes, diaries, letters. Reading isn’t necessary for the playthrough, but they give the world depth: stories of people who are no longer here.
12 Training Manuals give skill points for upgrading in the Survival, Crafting, Weapon, Stealth, and Melee skill trees. The earlier you find them — the more abilities you can unlock before the finale.
5 Tool Boxes expand capabilities at workbenches: without them, some weapon modifications are unavailable. Distributed across chapters 3, 4, 5, 9, and 10.
11 Workbenches — weapon modification points. A suppressor for the pistol, an extended magazine, an improved shotgun stock. Every workbench is worth visiting — modifications carry through for the remainder of the journey.
All Safe Passwords in The Last of Us Part I
Four safes in the game — and each contains something valuable. Passwords are in nearby notes, but the notes are easy to miss.
The safe in Pittsburgh (22-10-56) is most often missed — the hotel looks like a dead end, and many players turn back without reaching the second floor. Go up without fail: Training Manual #3 inside is needed for upgrades.
The safe in Bill’s Town (05-17-21) is hidden in a side room of the very first building in the town. The password is literally written on the wall next to it — hard to miss if you don’t run past.
Hidden Achievements and Trophies in The Last of Us Part I
For the platinum trophy you need all achievements, including completing the game on Survivor difficulty or higher. Platinum in The Last of Us Part I is a realistically achievable goal: nothing listed here requires perfect mastery, only attentiveness and patience.
Boss Tactics and Difficult Enemies
The Bloater in Bill’s School
The gym is an enclosed space, which makes the Bloater here especially dangerous. First deal with the two Runners at the entrance — they interfere with focusing on the main threat.
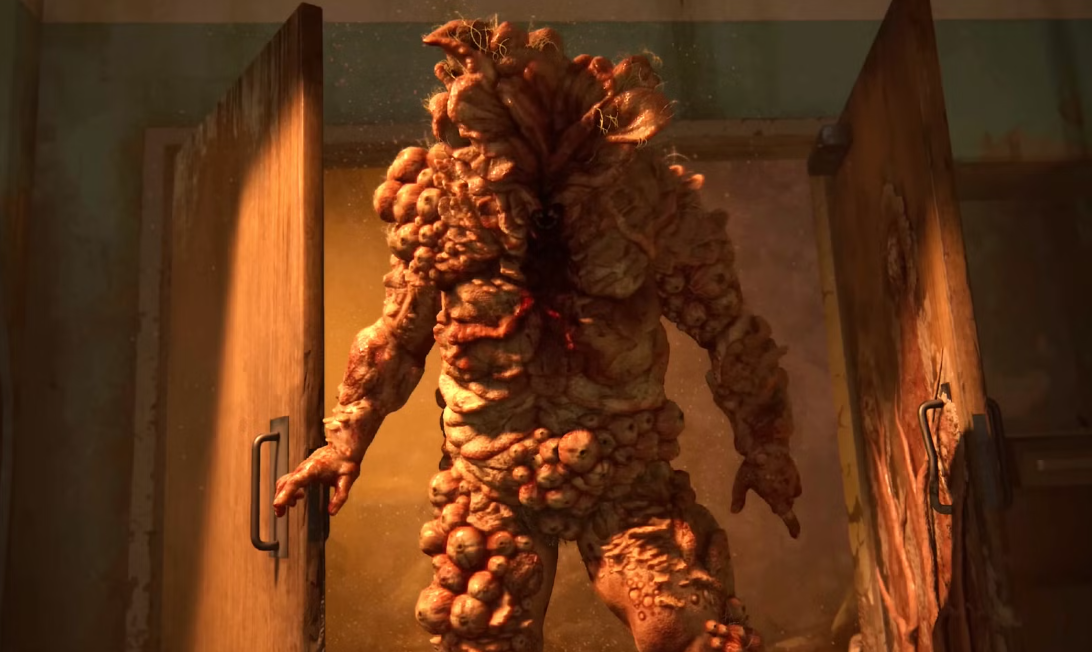
Keep your distance. The Bloater is slow, but its spore cloud during movement deals continuous damage — don’t let it back you into a wall. Shoot the bright glowing spots on the body: damage to them is two to three times higher than to the armor. Two or three Molotov cocktails to the body speed the fight dramatically. Constant movement around the perimeter of the hall — the main rule.
The David Boss Fight at the Resort
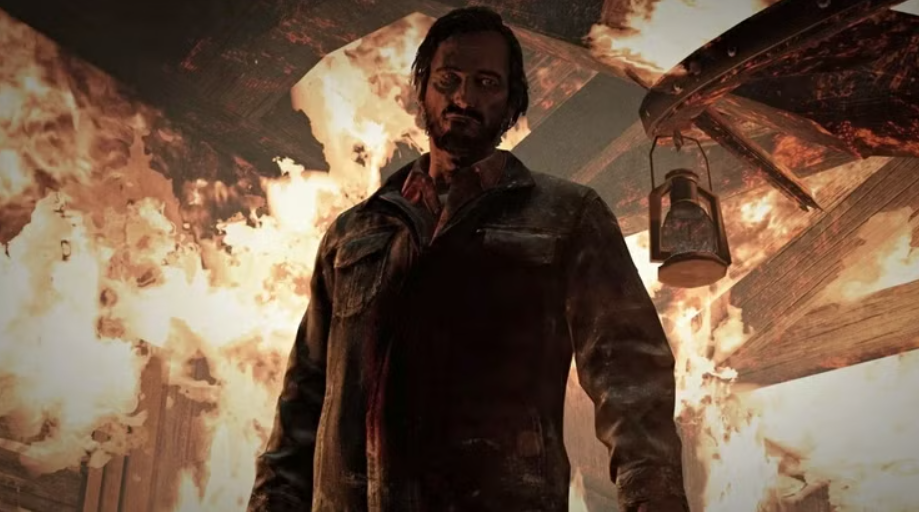
The restaurant is on fire, visibility minimal. David is fast and has good hearing. The tactic — three stealth strikes, alternated with taking cover.
Pick up health kits in the kitchen and at the bar counter — there are several, enough for the entire fight. When David begins searching for Ellie actively, hide under a table or behind the counter. Strike with the knife when he turns away. Three phases, three strike sequences. The final one — a machete. Missing at the end is practically impossible.
The Firefly Lab in the Finale
The lab corridors are linear, with cover every few meters. Firefly gunmen are well-armed but act predictably. The assault rifle from the armory on the second floor makes clearing significantly faster.
Barricade doors at key points when enemies try to flank. The head surgeon is unarmed — this is not a traditional boss fight. The final scene with Marlene in the basement is scripted. Just listen to the dialogue. The decision has already been made for you.
Conclusion: What to Do After Completing The Last of Us Part I
The final scene — Joel’s oath — doesn’t let go. That’s normal. The Last of Us Part I was made exactly for this: so that the question “what would I have done?” stays with you.
If the platinum isn’t there yet — it’s time. Through New Game Plus all collected upgrades and weapons carry over, so a second run goes faster and more comfortably. Survivor and higher unlock after the first playthrough — it’s a separate experience: almost no resources, the HUD is silent, every encounter requires cool calculation.
For those at 100%: check through Chapter Select whether any Firefly Pendants, Comics, or Artifacts were missed. The statistics menu at the end of each chapter shows how many items were collected.
The final step — The Last of Us Part II. The sequel continues the story several years later, and what Joel did in the Firefly lab becomes the starting point for everything that happens next. After Part I, that playthrough will be completely different — heavier, but more honest.