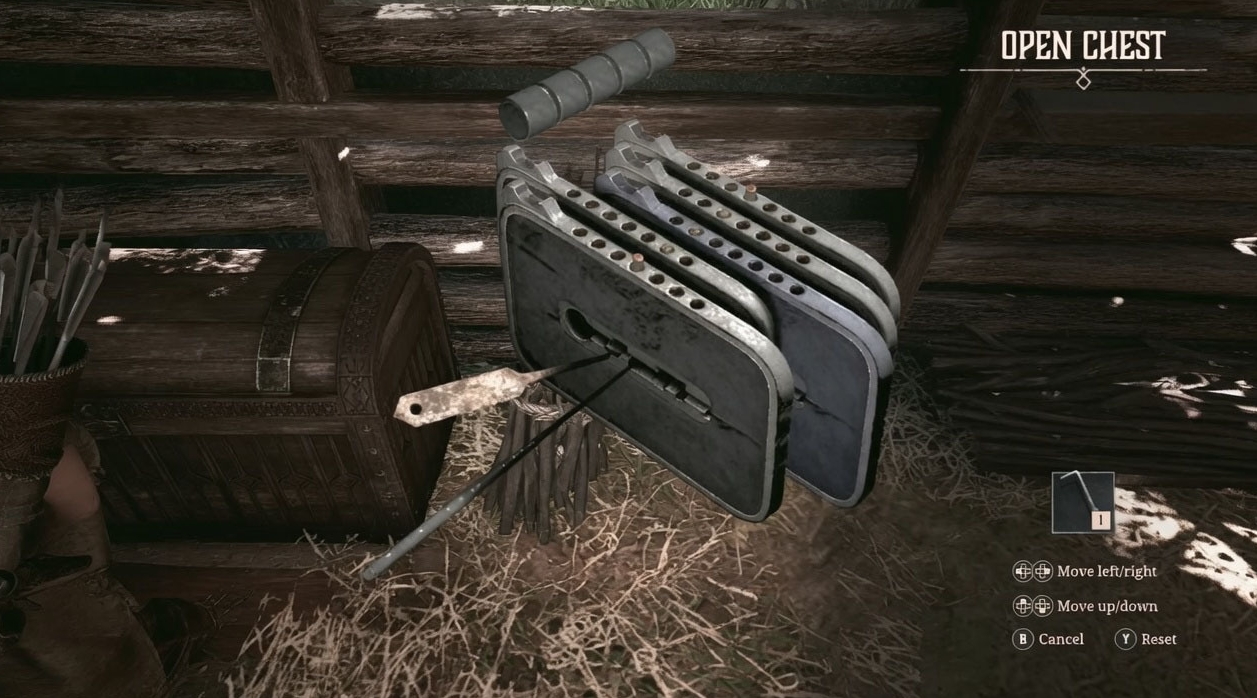
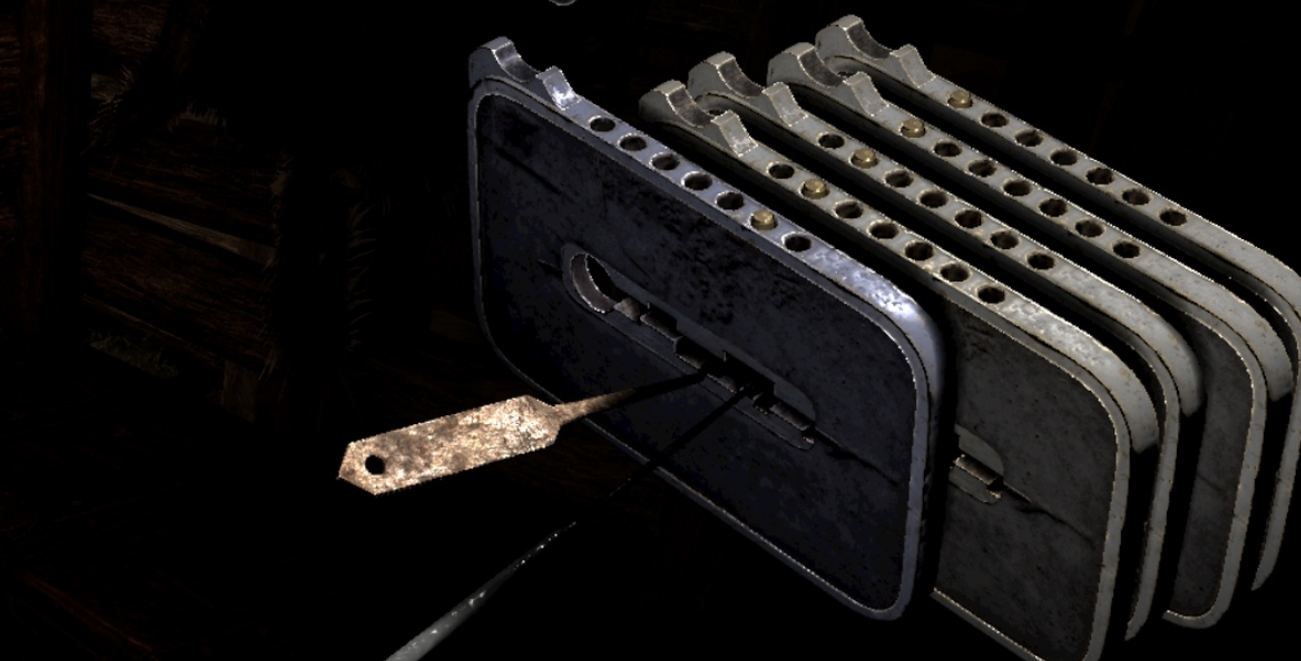
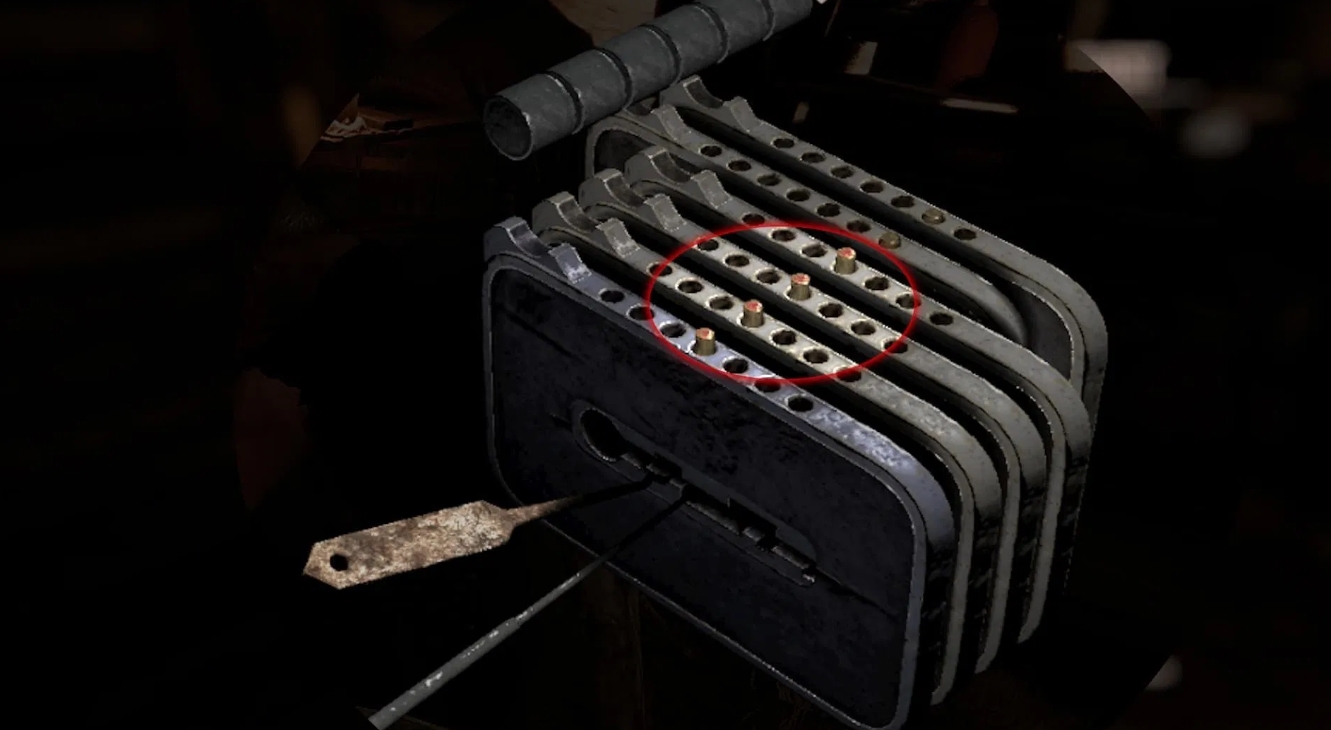
Gothic 1 Remake didn’t just update the visuals — it completely reworked how lockpicking works. Where the original gave you a lockpick and a prayer, the remake hands you a puzzle. Every lock has a numbered panel of plates, and you need to move each one a precise number of times in a precise direction. Get one step wrong and the lockpick snaps. Start over.
For characters without the Thief skill, this is especially punishing — some locks run 15 to 17 steps with zero margin for error. That’s exactly why having the exact plate sequences isn’t cheating. It’s resource management.
A few things to know before you start picking locks across the Minental:
-
Plates are numbered 1 through 6. A few locks in the Old Camp also use plate №7.
-
Direction matters absolutely. Left and right are not interchangeable — one wrong move breaks the pick.
-
Every lock is unique. There’s no master code. Silas’s door and Fisk’s chests have completely different sequences.
-
The Thief skill adds margin for error, but doesn’t change the actual combination. These codes work without it.
-
Lockpicks are finite. Stock up before any major area sweep — aim for 20+ before tackling the Old Camp.
Table format used throughout this guide: each cell shows the plate number and moves using L (left) and R (right) with the count. Example: R1×4 means plate №1, four times to the right.
Table of Contents
Gothic 1 Remake Lock Combinations — New Camp
The New Camp holds a massive chunk of early-game loot. Silas’s tavern, the rice fields, Lee’s cave, the mercenary huts — all locked up tight with unique plate sequences for each door, chest, and grate.
Silas’s Tavern — Doors and Chests
| Location | Plate Sequence (in order) | Steps |
|---|---|---|
| Door behind Silas in the tavern | L4×2 → R6×3 → R2×3 → R6×3 → R2×1 → R3×2 → L5×2 → R2×2 → R6×5 → R3×4 → L5×1 → R2×1 → R6×2 | 13 |
| Chest in Silas’s room | R3×3 → L4×4 → R6×6 → L1×2 → R3×6 → L4×3 → L5×2 → R2×2 | 8 |
| Underwater chest in Silas’s cellar | L1×2 → L3×2 → R2×2 → R4×4 → L5×6 → L3×5 → R4×5 → R2×2 → L5×2 | 9 |
| Door on the 2nd floor of the tavern | R1×1 → L3×5 → L5×6 → L3×4 → L4×2 → L2×2 → L4×2 → L5×4 → L4×1 | 9 |
| First chest in the locked room (2nd floor) | L1×3 → L2×2 → L4×3 → R3×3 → L2×1 → L5×4 → L4×1 → R3×1 → R6×3 | 9 |
| Second chest in the locked room (2nd floor) | R3×5 → R5×6 → R1×2 → R3×3 → R4×3 → R5×2 | 6 |
Gate Tower — New Camp Entrance
| Location | Plate Sequence (in order) | Steps |
|---|---|---|
| Chest on the upper level of the gate tower | L1×3 → L3×3 → L2×2 → L4×4 → L1×1 → L2×1 → L5×3 → L6×2 | 8 |
| Chest on the ground floor of the gate tower | R1×1 → L2×6 → R1×5 → R3×1 → L4×6 → L2×6 → R3×1 → L4×2 → R5×4 → R1×2 → R6×1 | 11 |
Rice Fields — Chests and Grates
The rice field area looks like a cluster of ordinary huts, but it hides some of the longest lock sequences in the New Camp. The upper grate in the sleeping quarters building is the area’s hardest lock at 15 steps.
| Location | Plate Sequence (in order) | Steps |
|---|---|---|
| Chest in the sleeping quarters building | R1×1 → L2×6 → R4×6 → L2×6 → R3×3 → L2×1 → R4×3 → L5×4 → R1×1 → R4×2 | 10 |
| Lower grate (sleeping quarters building) | R1×6 → L2×1 → R1×1 → R4×1 → R5×2 → R1×2 → L6×5 → R1×4 → L2×2 → L3×2 | 10 |
| Upper grate (sleeping quarters building) | L1×1 → L2×1 → L3×2 → L1×2 → L2×2 → L4×4 → L1×1 → L2×1 → L4×1 → L5×6 → L2×2 → L1×2 → L2×2 → L1×1 → L3×2 | 15 |
Lee’s Cave, Mercenary Huts and Named Characters
| Location | Plate Sequence (in order) | Steps |
|---|---|---|
| Horn’s hut — chest | R3×1 → R4×3 → L5×6 → L1×3 → R2×3 → R3×3 → L5×6 → R2×3 | 8 |
| Left hut near Lee’s cave | R1×3 → L2×3 → R3×1 → L4×6 → R5×6 → L4×6 → R1×3 → L2×1 → L4×1 → R5×1 | 10 |
| Middle hut near Lee’s cave | R1×3 → L2×3 → R3×6 → L2×1 → R1×1 → L4×3 → R5×4 → R1×1 → L4×2 | 9 |
| Right hut near Lee’s cave | R1×5 → R4×3 → R1×2 → L2×2 → R3×2 → R5×1 | 6 |
| Grate inside Lee’s cave | L1×2 → L2×4 → L1×4 → L4×3 → L5×6 → R3×6 → L2×4 → R3×2 → L5×1 → L6×3 | 10 |
| Lee’s chest | L2×5 → L3×5 → R5×4 → L2×4 → R6×6 → R5×6 → L4×2 → L3×1 → L2×1 → R1×2 → R6×1 | 11 |
| Right mercenary hut (near Shrike’s hut) | L1×3 → L3×1 → L1×1 → R2×1 → L1×1 → L5×6 → L3×3 → R2×3 → R4×6 → L3×3 → L5×3 | 11 |
| Middle mercenary hut | L1×3 → R3×1 → R4×6 → R3×3 → L6×6 → L1×3 → R2×1 → R3×1 → R5×2 | 9 |
| Left mercenary hut | R2×2 → R3×5 → R5×1 → L4×1 → R2×1 → L6×4 → L4×4 → R2×2 → L6×4 → L4×1 | 10 |
| Torfloaf’s hut | R2×6 → L3×4 → R2×4 → R4×4 → L3×3 → R1×1 → R4×2 → L5×4 → R4×1 | 9 |
| Orik’s hut | R4×1 → L5×4 → L3×4 → L1×2 → L5×4 → R2×2 → L1×4 → L3×2 → L5×4 → L3×1 → R4×1 | 11 |
| Cord’s hut | R2×4 → R3×6 → R2×2 → R3×2 → R4×6 → R1×1 → R2×4 → R3×5 → R4×1 → L5×3 → L6×2 | 11 |
| Hut directly below Cord’s house | R1×1 → L2×4 → L4×1 → R1×1 → R3×1 → R1×1 → L4×1 → R1×1 → R3×1 → L4×1 → R3×1 → L4×1 → R3×1 → L5×5 → L4×4 → R1×2 → R3×1 | 17 |
| Hut near Idol of Kagan campfire | R1×2 → L3×3 → L4×4 → L5×1 → R6×6 → L3×6 → L4×6 → R2×3 | 8 |
| Hut near Sharky’s bench | L1×6 → R2×1 → R3×3 → L1×3 → L5×4 → L1×2 → R2×1 → R3×1 | 8 |
| Butch’s chest | R1×5 → L5×6 → R1×3 → R2×2 → R3×2 → R2×2 → R3×2 → R2×2 → L4×2 → R3×1 | 10 |
| Homer’s chest | R1×4 → R2×1 → R3×1 → L4×6 → R2×2 → R3×1 → L4×2 → L5×4 → R2×2 → R6×1 | 10 |
| Wolf’s chest | L1×6 → L2×4 → L3×4 → L5×4 → L1×1 → L2×2 → L3×2 → L4×1 | 8 |
| Buster’s chest | L2×5 → R3×2 → L2×1 → R4×2 → R1×1 → R5×1 → R6×6 → R1×1 → R4×4 → R1×1 → L2×2 → R6×1 | 12 |
| Chest under Buster’s hut | R1×1 → R4×3 → R1×1 → R2×2 → R4×2 → R2×2 → R4×2 → R2×2 → R4×2 → R5×4 → R4×1 → R6×3 | 12 |
| Lares’s chest | R2×3 → R3×5 → R4×2 → R5×1 → R1×1 → R4×2 → L6×6 → R5×5 → R1×1 → R4×4 → R1×1 → L6×2 | 12 |
| Jaco’s chest | R1×1 → L2×6 → R1×5 → L2×5 → L3×4 → R1×4 → R4×4 → R1×1 → R5×1 → R6×2 | 10 |
| Chest in the ruined building by the lake | R2×2 → L3×4 → L4×6 → R1×5 → R2×2 → L3×3 → L4×2 → R5×1 | 8 |
Free Mine and Warehouse
The Free Mine area rewards efficiency — most of its locks are short and forgiving, making it the perfect place to get comfortable with the plate mechanic before moving on to the Old Camp’s longer sequences.
| Location | Plate Sequence (in order) | Steps |
|---|---|---|
| Chest near the top of the Free Mine | R1×6 → L3×3 → L5×3 → R4×3 → R6×3 | 5 |
| Okyl’s chest | L2×5 → R3×3 → R1×1 → R4×2 → R1×1 → R5×2 | 6 |
| Sweeney’s chest | R1×5 → R2×6 → R1×6 → R3×3 → R2×2 → R1×2 → R4×2 → R1×2 → L5×3 | 9 |
| Right warehouse chest | R3×6 → R4×2 → R1×2 → L5×6 → R2×3 | 5 |
| First chest in the left warehouse | R1×4 → R2×2 → L4×1 → R1×1 → R5×5 → R1×2 → R2×2 | 7 |
| Second chest in the left warehouse | L2×6 → L1×5 → R3×1 → R4×3 | 4 |
| Chest above the main mine entrance | R1×2 → R3×1 → R1×1 → R4×2 → R3×2 → R2×1 → L6×4 → R3×1 → R5×1 | 9 |
| Walkway hut 1 (above Kagan Idol campfire) | R1×4 → L2×2 → R4×2 → L5×2 → R1×2 → L3×2 → L5×4 → R1×2 → L3×2 → L5×1 | 10 |
| Walkway hut 2 | L2×4 → L3×6 → R4×6 → R1×3 → L3×2 → L2×2 → R4×2 → L5×2 | 8 |
| Walkway hut 3 | R1×3 → R2×2 → R1×1 → L5×1 → R1×1 → L6×6 → R1×3 → R3×5 → R4×2 → R1×2 → L6×2 | 11 |
Gothic 1 Remake Lock Combinations — Old Camp
The Old Camp is Gomez’s territory, which means every lock you pick here carries extra risk. Guards patrol, NPCs react, and the consequences of getting caught are immediate. That said, the Old Camp also holds the best early-game gear in the Minental — and some of the most complex lock sequences in the entire game.
Diego’s Zone — Huts Near the Camp Entrance
| Location | Plate Sequence (in order) | Steps |
|---|---|---|
| Diego’s chest | L1×2 → L2×1 → R3×6 → L2×2 → R3×2 → R4×1 → L2×1 → R3×1 → L5×3 → L2×3 → R3×6 → L5×3 → L2×3 → R3×3 → L6×3 | 15 |
| First hut left of Diego’s house | L2×1 → L3×3 → L2×2 → R4×6 → L6×6 → R1×2 → R4×2 → L5×2 → L6×1 | 9 |
| Hut next to Diego’s house | R1×4 → L2×5 → L4×5 → R1×2 → L2×1 → R3×1 → R5×2 → R6×1 | 8 |
North Gate — Four Huts on the East Side
| Location | Plate Sequence (in order) | Steps |
|---|---|---|
| First hut (east side) | R2×3 → R5×6 → L3×3 → R1×3 → R2×3 → R4×3 → R1×3 → R2×3 → R5×3 | 9 |
| Second hut (east side) | L2×6 → L3×2 → R5×1 → L2×1 → L6×6 → L1×4 → L3×2 → L4×1 → L6×1 | 9 |
| Third hut (east side) | R1×6 → R3×6 → L4×6 → R2×3 | 4 |
| Fourth hut (east side) | R1×2 → L2×1 → R3×5 → R4×1 → R1×1 → R3×1 → L6×6 → R4×4 → R1×1 → L2×1 → R5×1 → L6×2 | 12 |
Mad’s and Snaff’s Zone
| Location | Plate Sequence (in order) | Steps |
|---|---|---|
| Hut opposite Mad (wall entrance side) | R2×3 → R1×3 → R2×3 → R1×3 → R2×1 → L3×2 → L4×4 → R1×1 → L3×1 → L5×1 | 10 |
| Hut opposite Mad (near scavengers) | L1×5 → R2×1 → R3×5 → L4×1 → R5×5 → L1×1 → R3×5 → L1×2 → L4×1 → R5×1 | 10 |
| Mad’s chest | R2×2 → L3×2 → L1×2 → L4×4 → L5×4 → L1×1 → L4×1 | 7 |
| Chest left of Snaff’s house (under wall) | L2×3 → R3×2 → R1×2 → L4×1 → R5×1 → R6×6 → R1×5 → R5×2 → R6×2 | 9 |
| Chest right of Snaff’s house (under wall) | L2×5 → R1×3 → R3×1 → R4×4 → R1×4 → L2×1 → L5×3 | 7 |
| Long house next to Snaff | L1×2 → L2×2 → L3×3 → L4×4 → L1×1 → L2×2 | 6 |
| Snaff’s chest (near door) | R3×4 → L1×2 → R4×6 → R2×1 → R4×1 → L5×4 → L1×1 → R4×4 → R6×5 → R3×2 → R4×2 | 11 |
| Snaff’s chest (near bed) | L3×6 → R1×4 → R4×1 → R2×1 → R5×4 → R2×1 | 6 |
| Miner’s house (between Mad and castle gate) | L4×4 → L2×3 → R5×6 → R1×1 → R3×3 → R5×1 | 6 |
The Arena and Seven Surrounding Chests
| Location | Plate Sequence (in order) | Steps |
|---|---|---|
| Arena house 1 | R1×1 → L2×3 → R3×6 → R1×1 → L2×5 → R3×1 → L2×1 → R4×5 → R3×4 → R1×2 → L2×2 → R5×3 | 12 |
| Arena house 2 | R4×1 → R1×1 → R5×6 → R1×5 → R2×1 → R4×1 → R1×1 → R5×6 → R1×1 → R2×3 → R5×1 | 11 |
| Arena house 3 | R1×4 → L2×2 → L5×6 → L2×6 → R4×6 → R3×3 → L5×3 | 7 |
| Arena house 4 | L1×1 → L2×2 → R3×1 → R4×1 → L5×6 → L1×5 → L2×3 → R3×1 → R4×4 → R3×1 → L5×2 → L6×2 | 12 |
| Arena house 5 | R1×2 → R2×2 → R3×2 → R2×2 → L4×3 → L5×6 → R2×4 → R3×1 → R6×4 → R1×1 → R2×1 → R3×1 | 12 |
| Arena house 6 (has plate №7) | R1×3 → L3×2 → R4×2 → R5×6 → R2×2 → R1×1 → R4×2 → R2×1 → R6×3 → L7×1 | 10 |
| Arena office chest | R1×4 → R2×5 → R1×5 → L3×3 → L5×2 → R2×2 → L4×2 → R2×1 → L4×1 → R6×4 → L4×1 | 11 |
Market, Fisk’s Hut and Surrounding Area
Fisk is the Old Camp’s most lucrative — and most protected — target. His hut has a locked door plus three separate chests inside, each with its own unique sequence. One of those chests uses a cyclic pattern that repeats six times in a row. Come prepared with at least 15 lockpicks before attempting this cluster.
| Location | Plate Sequence (in order) | Steps |
|---|---|---|
| Fisk’s hut door | R3×1 → R4×6 → R3×5 → L5×5 → L1×5 → L6×6 → R3×6 → L2×3 → L5×3 → L1×1 → L6×6 → R3×4 → L5×1 → L6×1 | 14 |
| Fisk’s chest №1 | L1×4 → L5×5 → R2×4 → L1×4 → R2×1 → [L3×1 → R4×1] ×6 → L5×5 → R4×2 | ~20 |
| Fisk’s chest №2 | L1×6 → L2×5 → L1×5 → L3×1 → L1×1 → R5×6 → R4×5 → L1×4 → L3×2 → R5×2 | 10 |
| Dexter’s chest at the market | R4×6 → R3×6 → L1×3 | 3 |
| First market chest (Mordrag’s side) | L1×2 → L2×1 → R4×5 → R3×5 → L1×1 → R4×5 → R3×2 → R5×3 | 8 |
| Bellows hut before the market | L5×6 → R1×5 → L4×1 → L3×1 → L5×6 → R1×2 → L4×4 → L3×1 → L5×5 → R1×2 | 10 |
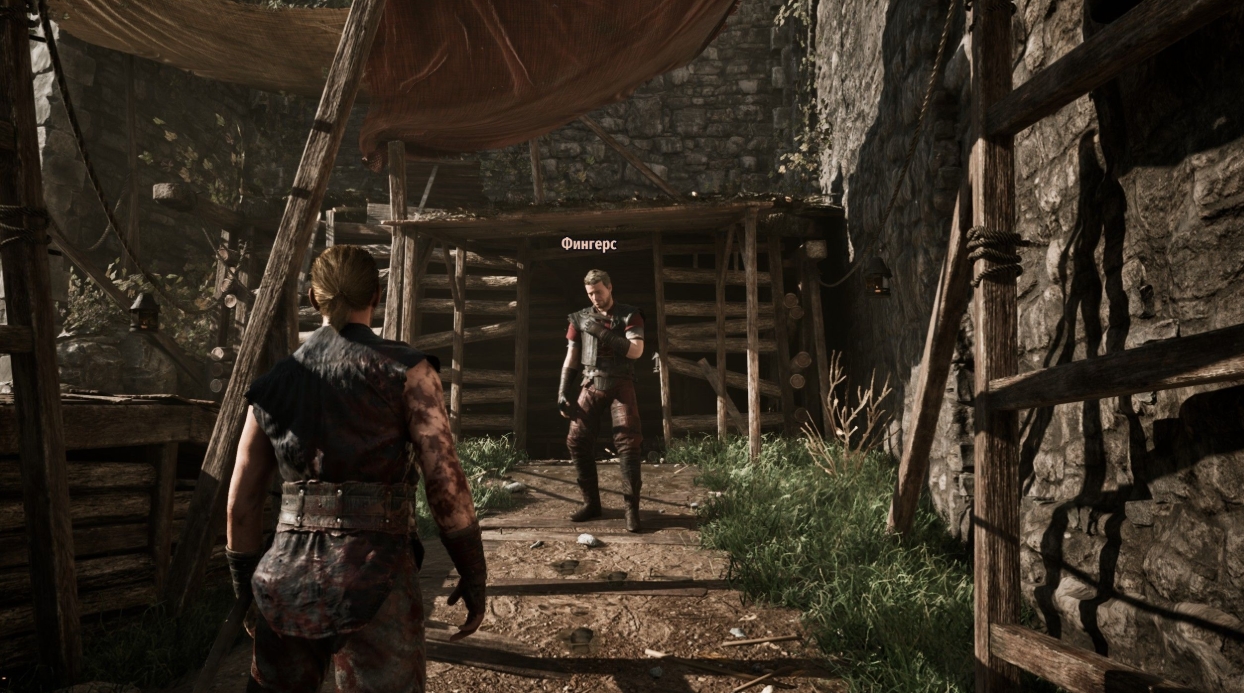
| Fingers’s chest | L3×6 → L2×1 → L3×1 → R4×5 → L3×5 → L6×6 → R1×2 → L2×3 → L3×1 → R4×1 → R5×1 | 11 |
| Scatty’s chest | R2×2 → L3×4 → L5×6 → L3×1 → L4×5 → R1×2 → L5×6 → R2×2 → L3×2 → L5×1 | 10 |
| Harim’s hut (has plate №7) | L1×4 → L2×2 → R3×2 → L4×5 → L5×4 → R3×1 → R6×3 → L7×3 | 8 |
| Kirgo’s hut | R5×6 → L2×4 → L1×3 → R4×5 → R3×4 → L2×1 → R5×2 | 7 |
| Gor Haniis’s hut | R3×4 → L4×6 → L1×1 → R3×6 → R2×2 → L4×3 → L5×6 → L1×3 | 8 |
Forge Area, Ruined Tower and Mordrag’s Zone
| Location | Plate Sequence (in order) | Steps |
|---|---|---|
| House right of the forge | R1×3 → L2×3 → R1×3 → L3×6 → L2×3 → R1×3 → L2×3 → R1×3 → R5×3 | 9 |
| Left hut near the forge | R1×4 → L2×1 → R1×1 → R3×3 → R1×1 → R4×2 → R1×2 → L5×3 → R1×2 → L2×1 → R4×1 → L6×4 → L5×1 | 13 |
| Central zone near the forge | L2×4 → R1×3 → L4×6 → R1×1 → R3×4 → L2×2 → R1×1 → L4×6 → R1×3 → R3×1 → L4×1 | 11 |
| Right hut near the forge | L2×6 → R3×3 → L2×3 → R4×3 → L5×1 → L6×6 → L1×3 | 7 |
| House left of the forge | R1×2 → R2×2 → R1×2 → R2×1 → R1×1 → L3×3 → R4×3 → R5×4 → L6×6 → R2×3 | 10 |
| Ruined tower chest | L1×6 → L3×6 → L1×2 → R2×1 → L3×1 → L4×5 → R2×1 → L3×3 → R2×1 → L3×1 → R5×3 | 11 |
| First chest above the ruined tower | R2×3 → R1×1 → L3×1 → L5×6 → L3×6 → R4×4 → R2×1 → L3×2 → L5×1 | 9 |
| Second chest above the ruined tower | L3×1 → L2×1 → L1×1 → R4×5 → L5×6 → L2×3 | 6 |
| Hut near Mordrag | L1×1 → L5×6 → L1×5 → R2×1 → L3×1 → L5×6 → L1×2 → R2×1 → L3×2 → L6×4 → R4×1 | 11 |
| Next hut after Mordrag’s building | R1×1 → R2×2 → R4×1 → R3×1 → R5×5 → R4×5 → R3×2 → L6×3 | 8 |
| Ghost’s hut (near Mordrag) | [L2×1 → R1×1] ×6 → L2×1 → L3×6 → L2×5 → R1×4 → L2×3 → L3×1 → L4×2 | ~20 |
| Ghost’s hut (between arena and tower) | L3×2 → L5×2 → R2×2 → L1×2 → L3×4 → R4×1 → L3×1 → L5×4 → R2×4 → L1×2 → L3×6 → L5×4 → R2×1 → L3×1 | 14 |
Lockpicking Tips for Gothic 1 Remake — No Thief Skill Required
Having the right code is only half the job. Executing it without a mistake is the other half. A few habits that will save your lockpick supply:
-
Save before every lock. A quick save takes two seconds and costs nothing. One misclick on plate №3 vs №5 will cost you a lockpick — and your patience.
-
Read L and R carefully. Left and right are not swappable. A wrong direction on step one means a broken pick before you’ve started.
-
Start with short locks. Dexter’s chest (3 steps) or the Free Mine summit chest (5 steps) are ideal warm-ups before attempting Fisk’s hut.
-
Carry 20+ lockpicks before sweeping the Old Camp — especially the arena cluster and forge area, which alone hold a dozen locked objects.
-
Cyclic patterns (Fisk chest №1, Ghost’s hut) repeat blocks of moves. Treat them as a rhythmic loop rather than individual steps — it’s easier to track.
-
Plate №7 only appears in a handful of Old Camp locks (Harim’s hut, arena house 6). Don’t confuse it with №6 mid-sequence.
Is the Thief Skill Worth Taking Just to Pick Locks in Gothic 1 Remake?
Short answer: not if you have this guide. The Thief skill in Gothic 1 Remake adds extra tolerance for mistakes and makes the plate interface slightly more responsive — but the actual sequences don’t change. A warrior or mage using this reference will open the same locks as a maxed-out thief, just with a thinner margin for error.
For non-thief builds, investing skill points into the Thief branch purely for lockpicking is a poor return. You get more value from combat or magic upgrades, and the locks themselves become a puzzle of knowledge rather than character stats.
That’s ultimately what Gothic 1 Remake did to the lockpicking system — it turned it from a dice roll into a test of preparation. You either know the sequence or you don’t. Controversial among fans of the original, but it does open every piece of content to every build. Know the codes, stock up on picks, and the Minental holds nothing back from you.
The next guide – Where to Find Obsidian in Gothic 1 Remake: Guide 2026