Cliff’s main goal in Crimson Desert is to revive the clan that once protected Pywel. And the first step toward that is establishing a new base in the Ernand region. Over time, the camp on Wolf Hill will grow into a self-sufficient settlement: your people will go out on missions, traders will bring in profit, and you will reap the rewards. But let’s take things one step at a time.
Table of Contents
How to Found the Greymane Camp in Crimson Desert: First Steps
At the start of the game, Cliff is completely alone. His allies are dead or scattered. You will not begin to fix that until after Chapter 2 and the battle against the boss Horn Cleaver. In Chapter 3 you will run into a surviving clan member — Marius. He immediately starts spreading the word of your return far and wide. From there, fate brings you face to face with the marquis of House Sercis. As a reward for your deeds, a plot of land is set aside for a new camp.
Head south from the city of Ernand, following the marquis’s guard. The destination is the summit of Wolf Hill (south, not far from where you fought Horn Cleaver). Two quests kick off back to back there: “First Step Toward Revival” and “A New Beginning.” Once you complete them, the Greymane camp will be built.
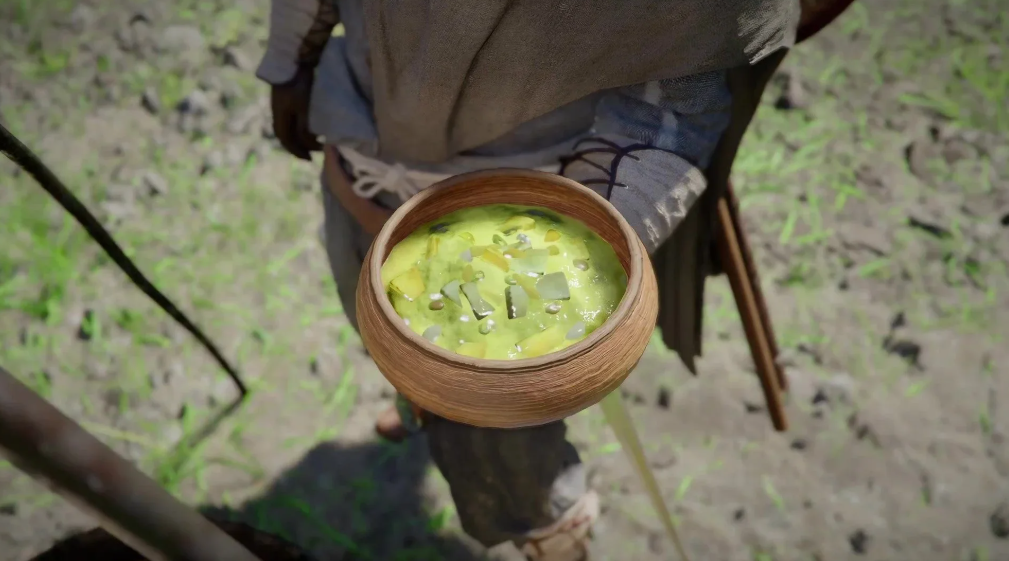
The quest “A New Beginning” sounds mundane: move supply bags, push a cart, drive in stakes, raise a banner. But it is precisely this quest that officially founds the camp and unlocks Damiana Spencer as a playable character. There is also a short lesson on cooking “Humble Clear Broth” at the nearest cauldron. The food mechanic in Crimson Desert, by the way, will come in handy all the way to the final chapter.
Why Develop the Greymane Camp and What It Gives the Player?
Right after construction, the first thing to do is activate the fast-travel point “Abyss Trail” in the northern part of the settlement. It becomes available after Act 4. And it is genuinely convenient — you can instantly return to Wolf Hill without breaking away from exploration.
When you arrive with Marius at the newly built camp, two other surviving Greymanes will already be there — Ross and Karl. But for the camp to start providing real value, you will need to put in the work. Marius will point you toward where to find the other key characters — and that becomes the main objective of Chapter 3.
At the start there are not many options. However, a large house across the ravine to the east opens up right away. You can furnish the interior there — and simply rest from running around Pywel. Do not miss this moment: many players treat the camp as a waypoint between story missions. That is a mistake. Because over time it will start producing food, silver, crafting materials, and even rare gear — while you explore the world.
Key NPCs of the Greymane Camp: Who Is Responsible for What
Right after setting up the base, two surviving Greymanes will join you — Karl and Ross. These are the NPCs you will deal with every single day.
Karl is in charge of Provisions. He sits next to the supply chest. You can feed him resources — that is how the camp’s shared stockpile gets topped up. Through him you also get access to manual material deposits. A small thing, but useful.

Ross is your Mercenary Office. All assignments for the Greymanes go through him. Once the hiring system is fully activated, Ross will become the most-visited NPC. So every time you return to Wolf Hill — go to him first.

Marius serves as the chief Overseer. He is the one who gives quests to expand the camp and hire new people. You go to him when you feel the settlement has outgrown itself.
Other NPCs unlock as you complete story and faction quests. For example, Erik the Barber and Oliver the merchant from the Dyeworks — both are important for character customization. Plus various faction traders. You cannot get by without them.
How to Upgrade the Camp in Crimson Desert and Unlock New Mechanics?
Founded the camp? Congratulations. It does almost nothing at first. And no one will explain what is what. The best strategy: just follow the story. Finish Chapter 3, meet the Reed Devil. After that the search for old acquaintances begins — and that is when the mechanics really start rolling.
Here is what unlocks and when:
-
After meeting the Reed Devil, Karl unlocks “Camp Resource Support.” Finally.
-
Complete the quest “Rumors from the Sawmill” — find the letter from Shakatu in the shrine inside the base. It will open “Camp Missions.” The first one is called “Expanding the Camp on Wolf Hill.”
-
At the start of Chapter 4, side quests for finding new recruits become available.
We will update this guide going forward — covering the remaining recruits. Stay tuned.
Greymane Faction Quests: Why You Cannot Skip Them
Technically the “Lands of the Rising Sun” chain in the journal (the “Faction Quests” section for the Greymanes) is not required for the main story of Crimson Desert. But in practice it is one of the most important quest chains in the game. Why? Because every new building, every hiring slot, and any camp expansion is locked behind it. Without it, Wolf Hill will remain a pair of tents.
Greymane Assignments are small requests from the people already living in the camp. They often function as a brief tutorial on a new mechanic or an introduction to another trader. Each completed assignment gives you a Medium Bag — it adds +3 inventory slots. Does not sound serious? There are 27 assignments in the game in total. Do the math: 27 × 3 = 81 extra slots. And given how awkward backpack management is in Crimson Desert, that is already a solid reason to complete everything.
Rumors are recruitment quests. Each one brings a new fighter to the camp. You can recruit nearly 40 Greymanes in total. And the more people you have, the more missions you can run simultaneously. Simple math: more hands, more profit.
Camp Economy in Crimson Desert: Resources, Donations, and Personal Gain
Talked to Karl? Great. You can now donate supplies to the shared pool. At first the return is almost zero — but do not blink, because once camp missions unlock, the mechanic comes alive. The flow is simple: you restock the warehouse, then spend those reserves on completing missions. You can feed Karl almost anything, and in return he will give you one of several types of local currency. What does he accept?
-
Gear — armor, clothing, weapons.
-
Ore — stone, minerals, any raw nuggets.
-
Lumber — wood, planks.
-
Food — cooked meals, cooking and alchemy ingredients.
-
Coins — money and jewelry.
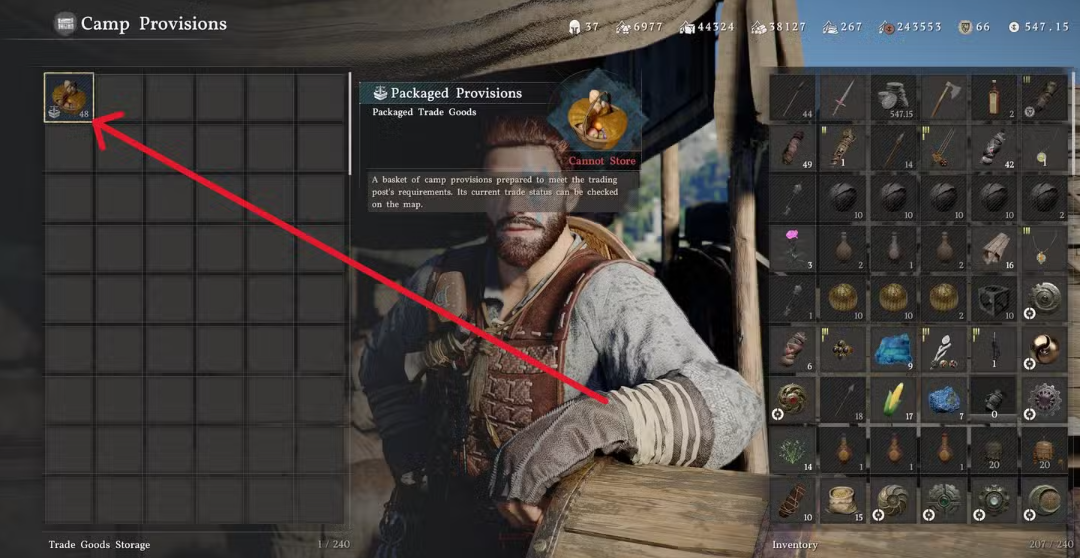
Items with a scale icon are “Trade Goods.” They drop into a separate window on the left, but packaging costs silver. There is no point dealing with them for now — you need caravans with wagons, and those appear later. In short, do not bother.
Important note: you will never get your donated resources back. Never. Only donate what you definitely will not need. Food or ore used for crafting, for instance — let those go without regret.
All donated items count toward Greymane side assignments. The indicators there level up several times in a row, and you will not receive the reward immediately — you will have to wait. But as the base expands, abandoned resources will start appearing on its territory: food, weapons, miscellaneous items. You pick all of it up and pocket it. A nice bonus.
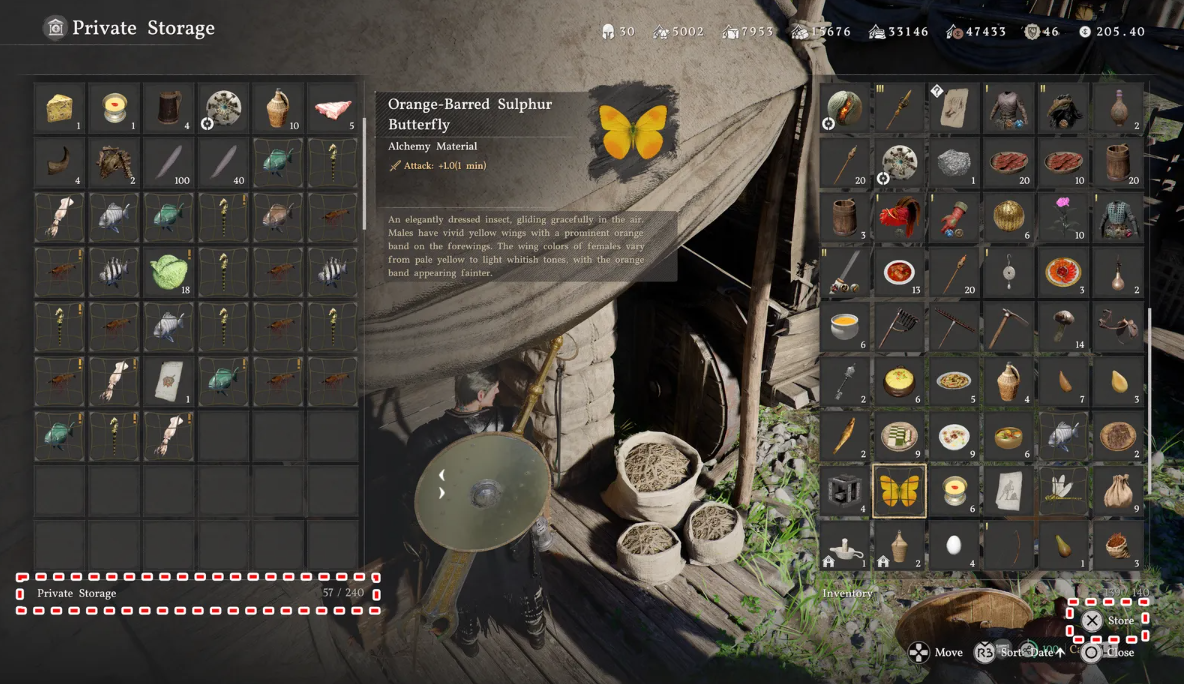
Supply Chest: How to Use Your Personal Storage
In your tent behind Karl sits the “Personal Storage” chest. All loot from completed missions and camp production ends up here. Make it a habit to check it every time you return to Wolf Hill — it genuinely helps. The resources inside go toward crafting gear and cooking food, so letting it overflow is pure waste.
Noticed a particular resource is constantly in short supply? Here are the three fastest ways to fix that.
-
Food — the “Sin Volt Ranch” location, once unlocked, yields more than 50 units of quality meat per cycle. Forget about manual hunting.
-
Silver — three reliable mid-game sources: “Briar Food Storage,” “Singing Grove Estate,” and “Azerian Estate” in Demenisse. After Chapter 10, Gorthak’s Forge in Delecia opens — it produces thousands of units of weapons in a single run.
-
General materials — regularly turn in your personal haul through Karl. Do not hoard gear you are not going to use — donate it to the shared stockpile, it will do more good there.
One more thing: at the fourth camp expansion, the trade wagon unlocks. You can package Trade Goods there and sell them at trading posts across Pywel. Build additional wagons as they become available — but before a large shipment, always check market price fluctuations. Otherwise you risk investing in the wrong run.
Greymane Missions in Crimson Desert: How to Send Mercenaries and Manage Resources
Everything kicks off with a gift from Shakatu — resources for expanding the base. After that you can send mercenaries beyond your zone of influence. Essentially these are repeatable assignments: complete one, receive resources. Those resources are then spent on more complex tasks or on upgrading the camp itself.
Mission management works through two interfaces: talking to Ross and the map.
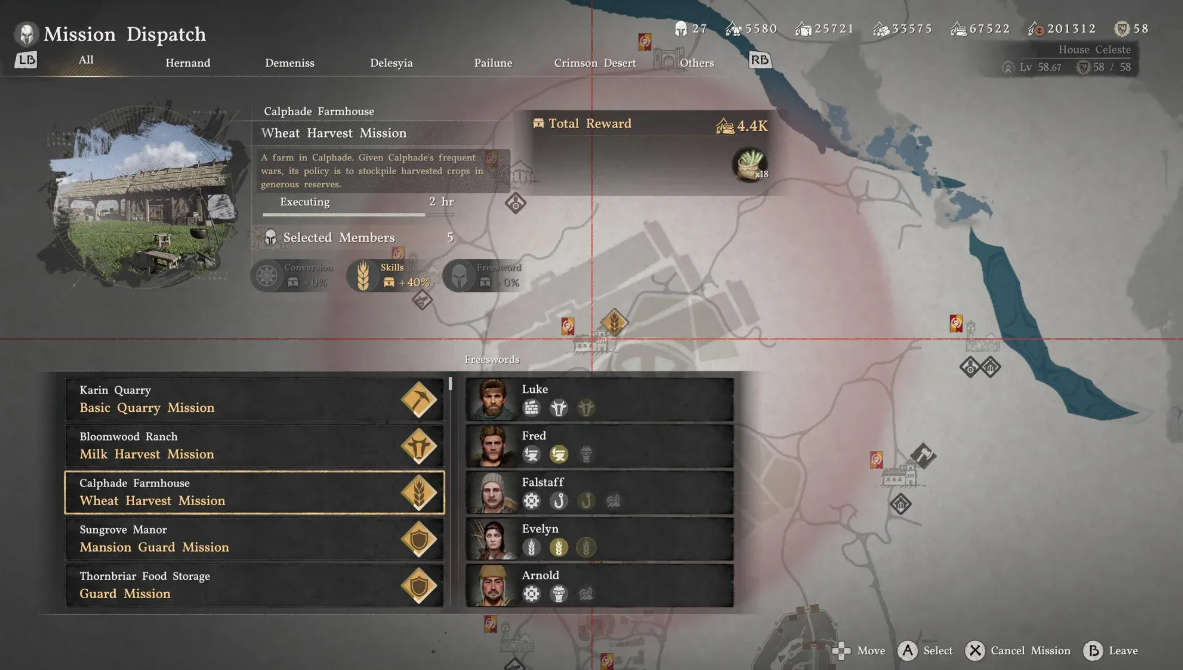
When you talk to Ross, you see a list of all available mercenaries. At the start it is only Luke and Ronald (other key characters are busy with their own affairs). But Marius will hand out side quests — and the number of recruits will start climbing.
Available missions are highlighted on the map in the faction tab. Next to the flag you can see a diamond-shaped icon. Click on a location, the map zooms in — and mission details are right there in front of you.
Each mission is identified by an icon on the diamond. From it you can see what is required to send the group and what you will get in return (though there are exceptions).
Every mission has requirements: a number of mercenaries, certain skills, sometimes resource costs (most often food and silver). The mission types you will encounter most often:
-
Production missions — gathering food, lumber, ore, and materials at designated locations.
-
Combat missions / Suppression — reduce enemy activity in a region, unlock trade bonuses and access to new locations.
-
Construction missions — directly tied to camp improvements and builds.
-
Rumors — recruiting new Greymanes.
Each recruit has a set of skills: Builder, Hunter, Warrior, and so on. Matching the right skill set to the mission type noticeably raises efficiency and final rewards. A Builder is irreplaceable on construction, while a Hunter will gather far more food than any Warrior.
After sending a group of Greymanes on a mission, you can personally travel to the site and watch them work. A nice detail — sometimes useful if you just want to check what the crew is up to.
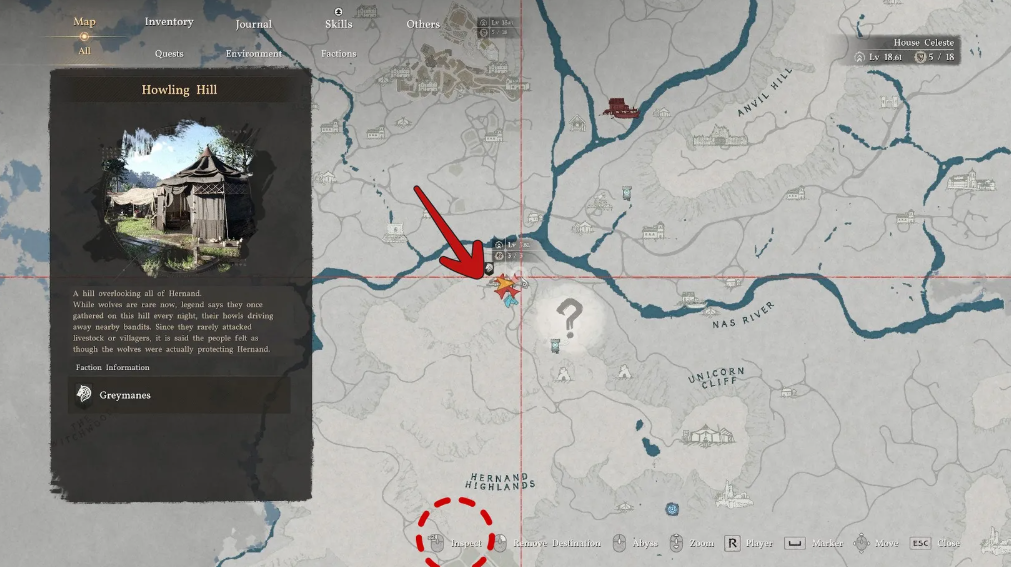
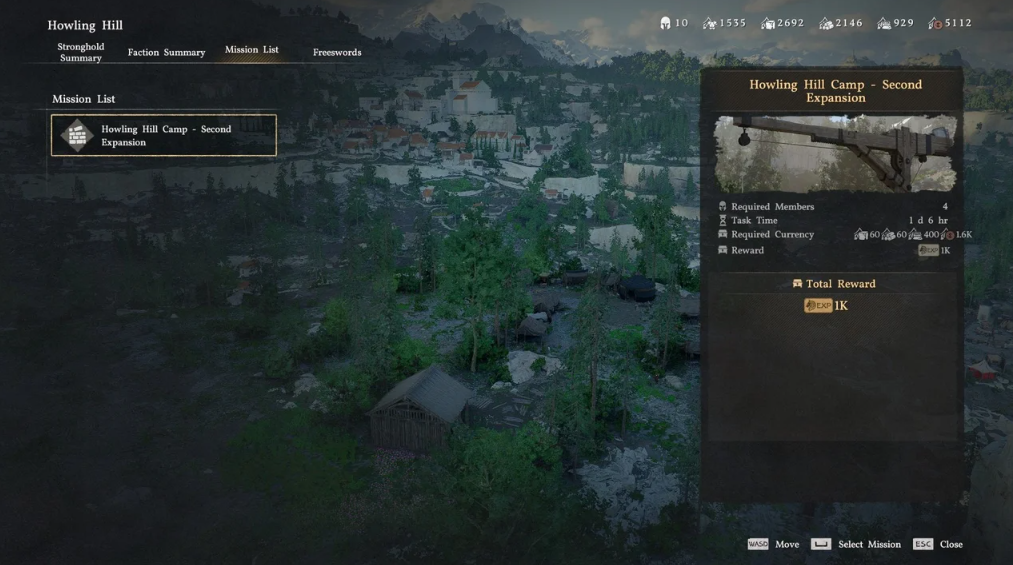
How do you open the mission menu? Open the map, find the Greymane camp icon, press “Inspect” (Y on Xbox, Triangle on PS5, or double-click on PC). Then go to “Mission List,” assign mercenaries, and launch. The system is not the most intuitive, but once you get the hang of it you will run it on autopilot.
Mission Types and Rewards — Crimson Desert
Mission Types & Rewards — Crimson Desert
Background Missions: How to Save Time in Crimson Desert
You go about your business while your crew hauls resources back to camp in the meantime. Sometimes they even clear out particularly troublesome enemy points — a welcome bonus that saves a lot of time.
Some missions (such as construction or capturing fortifications) are one-time only. But most are repeatable. And here is the key thing: a mission repeats automatically until you manually cancel it. If you do not keep an eye on supplies, it is easy to burn through one currency chasing another.
For example: you send Luke and Ronald to guard a manor — they bring in money but consume food. Forget about them for a few in-game days and the camp’s storage will run dry.
The approach is simple: hire as many people as possible to run several missions at once. Let one group gather food while another group spends that food on security. The money from security funds the gatherers — and the cycle goes on. It works without a hitch.
A separate note — construction missions. They require more resources than others, but they raise the camp’s rank and unlock access to new mechanics. These are worth investing in generously.
Expanding the Greymane Camp on Wolf Hill: Full Crimson Desert Guide
Expanding the Greymane camp in Crimson Desert does not work the way it does in most RPGs. Forget about a dedicated menu and an “upgrade” button — here everything is tied to quests and sending squads on missions. The developers wove the system organically into the story, but this approach has a downside: your progress is tightly bound to how far you have gotten in the narrative. And to resources, naturally.
What you need to know about each stage of development:
-
First expansion (“Stirring on the Hill”) launches in Chapter 3. Requirements: 2 recruits, 100 units of food, and 250 silver. Reward — access to the mission-sending system, new hiring slots for fighters, plus Marius begins handing out additional quests. After sending the squad, construction will take 18 real in-game hours.
-
Second tier will require more recruits and serious material stockpiles. In return you unlock the farm and the ranch. Tip — do not delay: first lay down the farm and activate the “Apple Trees” quest. The trees grow in real time, not game time. Plant them as early as possible or you will regret it. While the fruit is growing, simultaneously complete Ben’s ranch training quests — by the time construction finishes the ranch will already be ready for full operation.
-
Third stage — more recruits and resources again (and noticeably more of them). Additional mission slots open up along with upgrades for already-built structures.
-
Fourth expansion is a serious milestone. 10 mercenaries and high material costs. Reward: a wagon, a hot air balloon, and access to advanced item crafting. This is where most players hit a wall. Weapons start to genuinely slow down progress — arms and armor accumulate far more slowly than food or silver. The solution? Start stockpiling trophy weapons into the camp’s shared reserve well before you hit the limit. Better to be safe — the fourth tier does not forgive carelessness.
-
Fifth expansion and beyond only unlock in the late chapters. There you will find Pywel restoration, access to the Council, and the Institute — but that is a story for experienced players who have cleared a good portion of the story.
Notably, each successive tier requires not just more resources, but significantly more. Recruits also need to be found — their required count grows with each stage. So while upgrading the camp, do not forget to search for new recruits out in the world of Crimson Desert. Without them you generally will not be able to move forward.
Tips for Managing the Camp in Crimson Desert: Common Mistakes and Useful Tricks
Every time you return to Wolf Hill, the first thing to do is open the faction journal. New Greymane quests are waiting there. Expansion and recruitment assignments pop up regularly as long as you keep advancing through the story. Skip them for even a couple of chapters and camp growth will quietly slow to a crawl. Then you sit there wondering: why has everything stalled?
A typical beginner mistake — accidentally sending a trader or key NPC on a mission. A vendor disappeared from camp? Check the active dispatches. There is a 99% chance they are out there hauling some resources instead of selling you armor.
Another thing that is easy to miss — church donation boxes. They are scattered across the settlements of Pywel. Toss silver in and you get a temporary bonus to all assignments in the area. The dispatch efficiency near that location jumps noticeably. The radius is limited, so the bonus will not cover the whole world, but for farming a specific region it is an excellent boost.
If you find yourself just waiting for production cycle timers to run out, the bed in camp will become your best friend. Sleep skips time forward by twelve hours — ideal for sitting out a wait without downtime.
And one final point: do not neglect Pywel after Chapter 7. The city restoration chain there (Council and Institute) gives mercenaries long-term work and unlocks the most powerful production capabilities. Yes, it will require a lot of investment. But by that point your camp should already be running well enough that you can cover those costs without trouble. Provided, of course, that you have not let management slip.
Verdict: Is It Worth Investing in the Greymane Camp
The Greymane camp in Crimson Desert functions as a loot storage point and also represents a core mechanic borrowed directly from MMOs. At first it looks like a useless tin can. But once you level it up through the story and invest resources wisely into the right missions — you get a powerful tool for farming and progression.
The main thing is to keep an eye on the balance. Do not forget to cancel repeating missions, otherwise you will run out of food and other resources. But if you want to speed up base growth, go for construction missions right away — they are the ones that give your settlement the most experience.