Roadside altars are your main source of Abyss artifacts in Crimson Desert. Without them, upgrading skills and gear comes to a screeching halt. We’ll tell you where to find each sealed artifact and how to complete the bound challenge. Some tasks are genuinely fun, others are just infuriating. But we endure.
Table of Contents
When Do Abyss Artifacts Open Up in Crimson Desert?
Sealed Abyss artifacts aren’t the kind of loot Crimson Desert dumps on the player from the get-go. Pearl Abyss deliberately wove the mechanic into the story framework: until you reach the right progression point, the altars work as decoration. You’re running around at level 30, tapping every stone pyramid on the roadside, pressing R — zero reaction. No hint, no interaction icon. The game just doesn’t seem to see that you’re even standing there.
The rift opens closer to the finale of Chapter 2 — right after the story quest where Cliff first falls into a void crack and gets the “void jump.” That moment is the trigger: before it, the altars are silent; after it, they come alive. The recommended level to start the hunt is 18-20, no lower. Try it earlier — you’ll catch pain on challenges like “30 enemies with a spear in 30 seconds”: not enough damage, stamina ends on the tenth jab, and the timer ticks mockingly.
Conditions for Access to Abyss Altars by Chapter
Artifact Requirements
A separate layer of blocks is regional progression. Some altars are rigidly tied to local story arcs, and no workarounds will help here. A classic example is the artifacts of the North Crimson Desert near the Salt Road: until you close the Tommaso arc, they’re dead. Even if you break into the region through a map bug or a horse glitch (and players have already found such ways), the interaction still won’t work. The check runs not by coordinates, but by the quest flag in the save.
With special weapons, the story is even funnier. Lightning Spear, Flamespitter, Drill Fist — each of these tools is needed for its own separate challenge, and they’re handed out strictly for side quest chains in different regions. You’ll pick up the artifact even without the gun, but the task won’t count, the counter won’t move. So the logic is simple: before heading out to a specific altar, peek into the inventory. Don’t have the right piece? First to the Graymanes or to the Kilnden workshop for the chain, then to the challenge. You’ll save yourself a couple of hours of running back and forth.
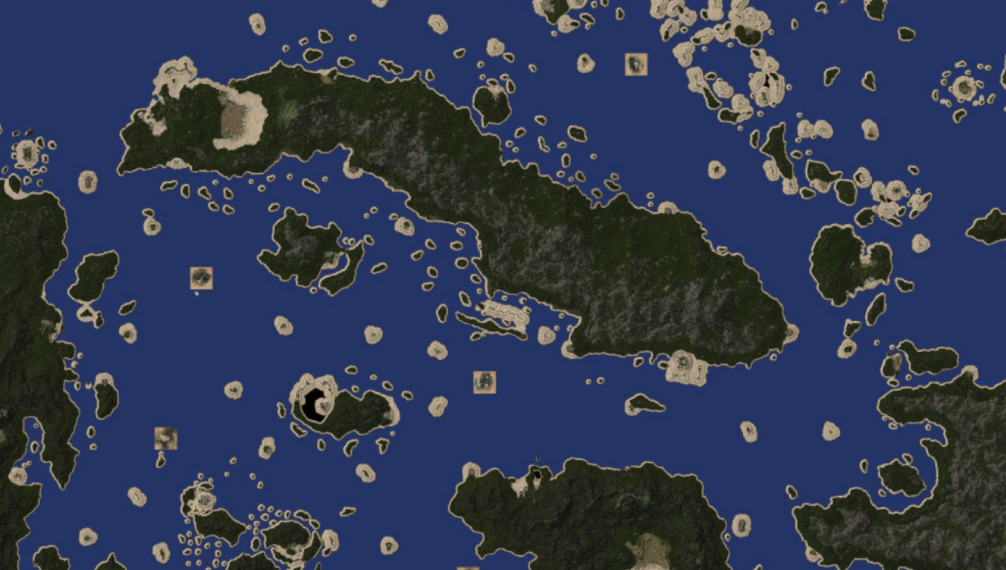
What Do Abyss Altars Look Like and Where to Look for Them?
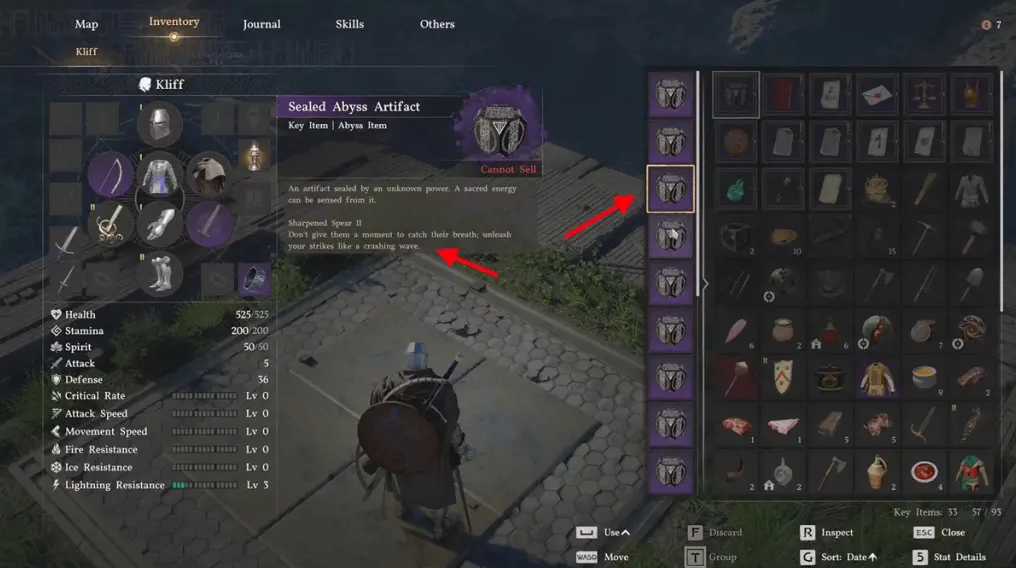
The sought-after items usually lie on small stone pyramids — altars on the roadside. Some are hidden in Graymane shrines. Memorize the look: as soon as you learn to distinguish these pyramids from simple piles of stones, collection will go like clockwork. You’ll find the very first artifact on the approach to Hernand — long before the game introduces you to the Abyss.
Important point: challenge progress counts when the artifact is picked up. Not earlier.
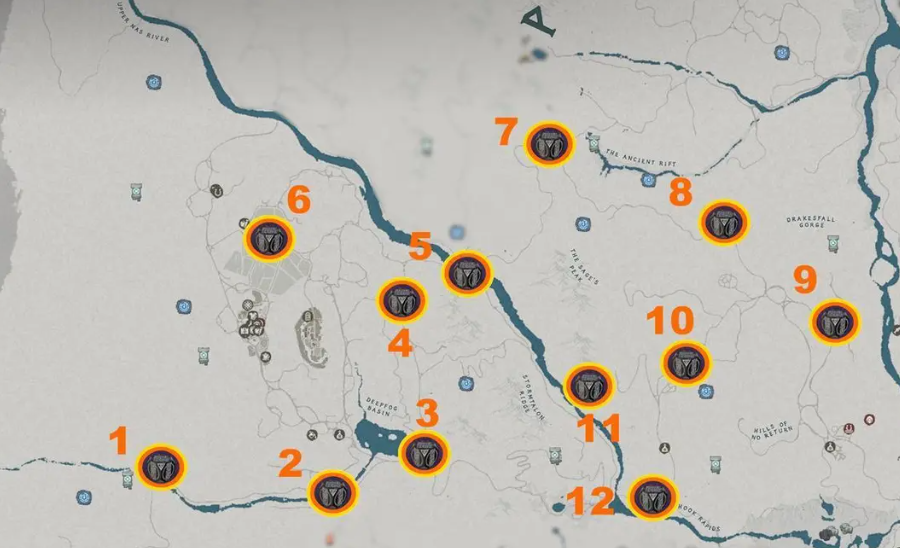
Central Hernand
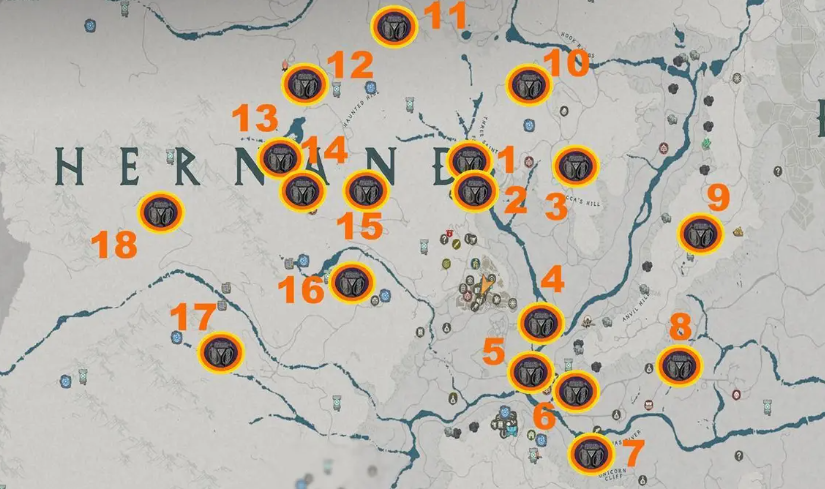
1. Sword of Trials I
Task: Take down three enemies with a sword in 30 seconds.
Where to find: At the fast-travel location near the Waterfall of Three Saints. Not difficult.
2. Shield of Unshakable Will I
Task: Destroy three opponents with a shield.
Where to find: At the stables behind Hernand Castle. By the way, you can also rent horses there.
3. Shield of Unshakable Will IV
Task: Handle five enemies with a shield without getting a single scratch.
Where to find: On Rocca Hill, east of Embernest Lighthouse. Now this is more serious.
4. Sharpened Spear II
Task: Skewer 30 enemies on a spear in 30 seconds.
Where to find: Graymane shrine at the river junction, southeast of Hernand. Madness? Perhaps. Doable? Yes.
5. Sword of Trials III
Task: Win a skirmish of three with a sword without taking damage.
Where to find: On the road between Hernand Castle and the farms. We recommend luring opponents out one by one.
6. Slope Descent
Task: Slide 50 meters on a shield.
Where to find: East of the Post on the Nas River. Find a suitable hill and go for it. By the way, it doesn’t work from every slope.
7. Balance on the Wind
Task: Cross 10 meters on a rope.
Where to find: Hilly trail near Unicorn Cliff. Balance is everything.
8. Night of the Silent Banner
Task: At night, while remaining undetected, destroy 10 banner pikes.
Where to find: Along the road to the Abode of Saint Halssius. Crawling, in the shadows, take your time.
9. Expose the Deception in Duo
Task: Apply “Insight” to bring a cheater to clean water.
Where to find: In the northeast of Anvil Hill, between the Stone and the Heart of the Abyss. Coincidence? Unlikely.
10. Feather of the Earth
Task: Catch and carry five birds.
Where to find: North of the fast-travel point at the Waterfall of Three Saints. A meditative activity, but necessary.
11. Judgment of the Storm
Task: Take down 30 enemies in one minute.
Where to find: Behind the camps northeast of Ghost Hill. Group up the crowd and use AoE abilities.
12. Sharpened Spear I
Task: Perform 15 counterattacks with a spear in 30 seconds.
Where to find: South of the Kalfade Gate. Rhythm is the key to success.
13. Crushing Blow III
Task: Push back 10 enemies with a sword in 30 seconds.
Where to find: At the ruins on the lakeshore southwest of Ghost Hill.
14. Star That Cleaves the Skies
Task: Jump from the Abyss and touch the ground in less than 30 seconds.
Where to find: Black market at the farms south of Hernand. Don’t forget to spread your “wings” in the fall.
15. Shepherd’s Lament
Task: Sell three goats to Bram at the ranch in the camp.
Where to find: Between the letters “A” and “N” in the word “Hernand” on the map. Yes, the developers are mocking us.
16. Sword of Trials IV
Task: Kill three enemies at once with a Spinning Strike of the sword.
Where to find: At the Kilnden workshop, where the Kuku cauldron is given. Group up the mobs tighter.
17. Rainbow in the Sky
Task: Perform a pole jump using a banner pike five times in 30 seconds.
Where to find: At the end of the western road near the double river in Duskwood. Honestly, one of the silliest challenges.
18. Shield of Unshakable Will III
Task: Hit three opponents with a single shield strike.
Where to find: On the winding trail in the Eternal Permafrost. Ideal if enemies walk in a tight group.
Central Demeniss
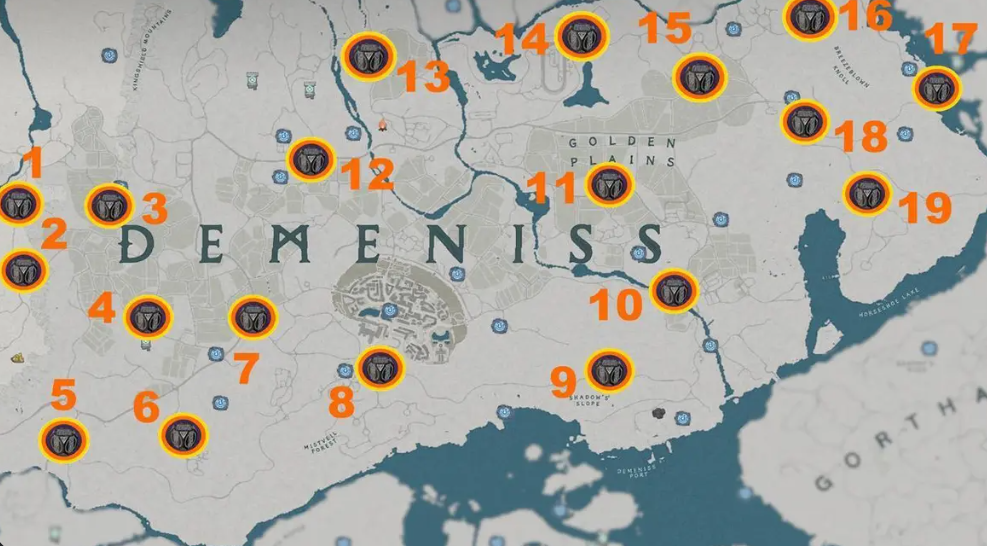
1. Harmony of Hooves I
Task: Tame two wild horses.
Where to find: Reventin Monastery on the border with Hernand. Sneak up carefully and don’t yank the reins. The animals are nervous but obedient.
2. Sword of Trials V
Task: Defeat three enemies in a row only with the blade and “Lunge” — no concessions.
Where to find: The road south of Reventin Monastery leads through a bandit camp. Dodge and stab without stopping.
3. Sharpened Spear IV
Task: Hit three opponents with a jumping spear strike in a minute.
Where to find: Castle of the Knights of Flame, right north of the letter “D” in the word “Demeniss.” The guards there stand close together. Jump boldly.
4. Shield of Unshakable Will V
Task: Toss up five enemies with a shield.
Where to find: South of the letter “D,” at the ruins of the Screaming Vault. Opponents advance in a dense group — one powerful swing, and count heads in the air.
5. Harmony of Hooves II
Task: Five beasts in five minutes. On horseback.
Where to find: North of the Abode of Saint Halssius, where the lands of Demeniss and Hernand meet. The game runs in herds — ride, shoot, don’t hesitate.
6. Little Predator
Task: Catch and carry five mustelids.
Where to find: From the ruins of the Screaming Vault, head east to Iselberry. Shadows flicker in the grass. Catch carefully — the critters bite.
7. Shot
Task: Neutralize an elite enemy with a firearm. And nothing else.
Where to find: The southern road from the fifth artifact to Scorchrock is patrolled by a serious opponent. Load your musket or pistol, aim for the head.
8. Mysterious Accessory Shop
Task: Visit all the witches’ saddle workshops.
Where to find: South of the capital of Demeniss, next to the wildlife park, one of these shops lurks. Go in, talk.
9. Squall Cannon II
Task: Defeat three enemies with each variant of the Charged Shot. Elemental ones also count.
Where to find: The road on the slope to Demeniss Port — you can blast there with fire and ice. Experiment.
10. Dancing Blade, Shining Shield II
Task: Ten rapier thrusts. And not a scratch on you.
Where to find: South of the letter “A” in the name “Golden Plains” on the map — a place for duelists. The opponents are slow. Prick and dodge.
11. Harmony of Hooves V
Task: Land on a horse from the air three times. And stay in the saddle.
Where to find: Springdale Farm with its high roofs is ideal for acrobatics. Run-up, jump, landing.
12. Crushing Blow II
Task: Finisher with a two-handed sword. Three enemies without damage to you.
Where to find: Golden Gallop Racetrack — not only for races. There are bullies there who will gladly step under the final chord.
13. Defender’s Clash
Task: Seven parries. Without a single mistake.
Where to find: Northeast of the Golden Plains, Hayruf Farm. Opponents attack predictably. Listen to the rhythm, put up a block in time.
14. Underwater Ecosystem
Task: Get the full set of knowledge about freshwater fish.
Where to find: Between Breezeblown Knoll and Musket Outpost (or Gear Spire), the river teems with species. Catch, study, record.
15. Winning Streak in Duo
Task: Three card victories in Duo in a row. No right to error.
Where to find: Eastern edge of Breezeblown Knoll, by the river, players gather for games. Build a strong deck and hope for luck.
16. Dancing Blade, Shining Shield V
Task: Shield throw — nine enemies in 15 seconds.
Where to find: Southern slope of Breezeblown Knoll. The crowd stands so densely that the shield will ricochet like a billiard ball.
17. Special Weapon — Storm Shield
Task: Defeat thirty enemies with this shield.
Where to find: The roadside between the Forgotten Tower and the Demeniss barracks — a decent training ground. The Storm Shield strikes with lightning. Three dozen will add up quickly.
South Demeniss
1. Walking on Clouds
Task: An Aerial Power Strike must launch you up 10 meters or higher.
Where to find: Stone at the South Gate of Bloodsteel. Just be careful — the boss Bredy Gu wanders nearby. Better deal with him first, and then experiment with height.
2. Return of the Graymanes
Task: Complete the second expansion of the camp on Howling Hill. A quest chain requiring resources.
Where to find: Eastern edge of the Bloodsteel plateau, overlooking Thornbriar Fortress — there you have construction and a beautiful panorama.
3. Dark Pilgrim Who Stole the Embers
Task: Steal candles from three churches: West Demeniss, East, and the Cathedral.
Where to find: On the cliff by the walls of Thornbriar Fortress, in front of the tunnel to the secret prison, your pilgrimage begins. Steal quietly. A sin, but for the sake of progress, it’s allowed.
4. Pine Broom
Task: Immobilize a bear with this inventory.
Where to find: The road to the Thornbriar outpost. Looks absurd, but it works. Hit the paws, dodge the claws.
5. Dancing Blade, Shining Shield III
Task: Five rapier thrusts on a downed enemy.
Where to find: Further along the trail from the Thornbriar outpost, across the river. Knock the opponent off his feet, finish with precise jabs.
6. Harmony of Hooves III
Task: Twenty enemies in five minutes. On horseback.
Where to find: Ironwood Farm is surrounded by fields where bandits roam. Gallop through the ranks, chop left and right. The stopwatch is ticking.
7. Sword of Trials VI
Task: Direct sword strike — five enemies in 15 seconds.
Where to find: Serpent Swamp, stone pyramids. The creatures there are nimble but frail. Warm up the blade and slash without stopping.
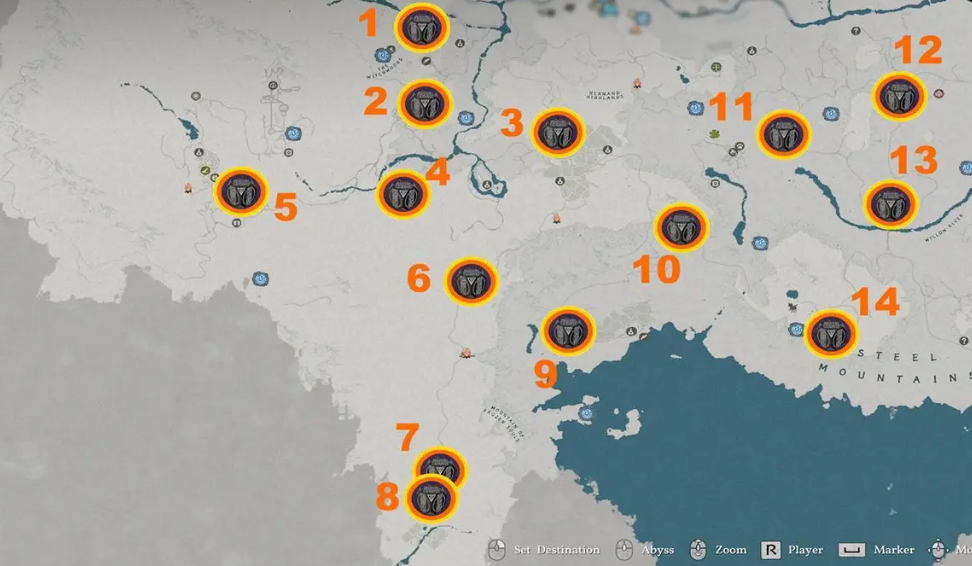
North Demeniss
1. Will Harder Than Stone
Task: Defeat ten stoneback crabs.
Where to find: The road east of the word “Kingshield” on the map is littered with these shelled ones. Hit the joints — the armor is thinner there.
2. Crystals in the Veins
Task: Full collection of knowledge about minerals.
Where to find: Northeast of the Kingshield Mountains — a real geological paradise. Tap with a pickaxe on every shiny vein. Record the properties.
3. Bow Aimed at Fate V
Task: Shoot down five enemies at once from a distance of 20 meters or more.
Where to find: Hill behind the Graymane shrine at the beginning of Chapter 7 — an ideal position. Draw the string and wait for the crowd to huddle.
4. When Lightning Strikes IV
Task: Seven mounted enemies with a firearm. And you too on horseback.
Where to find: Trail to the Tariv settlement. Gallop, shot, reload. A cowboy challenge in a fantasy world. Hold on tighter in the saddle.
North Delesyia
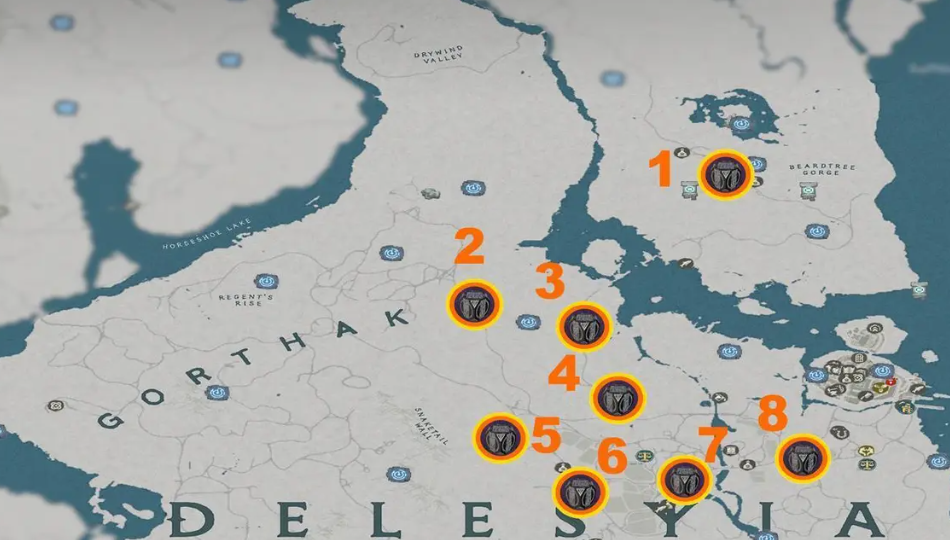
1. Squall Cannon I
Task: Hit three enemies at once with a hand cannon.
Where to find: The place is wedged between two Ancient Ruins in Beardwood Gorge. Not the most obvious landmark, but it’s visible on the map.
2. Wild Duel
Task: Defeat three wolves with bare hands. No weapons.
Where to find: East of the letter “K” in the word “Gorthak.” Sounds like suicide, but the wolves there aren’t that scary if you know the dodge timing.
3. Journey Without Wind and Sails
Task: Walk 2 kilometers, but you can’t move straight. No straight-line sprints.
Where to find: Even further east, from artifact #2, near the railway. We recommend bringing tea — the process is not fast.
4. One Spark — Seven Strikes
Task: Take down 7 enemies with one explosion.
Where to find: Down the road south of the previous artifact. Ideal if you gather a crowd of mobs and fire from something heavy.
5. Gifts of the Meadows
Task: Get all the knowledge about rare collectible resources. A task for collectors.
Where to find: Southwest of artifact #3, beyond the ruins and Silverbrook Hearth. There are many herbs and minerals, but you’ll have to sweat.
6. Requiem Across the Border
Task: Immobilize guards in smoke.
Where to find: Timberton or Fullharvest Farm. A smokehouse will help you.
7. Squall Cannon III
Task: Defeat 10 enemies in 50 seconds with a hand cannon, and most importantly — without destroying other objects.
Where to find: Timberton, Sweetbloom Plantation. Speed and accuracy are important here: one extra shot at a crate, and it’s a failure.
South Delesyia
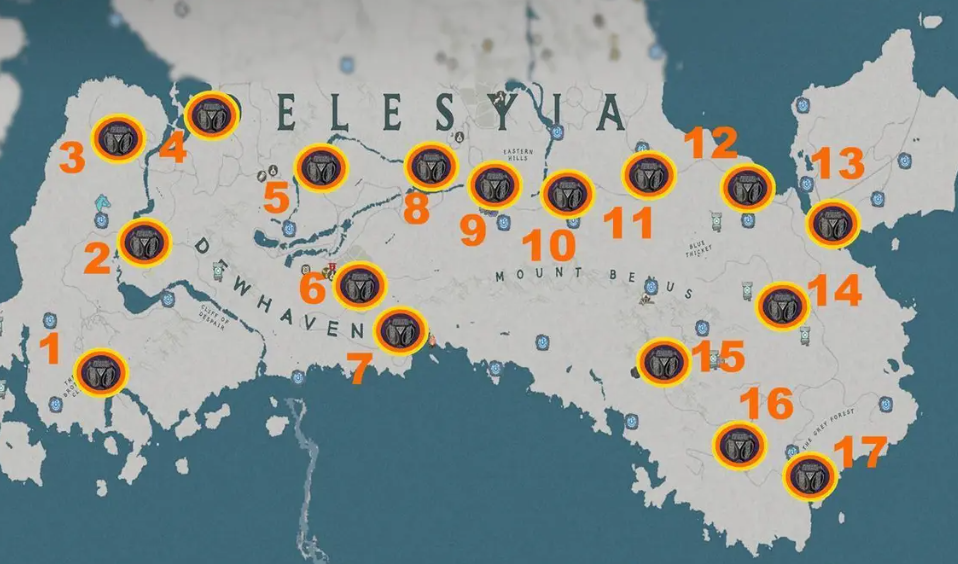
1. Dancing Blade, Shining Shield IV
Task: Take down three enemies at once with a rapier from a distance of 10+ meters. Sounds poetic, but in reality it’s tough.
Where to find: The ridge in front of Fort Windridge — that’s where you can pull it off. The range is no joke, so it’s better to spread the crowd and hit accurately.
2. Special Weapon — Marni’s Laser Helmet
Task: Hit 5 enemies with a beam.
Where to find: Look west of the letter “D” in the word “Dewhaven,” north of the Shrine of Devotion. The helmet is given out for completion — and it’s really funny, but effective.
3. Tornado of Steel
Task: Hit 6 enemies with variants of the Spinning Strike (elemental ones also fit).
Where to find: Stones near the Dewhaven lumber mill. Spin like a top.
4. 4-Player Duo Champion
Task: Win a match.
Where to find: The location is indicated literally: in the letter “D” in the word “Delesyia” on the map. Co-op is mandatory, you can’t pass it solo.
5. Harmony of Hooves IX
Task: Leave Delesyia at night and arrive in Pylune before dawn.
Where to find: The road south of the letter “L” in the word “Delesyia,” at the Steelspike armory. The timing is tight, so prepare a fast steed.
6. Informed Graymane
Task: Visit all 12 Graymane shrines.
Where to find: Starting point — at Windrose Farm near Dewhaven. It’s a marathon, but the reward is worth it.
7. Squall Cannon IV
Task: Knock down a mounted enemy from a distance of 30+ meters.
Where to find: Winding trail from Dewhaven to Stoneward Harbor. A well-aimed shot — and the rider flies into the mud.
8. Seeds of Discord
Task: Commit a crime in Delesyia in Varnia armor and in Varnia — in Delesyia armor. A tricky task.
Where to find: South of the letter “S” in the word “Delesyia,” between the South Gate and the Tinkerton Excavation. Pure provocation.
9. Pets
Task: Tame 30 unique ones.
Where to find: Right there, south of the letter “S,” by the road. Take more feed.
10. Magnate of the Golden Desert
Task: Earn more than 300,000 in the camp fund through trade.
Where to find: Road east of artifact #9. Trade anything that isn’t nailed down.
11. Fruits of Patience
Task: Get all the knowledge about grain, vegetables, fruits.
Where to find: Coastal Windmill Tower in the east. A farming simulator inside an action game.
12. Special Armor — Platinum-Charged Plate Armor
Task: Get the Titan’s Armor.
Where to find: Stones on the coast near the gates of Marni’s Laboratory. The armor is monstrous, but finding it is a separate quest.
13. Flash
Task: Hit 5 targets at once with a Blinding Flash.
Where to find: Fork southeast of Blue Thicket. Ideal for crowds.
14. Lightning Waves
Task: Hit 10 enemies with a destroyer.
Where to find: At the foot of the mountain pass near Mount Benus. Here you literally need a crowd — gather mobs and strike.
15. Raven’s Crown and Last Chivalry
Task: Arrest the criminal.
Where to find: Road southeast of artifact #15, beyond the Northeast Gate of the Masterium. Be ready for a chase.
16. Giant Mill
Task: Hit 7 enemies in 30 seconds with a Giant Swing.
Where to find: Aviation Research Base. The swing is such that enemies scatter like pins.
South Crimson Desert
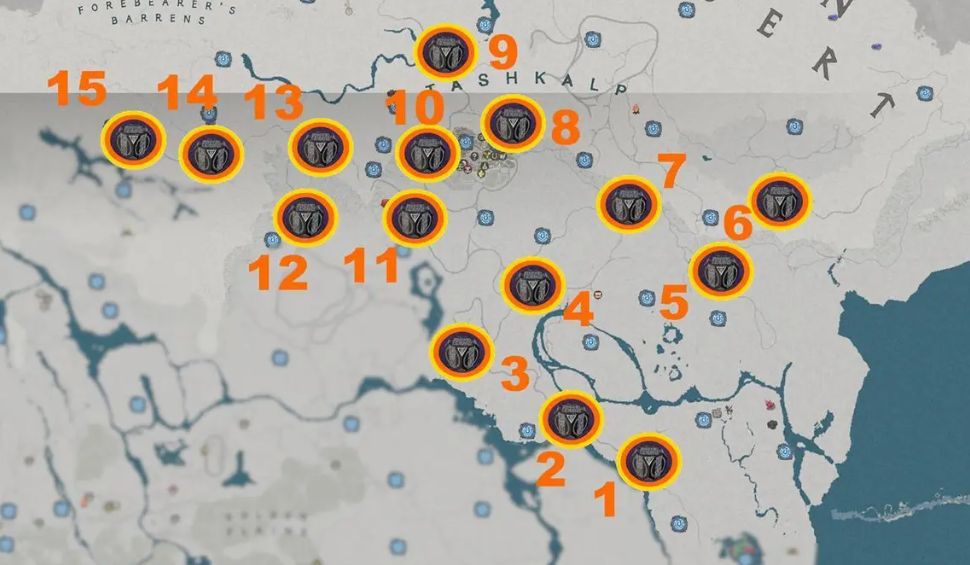
1. When Lightning Strikes II
Task: Three enemies with a firearm in five seconds. From a distance of at least five meters.
Where to find: Roadside northeast of the Dry Wind Valley — caravans pass there densely. Choose a larger target, press the trigger without hesitation. Time ticks hard.
2. Song of the Moon-Swallowing Sword
Task: Latch onto a wolf and deliver six strikes in a row. Without letting go.
Where to find: The road south of Arcosa teems with these predators. Grab onto the nearest, hammer without stopping. They’ll spin, growl, but your grip must be dead.
3. Golden Crown Contract
Task: Deliver trade goods to the courts of Hernand, Demeniss, Delesyia, and Varnia.
Where to find: South of the Desert Mercenaries camp begins your logistical voyage. Take the cargo, saddle the horse and wind circles around the map. Boring, but the pay is good.
4. Special Weapon — Lightning Spear
Task: Thirty enemies with this electric shaft.
Where to find: Dirt trail northwest of the Arcosa plateau is patrolled by weak mobs. The Lightning Spear strikes with an arc. Just don’t forget to recharge the magical charge.
5. When Animals Die
Task: Get Thin, Thick, Durable, Short-haired, and Long-haired hides. Different species — different material.
Where to find: The station at Duskway camp will become your base. Skin whoever comes along. Assortment is more important than quantity.
6. Harmony of Hooves X
Task: Three legendary horses. Tame them all.
Where to find: Southwest of the letter “T” in “Crimson Desert” on the map, right by the road, one of them grazes. Look for the rest throughout the Crimson Desert. The character is nasty, but the saddle endures.
7. Hand That Bypasses All
Task: Pick pockets at least once in Hernand, Demeniss, and Delesyia.
Where to find: Between the Hyena Den and the Crimson Mountain Fortress — a neutral strip where there are many distracted travelers. Approach quietly, cut purses. The main thing is not to get caught by the guard.
8. Drowning Fort
Task: Three watchtowers in twenty seconds.
Where to find: The ridge north of Tommaso is studded with these structures. Blow up powder kegs or use siege weapons. The stopwatch is launched — act quickly.
9. Hunter’s Discipline
Task: Three hyenas. Radius of 20 meters. Not a step to the side.
Where to find: Roadside north of Tommaso — an arena for testing endurance. Hyenas are cowardly, they’ll circle. Hold your position, strike only when they approach.
10. Squall Cannon V
Task: Two watchtowers with a hand cannon in 10 seconds.
Where to find: Western exit from Tommaso — there a pair of towers stand close to each other. Load with buckshot, shoot at the base. With luck, they’ll collapse in sync.
11. When Lightning Strikes I
Task: Five enemies from 30 meters and further. Firearm.
Where to find: Bandit camp of Moon Valley, near the Left Eye Tower southwest of Tommaso. Take a position on a rise, catch them in the scope. Don’t spare the bullets.
12. Top of the Food Chain
Task: Immobilize three herbivorous, predatory, and omnivorous animals each.
Where to find: East of the Abode of Enlightenment, fauna is represented in all its diversity. Traps, tranquilizer darts — anything. The main thing is to temporarily incapacitate without killing.
13. Special Weapon — Drill Fist
Task: Five explosions of the superheated Drill Fist.
Where to find: Fork east of Tommaso. Heat the weapon to red-hot and drive into the ground — the shock wave will hit everyone around. Careful with the hands.
14. Logging
Task: Five ordinary, five good, and five flawless logs.
Where to find: Forefathers’ Wasteland, the area of Sun Spire and the Burhum Labyrinth. The trees there give quality wood. Chop everything down, sort by class. Flawless ones are rare.
15. Bow Aimed at Fate IV
Task: Three birds with a bow from 15 meters.
Where to find: Western outskirts of Burhum. The birds there are fat, fly low. Draw the string, take the lead. Hitting a feathered target is harder than it seems.
North Crimson Desert
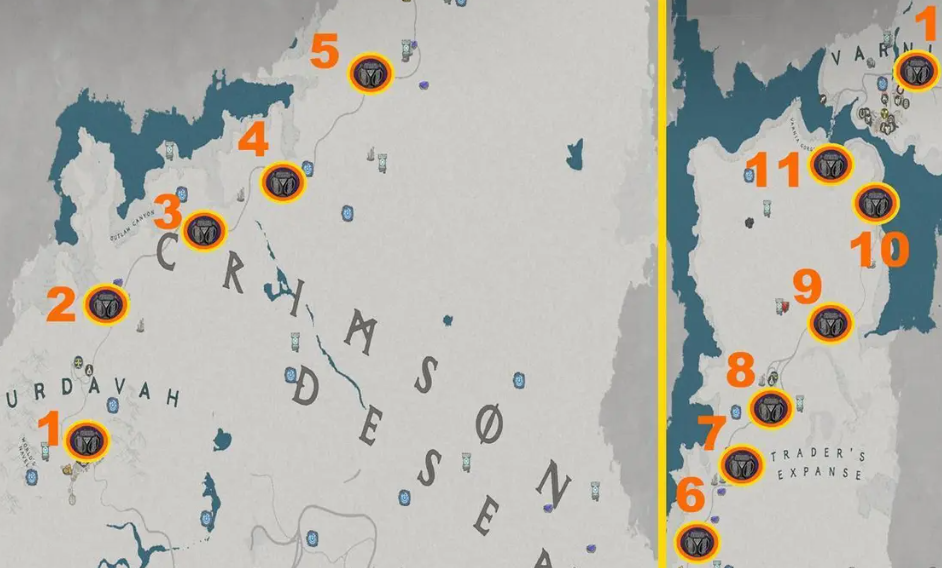
1. Through the Current
Task: One hundred meters at full speed without a break.
Where to find: Near the Salt Road the river is wide and calm. Swim with the current, save your strength. Stamina will run out quickly — so paddle rhythmically.
2. When Lightning Strikes III
Task: Three hits in one second from a pistol.
Where to find: Near the Salt Road there are plenty of targets. Shoot from the hip, in a fan. Even if not all the bullets reach the target, three in a second is realistic.
3. Provisions
Task: Three dishes with a field kitchen and three with a special cauldron.
Where to find: Near the Salt Road you’ll find all the ingredients. Field kitchen — for simple camp stews. Special cauldron — for potions and elixirs. Cook wisely.
4. Seven Strikes in a Row
Task: Nine enemies with a Power Strike in five seconds.
Where to find: Near the Salt Road enemies gather in packs. Build up the attack, crash into the thick of it. The Power Strike throws everyone in range.
5. End of Myth
Task: Track and skin the Silver Fang, White Bear, White-Scaled Crocodile, and White Bison.
Where to find: Near the Salt Road the hunt for legends begins. Rare beasts, tough hides. Each will require a special approach.
6. Special Weapon — Propeller Spear
Task: Five enemies at once with a wind attack.
Where to find: Near the Salt Road crowds stand in piles. Spin the spear, wait for a gust and release. The air wave will sweep away the nearest.
7. Hands Faster Than Eyes
Task: Five items in ten seconds.
Where to find: Near the Salt Road there are many merchants and onlookers. Weave through the crowd, slice purses. Ten seconds is one breath. Act on autopilot.
8. Special Weapon — Flamespitter
Task: Ignite ten enemies in fifteen seconds.
Where to find: Near the Salt Road it’s dry, everything burns well. Pour fire on the crowd, switch to new ones. The Flamespitter scatters flames wide.
9. Hidden Banner Pike
Task: Ten soldiers with banner pikes in Demeniss in thirty minutes.
Where to find: Near the Salt Road you’ll get a tip. Return to Demeniss, look for squads with pikes. Thirty minutes is enough if you know the patrol places.
10. Meteor Run in the Dark
Task: Two palisade gates at night.
Where to find: Near the Salt Road you’ll be briefed. Wait for darkness, sneak up to the enemy camp. The gates don’t break right away — you’ll need a ram or explosives.
11. Rainbow Mane
Task: Learn all dyeing techniques from dyers in all regions.
Where to find: Near the Salt Road you’ll be given the first hint. You’ll have to travel around to all the masters, pay for the lessons. But the steed’s mane will become unique.
12. Master of Throws
Task: Thirty enemies with a Meteor Kick in three minutes.
Where to find: Near the Salt Road there’s a training ground. Run up, jump, kick in the fall. Thirty targets in one hundred and eighty seconds — a frantic pace.
Summary of Abyss Artifacts in Crimson Desert
Now you know where all the Abyss artifacts hide and how to close the challenges bound to them. For other secrets of Crimson Desert, check out our guides and walkthroughs.