The boomerang in The Adventures of Elliot: The Millennium Tales isn’t just a throwing weapon. Your playstyle depends on which magicite you choose: whether you’ll use crowd control with stuns or maximize damage by building up your Hit Count. We’ll explore both paths and suggest the optimal build.
Table of Contents
Boomerang Builds for Control or Pure Damage
The developers have proposed two fundamentally different paths for boomerang development. The first is the control path, where the main tools are the Electric Boomerang and Pulse Throw. They transform each throw into a chance to stun the enemy, and if the enemy is already under a status effect, Pulse Throw adds an electric discharge and an additional chance to paralyze. The second path is pure damage, and here the emphasis is on Hit Count. The longer the boomerang flies, the more damage each subsequent hit inflicts—this mechanic is enhanced by the Biggun (which increases the size and slows the projectile) and the Satellite, which we’ll discuss separately.
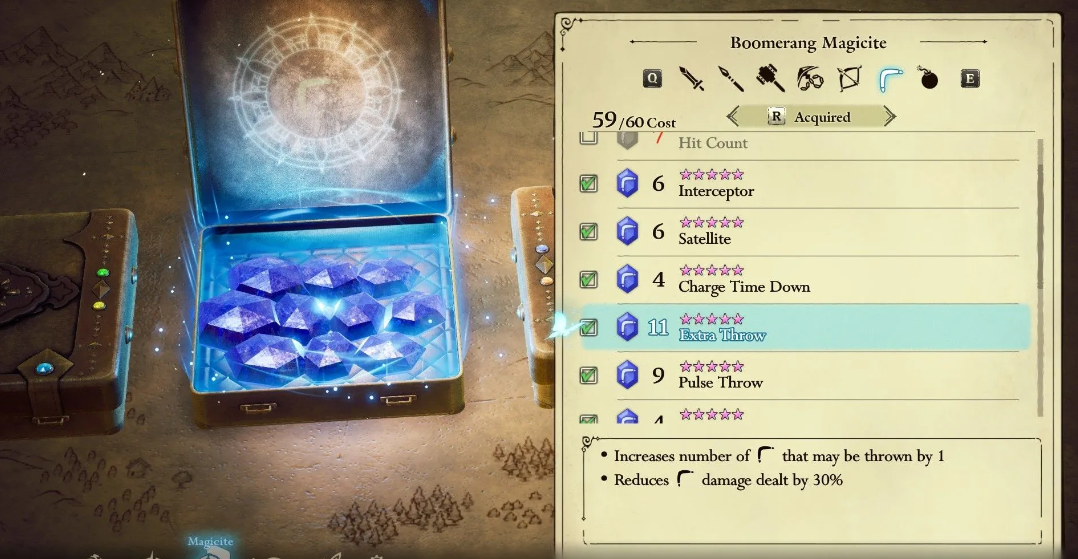
There are also two magicite that are always taken, regardless of the chosen tree. Extra Throw allows you to keep two boomerangs in the air at once (albeit with reduced damage), and Long Throw increases their flight time—critical for both control and Hit Count accumulation. Attack Up, meanwhile, becomes an automatic choice if there’s a free slot—plain but effective.
Features of Satellite Magicite Usage and Tactics
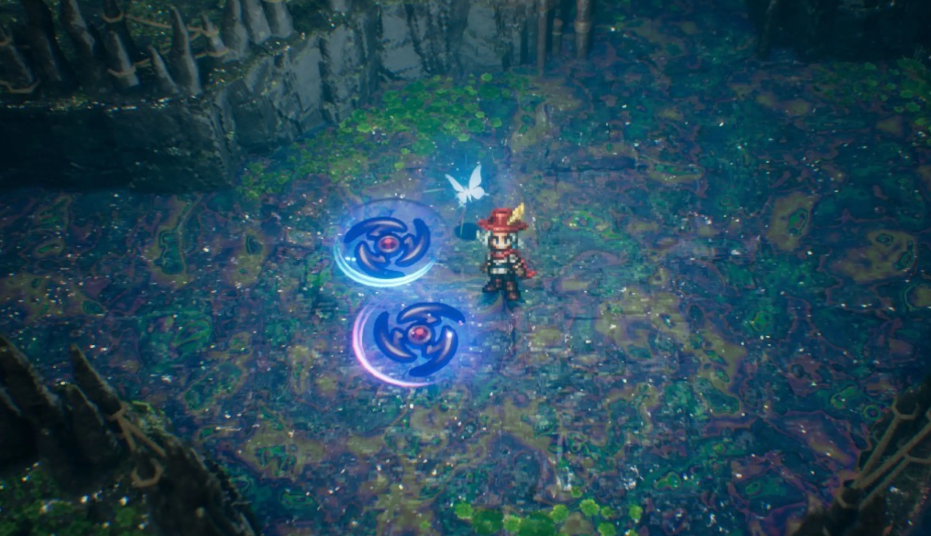
The most controversial magicite is Satellite. It weakens the character, but also radically changes tactics. Charged attacks begin to revolve around Elliot, turning a ranged style into a defensive close-range playstyle. Very risky, but a godsend for those who like to experiment.
Risky Throw is also worth mentioning: damage increases, but upon return, the boomerang also hits the hero. Playing with fire, but in the right hands, it provides a powerful boost. There are also purely utilitarian options: Interceptor intercepts enemy projectiles, Charge Time Down speeds up reloading, and Weapon Shift – Airborne increases the chance to hit other weapons while the boomerang is in the air. Critical modifiers (Stunned Efficacy, Critical Damage Up, Critical Rate Up) work in conjunction with stun— if you’ve chosen the crowd control branch, they’re essential.
A List of all Boomerang Magicite and Their Effects
Below are all available boomerang magicite with a brief explanation of their effects (names remain unchanged):
-
Electric Boomerang – Chance to stun an enemy on impact.
-
Hit Count – Damage increases with each boomerang hit while it’s in flight.
-
Interceptor – Boomerangs destroy enemy projectiles in mid-air.
-
Satellite – Charged attacks spin around Elliot (switch to melee combat).
-
Charge Time Down – Reduces the charge time of the throw.
-
Biggun – Increases the size of the boomerang but slows its flight.
-
Pulse Throw – Deals electric shocks to enemies with active status effects, additionally stunning them.
-
Risky Throw – Increases damage but deals damage to the player upon return.
-
Extra Throw — Allows you to wield two boomerangs simultaneously, but with reduced damage.
-
Weapon Shift — Airborne — While the boomerang is in the air, your other weapon gains a bonus to hit chance.
-
Attack Up — Directly increases boomerang damage.
-
Stunned Efficacy — Increases critical strike chance against stunned targets.
-
Critical Damage Up — Critical hits deal more damage.
-
Critical Rate Up — Critical hits occur more frequently.
-
Long Throw — Increases boomerang flight time.
Which Magicite Items Are Ruining Elliot’s Current Builds
Not every magicite in the game is truly beneficial — some artifacts downright hinder progression, reduce overall survivability, or take up precious slots. To avoid cluttering your slots with ineffective ballast, it’s worth weeding out questionable options in advance.
Weak Magicite for Elliot’s Starting Build
The Risky Throw artifact tempts with its massive damage output, but it also hides a serious danger. The problem lies in its mechanics: when the projectile returns, Elliot takes significant damage, causing his health bar to dwindle visibly during intense combat. This gem is only useful when paired with Satellite, as the boomerang barely follows a standard arc in this combination. In any other setup, you’ll be constantly losing HP.
Satellite alone is another questionable choice outside of the endgame, ruining positioning. Magicite forces Elliot to constantly engage in close combat, depriving him of a key advantage—the safe distance at which the boomerang excels. Considering Satellite only makes sense after unlocking five-star slots, building a heavy setup with Biggun and adding two additional projectiles.
Why Charge Time Down Gems Are Ineffective
The Charge Time Down gem seems useful only on paper. In practice, reducing the charge time quickly hits a system limit—the overall combat dynamics are tied to Hit Count and projectile flight time, not how fast you throw it. It’s much more beneficial to free up this slot and use a proven Attack Up or Long Throw.
As for Stunned Efficacy, without the right environment, this modifier becomes dead weight. Magicite increases critical damage exclusively against stunned enemies. If your build doesn’t include Electric Boomerang or Pulse Throw, the passive will never activate, wasting a slot.
Table of Ineffective Gems and Replacement Conditions
Remember: there are almost no bad gems in this game; everything depends on the synergy of a specific tree. Risky Throw, Satellite, or narrow crit modifiers only shine in the right context, and thoughtlessly installing them is guaranteed to weaken a character.
A Universal Boomerang Build Using Hit Count
In practice, the most versatile and reliable build is one centered around Hit Count. Take Extra Throw, Long Throw, and Biggun—they maximize the flight time, allowing Hit Count to accumulate high multipliers. Add Attack Up and, if you have room, one of the crit modifiers for the finishing push. Electric Boomerang and Pulse Throw are a great CC pairing, but they’re more optional in this build. Save Satellite for some experimentation—it changes the usual tactics too much. The end result is a weapon that’s equally effective in clearing crowds and in boss fights—tested in practice.
Top-tier Late-game Setup for Maximum Damage
At the start, the boomerang in The Adventures of Elliot: The Millennium Tales is truly disappointing. The throw is awkward, the damage is modest, and it seems easier to reach for a sword or bow. But magicite turns everything upside down—it affects this “toy” far more than any other weapon. And when you unlock all five-star slots, a completely different level opens up.
We’ve already discussed two main paths: control through Electric Boomerang and Pulse Throw, or pure damage through Hit Count. However, in the endgame, the lines blur. You can build a build that utilizes the best of both worlds—and isn’t afraid to take risks. The essential foundation—Extra Throw and Long Throw—remains unchanged: two boomerangs in the air and maximum flight time provide a huge advantage. Attack Up, if there’s an open slot, is also always useful.
But the key ingredient here is Satellite. Yes, the one we called controversial. In the endgame configuration, it ceases to be an experiment and becomes a key defensive element. Charged attacks begin to revolve around Elliot, turning the ranged style into something between a shield and a meat grinder. And when you add Biggun (increased size and slow), two boomerangs swirling around the hero create a dense damage cloud that’s hard to ignore.
Here’s the optimal setup for this tactic (all names retained):
-
Biggun
-
Hit Count
-
Long Throw
-
Interceptor
-
Risky Throw
-
Pulse Throw
-
Extra Throw
-
Satellite
-
Attack Up
How does it work in combat? You charge the throw, and the boomerangs (there are now two of them) remain near you, striking nearby enemies and intercepting incoming projectiles thanks to Interceptor. Each hit increases Hit Count, and Pulse Throw adds electrical discharges if enemies are already affected by a status effect. Risky Throw is a risky magicite that increases damage but also hits you when it returns. However, with Satellite, boomerangs barely return in the traditional sense—they constantly spin, minimizing return damage. It’s a bold move, but it pays off.
This build isn’t for beginners. It requires an understanding of positioning and charge timing. But if you master it, the boomerang will no longer be a secondary weapon—it will become your primary tool for both attack and defense, allowing you to feel confident against even the toughest bosses. Give it a try when you reach the maximum upgrade slot—you’ll either fall in love with it or revert to more predictable options. Either way, it’s worth the experiment.