Esper Cycles in Neverness to Everness are similar in many ways to elemental reactions in familiar RPGs. Two different attributes collide, creating a secondary effect that can seriously turn the tide of battle. These reactions are what build strong squads: a team without proper synergy will almost always lose to one where the player understands the mechanics. Let’s explore how Cycles work, how to trigger them, and how to enhance them.
Table of Contents
How Esper Cycles work and how to trigger them
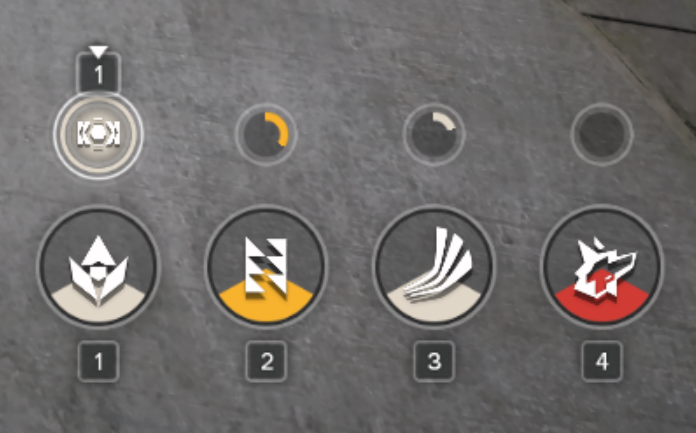
Esper Cycles are essentially elemental reactions in Neverness to Everness. The mechanics revolve around switching characters. Each character has Cycle Energy—a circular indicator to the left of their health bar. When you attack, the bar fills.

Now it gets interesting. You switch to another character (who’s not on the field), and if their attribute reacts with the active unit, that hero is deployed with a support skill. At the same time, a Cycle reaction occurs. If there’s no reaction, the character simply won’t enter combat with their skill.
Here’s an example. Haniel is Psyche, and Hathor is Lakshana. You boost Haniel’s Cycle Energy, then switch to Hathor. She charges into battle, activates her support, and triggers the “Stain” reaction. Yes, it works the other way around too—you boost Hathor’s energy, switch to Haniel, and you get the same effect.

How characters boost Cycles (and not necessarily even by participating in them)
Here’s the key nuance. Some characters boost their reactions simply by being in the party. For example, Blossom creates a “Vita Bud”—this thing fires up to five Vita Pistils at enemies every two seconds. And if Nunnally is in the party, Blossom starts spitting out pistils every second, up to ten. The character doesn’t necessarily have to personally trigger the reaction or participate in the Cycle. It’s enough that it’s simply sitting in the slot.

By the way, if you’re completely dissatisfied with your current squad composition, you can always reroll in NTE. But that’s a whole other story.
All Esper Cycle Reactions in NTE

There are six basic reactions in the game, which are triggered when switching between specific pairs of elements. These are Remora, Blossom, Nova, Scorch, Curse, and Stain. And if you combine two specific reactions, you can get stronger versions called Discord and Charge. But first things first.
Remora: Slowing and Debuffing Enemies
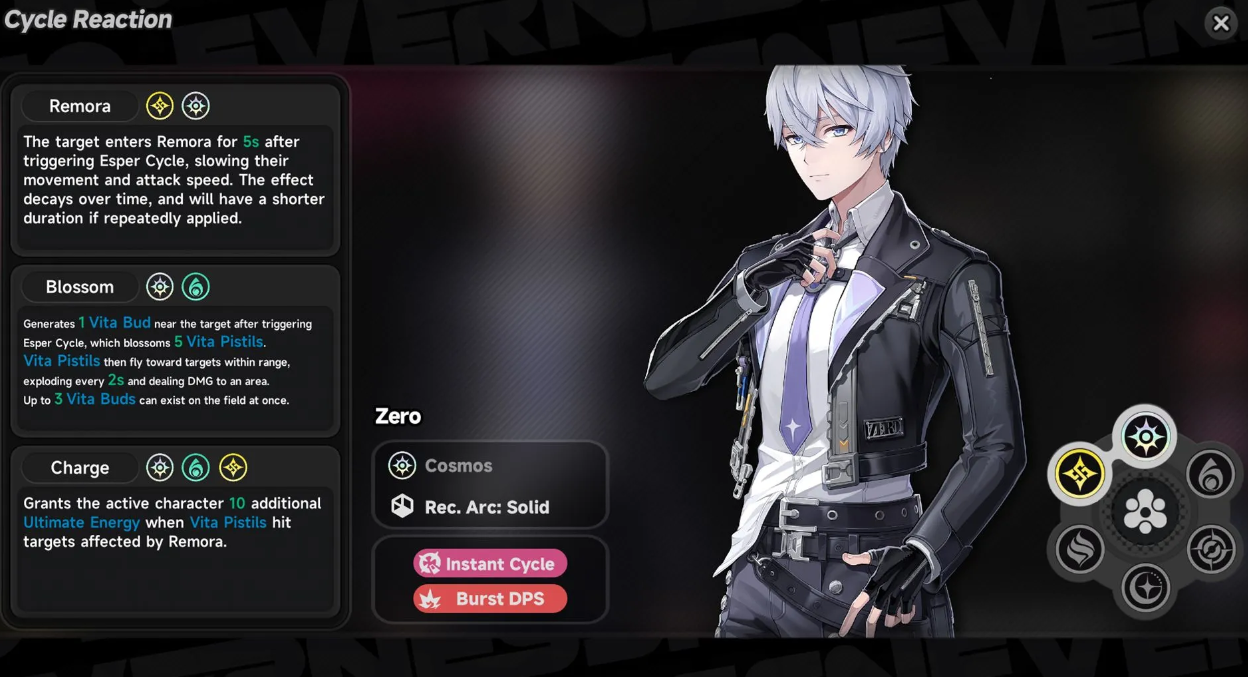
This reaction is triggered when Cosmos and Lakshana characters use a support skill back-to-back. The effect is simple: enemies receive a debuff for five seconds, reducing their movement speed and attack. When reactivated, the effect doesn’t refresh or stack, so you can’t use it indefinitely.
Frankly, Remora is one of the most useless reactions in NTE. She only becomes noticeable when paired with Charge or if Hathor is in the party with her passive “Delayed Warning.” Otherwise, we’ll just ignore her.
Blossom: Summoning Vita Pistils for Extra Damage
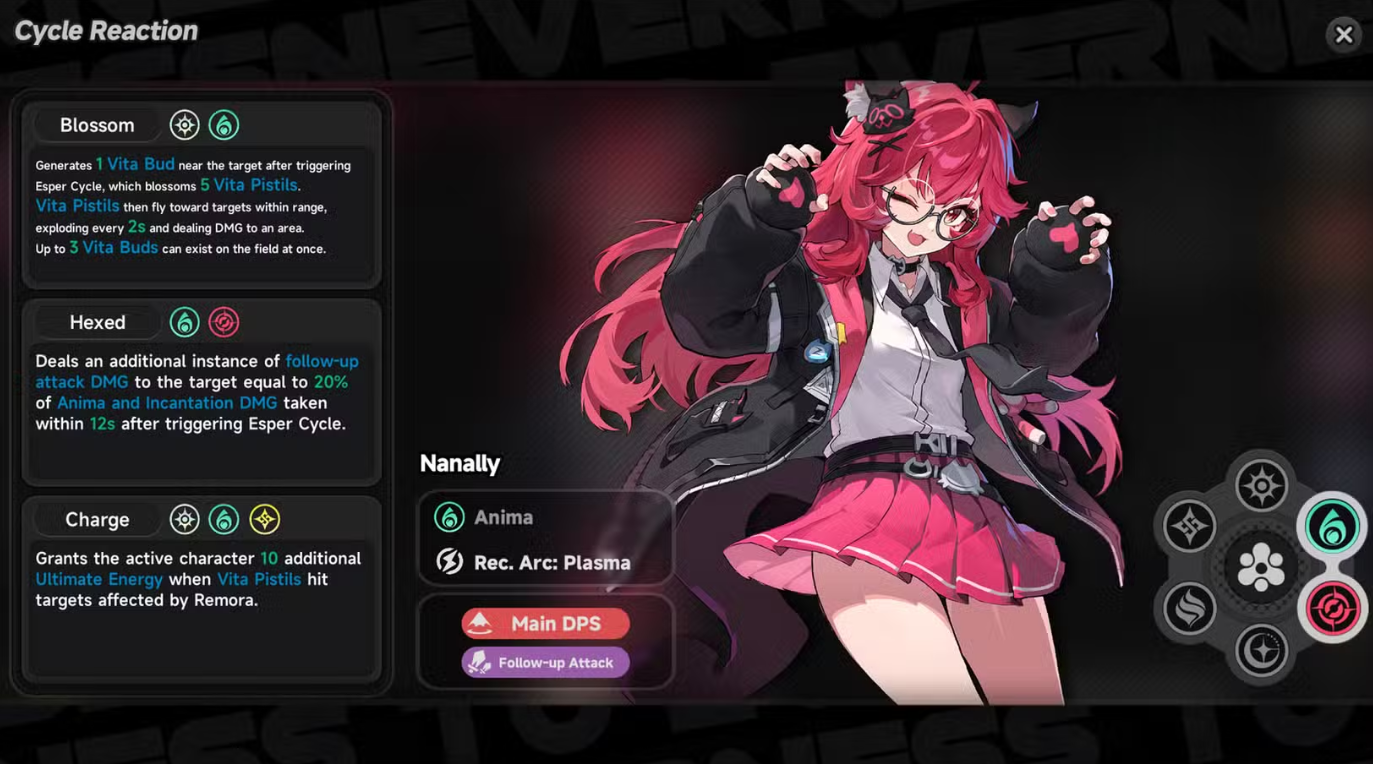
Now this is more interesting. Blossom is activated by Anima and Cosmic Espers. The reaction creates a Vita Bud, which fires a Vita Pistil at enemies every two seconds. Up to five in total.
Personally, I really like this cycle, especially if you have Nunnally on your team. Her “More Than Passion” ability makes the Pistils attack much more frequently—literally a new one arrives every second. A very nice synergy.
Nova: Powerful Mental AOE Explosion
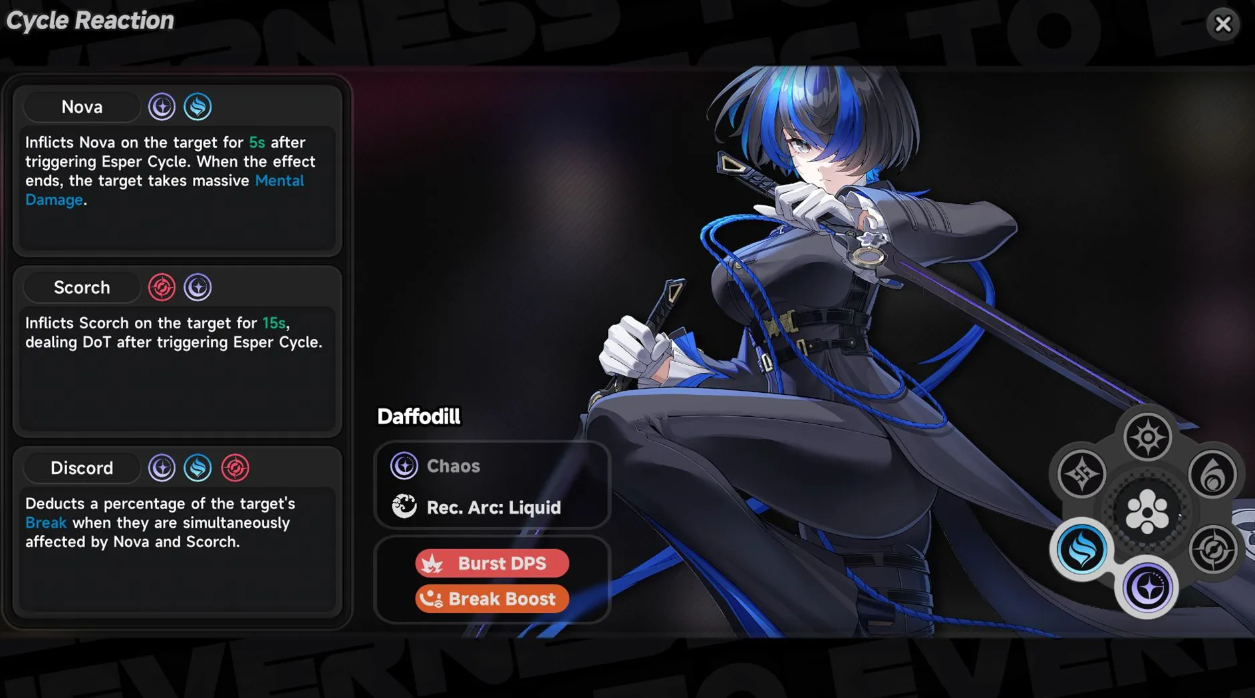
Here we’re dealing with the Chaos and Psyche elements. Nova attaches to enemies for five seconds, then explodes, dealing massive mental damage. And the main advantage: while you wait for the explosion, you can freely switch to other characters and do your own thing. This reaction is one of the best options for passive field control.
Scorch: Chaos Elemental DoT Damage
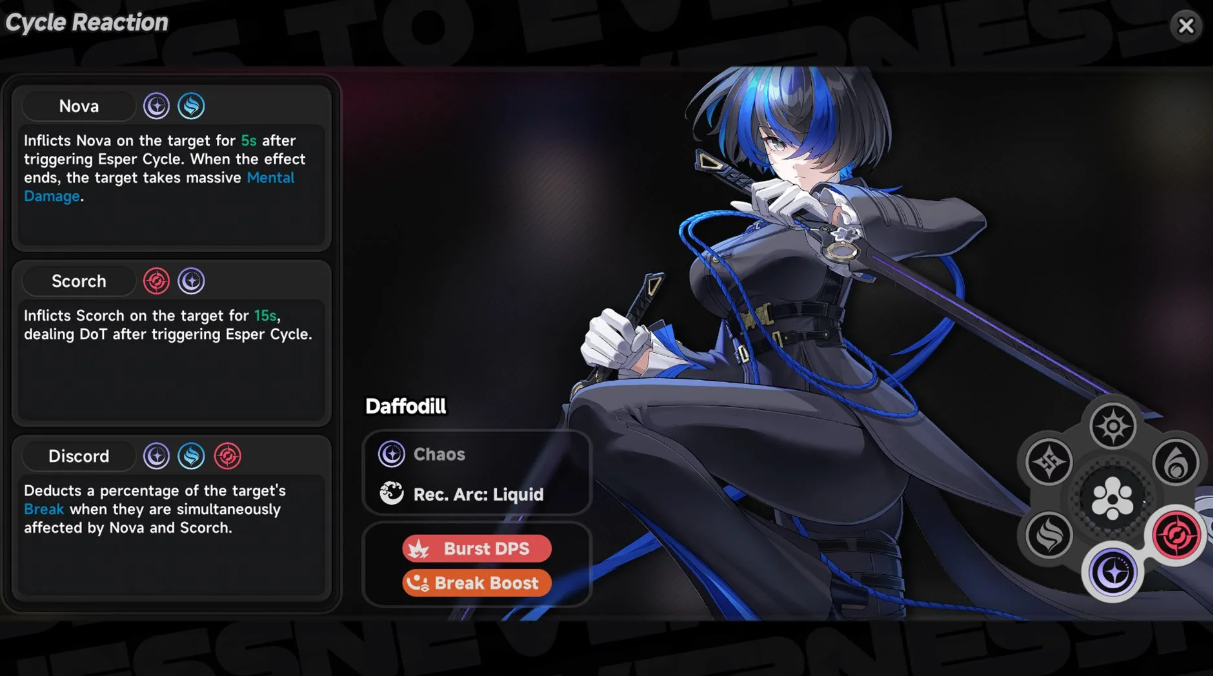
A combination of Chaos and Incantation. It’s simple: enemies take damage over time. A typical DoT debuff, but in the right hands, it’s very unpleasant. Especially if you have a strong Chaos character who can maintain this effect.
Curse: Anima and Incantation Damage Multiplier
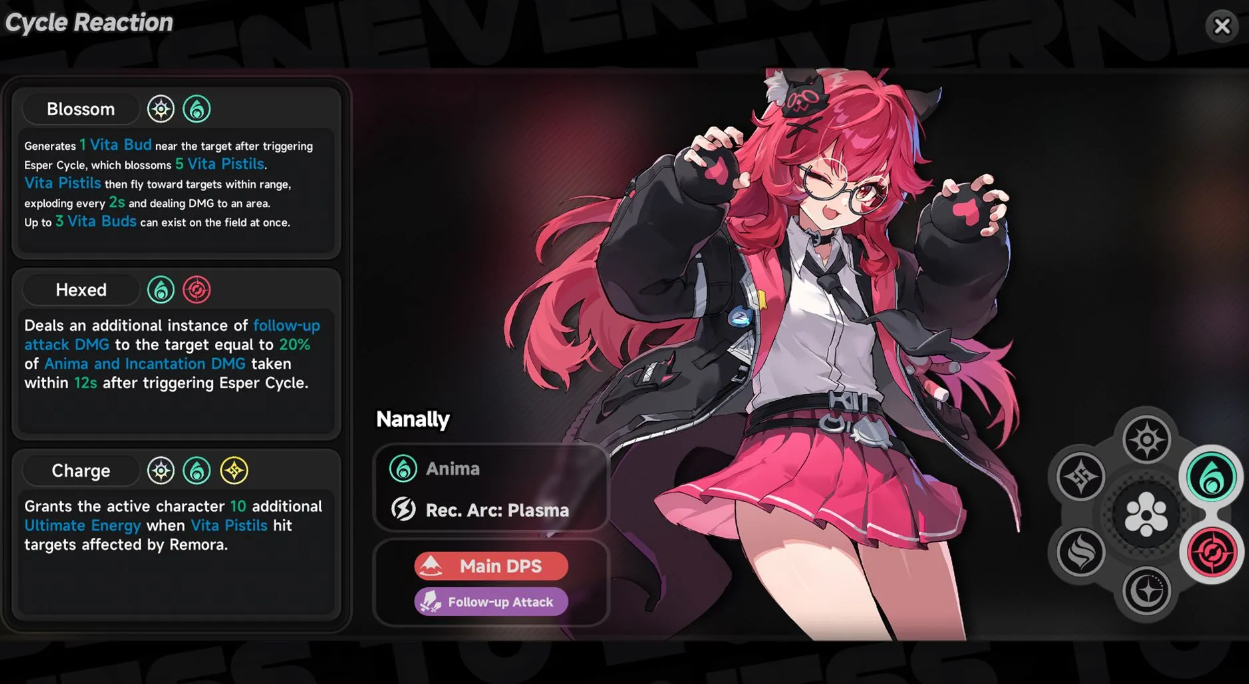
Activates when Anima and Incantation interact. Mechanics: after Curse is applied, enemies take an additional 20% damage—but only from sources of Anima or Incantation. This reaction isn’t universal, but it’s fully realized in a specialized build. Pairing it with characters that wield large weapons of the same type turns Curse into one of the most powerful reactions in NTE.
Stain: How to Increase Lakshan and Psyche’s Damage
One of the key mechanics in NTE relies on the clever blending of elements. Take, for example, the Esper Cycle “Stain.” To activate it, you need to have Lakshan and Psyche elemental characters in your party and use a support skill. It’s simple: enemies will receive a debuff that significantly increases damage from attacks of these two elements. Building a team around Lakshana or Psyche as your primary damage dealers? “Stain” will be your ideal reaction for maximum profit.
Discord: Chaos, Incantation, and Enemy Penetration
The mechanics here are more complex. “Discord” can only be activated if your team includes characters of three elements: Psyche, Chaos, and Incantation. Chaos is the central element here. To trigger the reaction, you need to simultaneously apply both “Scorch” and “Nova” to enemies. An important detail: “Scorch” lasts 15 seconds, while “Nova” lasts only five. Logic dictates: apply “Scorch” first, then quickly apply “Nova.” Once both effects are applied to the target, “Discord” will trigger. What does it do? It reduces the target’s penetration threshold. In simple terms, the enemy will become much easier to penetrate, requiring fewer hits. While both debuffs are active, it’s as if you’re peeling away the enemy’s outer protective shell.
Building a Combo Using a Squad as an Example
How do you apply this theory in practice? Let’s say you’ve assembled a squad of Daffodil, Haniel, and Baitzan. The sequence is as follows:
-
Launch Scorch. Baitzan will immediately buff it, increasing its overall damage.
-
Then the Haniel and Daffodil combo comes into play. Their job is to simultaneously cast Nova on the same enemies and activate Discord.
What does this do? Haniel will buff Nova, further increasing your entire team’s ATK%. And Daffodil, in turn, will further reduce the enemy penetration threshold. A good synergy that will significantly increase your squad’s effectiveness in battle (especially Haniel).
By the way, if you’re planning your build for the future, don’t rush to knock out every Esper in a row. It’s much more useful to find out in advance which banners will be appearing in the NTE soon. This will save you resources and create a truly synergistic team.
Charge: How to Quickly Build Your Ultimate with Remora and Blossom
The third important Esper Cycle is “Charge.” To activate it, you need characters of the Lakshana, Cosmos, and Anima elements in your party. The reaction center is Cosmos. Requirement: simultaneously apply the effects of Remora and Blossom to enemies. There’s an automatic trigger. When you apply Remora and the active Vita Bud attacks enemies, Charge is automatically activated. And every time the Vita Pistil hits an enemy under Remora, the active hero gains 10 Ultimate energy. Not a bad boost.
Who benefits from this? A character who relies heavily on their Ultimate and belongs to one of the three elements mentioned above. By activating Charge, you’re guaranteed to feed it energy—it remains active and receives all the energy. Convenient.
Assembling a team: Main Character, Hathor, and Nunnally
Let’s use an example. Let’s take the combination of Main Character, Hathor, and Nunnally.
-
Main Character and Hathor cast Remora. Hathor increases the duration of the entire Esper Cycle from five to twelve seconds. A noticeable difference.
-
Then we activate Blossom between Main Character and Nunnally. Nunnally amplifies this reaction—more Vita Pistils, more hits.
Now the mechanics: while Nunnally is active, enemies take damage from Blossom while under Remora. Each Vita Pistil hit adds 10 energy to Nunnally’s ultimate. And most of her damage is tied to her ultimate. It’s a vicious cycle: hit, charge your ultimate, ult, hit even harder.
Trio Reactions for Challenging Fights
The author of the source recommends combinations of three elements for the most hardcore battles. Two key reactions stand out.
-
Charge (Remora + Bloom) – brilliant for quickly recharging. Your attacks begin to regenerate your ultimate energy several times faster. Suitable for protracted fights, where each ultimate decides the outcome.
-
Dissonance (Nova + Scorch) – the best tool against armored targets. This reaction rapidly burns through the enemy’s penetration bar, stunning them. Essentially, you break their defenses and leave the enemy helpless.
Tellingly, both options revolve around the same mechanics – stacking effects and timely switching of the active character. Master them, and you’ll be able to complete any endgame content in the NTE without any problems.
Speaking of banners. If you’re just putting together a team for these reactions, don’t rush to waste resources on random Espers. First, scout out who’s appearing in the next Neverness to Everness banners—they might have the perfect triggers for Charge or Dissonance.
How to Activate Elemental Reactions in Neverness to Everness
Many newcomers to Neverness to Everness make the classic mistake of trying to mash the hero cycle buttons in hopes of a random profit. It doesn’t work that way. To trigger a devastating chain of effects, you first need to fill the active cycle system meter. The meter is located on the right side of the screen—as soon as it flashes, it’s time. Energy builds up during standard brawls: spam auto attacks, use active skills, and don’t forget about timing dodges. Without this, there won’t be any “bang.”
Most fighters in Neverness to Everness are additionally tied to passive talents. These passives significantly increase the efficiency of certain elements, so you shouldn’t build a pack based on “who’s the prettiest,” but rather for a specific elemental synergy.
Which deck should you choose for dominance?
The choice of setup depends on your playstyle. You can go for control and choke enemies with Remora’s slow, or you can go for total annihilation. In the latter case, the burst damage of Nova and Scorch is ideal—the numbers on the screen will go crazy. It’s important to understand: either you dictate the battlefield or you just randomly swap character models.
Key Reaction Mistakes: How Not to Ruin Your Build in Neverness to Everness
Many builds are built purely for the visuals. Throw in GG, Nunnally, Blossom, and Hathor—oh, how beautiful! But the profit is zero. In the realities of NTE, such a hodgepodge is completely unplayable: there’s no synergy, a stable Blossom doesn’t proc, and a well-designed Remora or Scorch are just a dream. Each Esper on the team must fulfill a specific role (secondary damage dealer or trigger).
Another surefire way to lose a match is to play a stationary tank. Sticking to one hero? In vain. Local fights require aggressive rotation, not boring button-clicking. If you don’t change your active hero for too long, you simply lose all combat potential: damage drops, control fades, and your ultimate doesn’t build. Powerful combinations like Dissonance are designed exclusively for constant swapping.
But even with a perfect setup, it’s easy to screw up your cast. Let’s look at the critical mechanics that plague new players:
-
Swapping with an empty bar. The most common failure. First, hit with auto attacks or dodge, wait for the Cycle indicator to brighten, and only then press the swap. Wasted clicking just to get a support to come out is useless.
-
Broken debuff timings. Let’s say Scorch’s status lasts 15 seconds, while Nova’s lasts only 5. The obvious step is to cast the long-lasting effect first, then the short one. Otherwise, the starting window for a powerful trio reaction will simply burn out.
-
Wrong element on the field. Did you roll out a promising Lakshana and Psyche combo? Great. But accidentally deploy a Chaos Esper, and the necessary “Stain” reaction instantly breaks. The entire build goes down the drain.
-
One-sided greed. Trying to apply all statuses at once with one character is a bad idea. Discord, for example, only works with a smart swap of the active unit, not from chaotic skill spamming in a solo fight.
Ultimately (and this is no exaggeration), the difference between a casual and a pro lies in micromanagement. An experienced player clearly understands the value of each transfer, lining up debuffs into a deadly chain. And the newbie hopes for a random cast.
Read on for the guide: How to lower your wanted level?