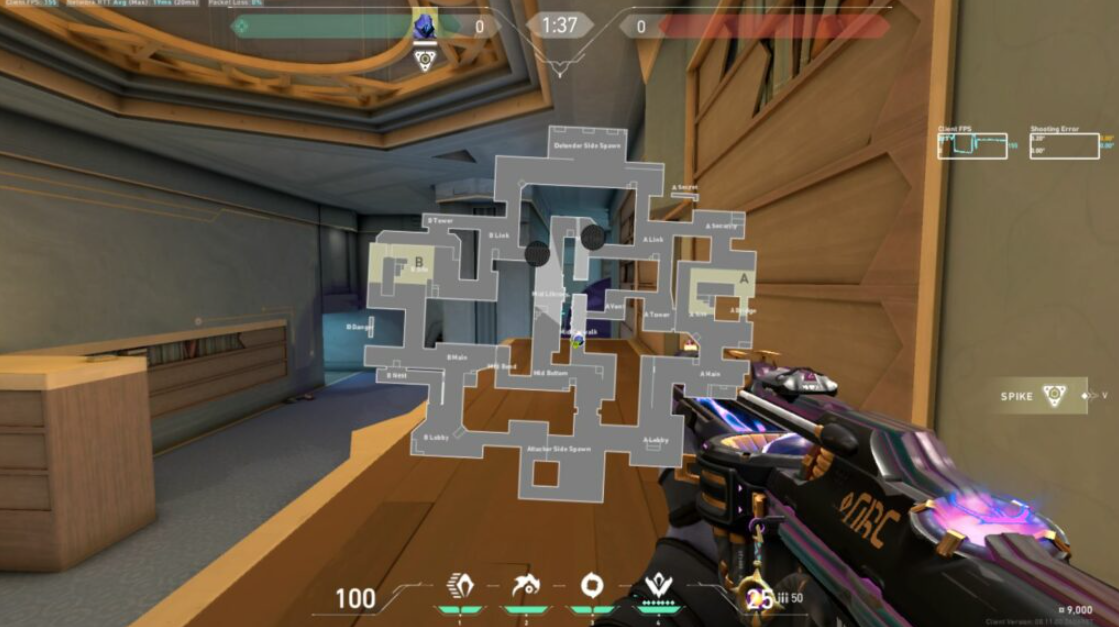
Valorant’s new Abyss map is shaking up the gameplay, forcing players to adapt their strategies to claim victory. As a Controller, mastering the best smoke placements on Abyss is crucial. This unique map offers elevated positions and deadly drop-offs that Controllers can leverage to pressure opponents and control the battlefield. The map’s central, cavernous layout creates choke points and flanking opportunities that require expertly placed smokes to secure. Whether you’re spearheading an assault or fortifying your team’s defenses, understanding these impactful smoke grenade spots can make all the difference in tipping the scales of an Abyss match in your favor. Strategically blocking off sightlines, obscuring rotations, and denying map control are all ways that Abyss’ smoke placements can swing the tide of battle.
For attacking, smokes can create safe paths to push key objectives like the A or C site captures. Denying the defending team’s vision and ability to accurately respond can allow your squad to gain the upper hand. Controlling the high ground with well-placed smokes also prevents the defense from establishing strong positions to rain down fire. On the flip side, defensive smoke placements can seal off flanks, cut off rotations, and buy time for your team to set up. Smoking off common attack angles forces the offensive to either reposition or push blindly into your traps. Creatively using Abyss’ elevation and environmental hazards, you can create no-go zones that the enemy must navigate through smoke at great risk. Mastering Abyss’ smoke lineups, both for attack and defense, takes practice but can be a game-changer. With the right smokes in the right places, you can dramatically tilt the balance of an Abyss match in your team’s favor. Understanding these crucial Controller abilities is key to outmaneuvering opponents and emerging victorious on this challenging new Valorant battleground.
Table of Contents
The Essential Abyss Smoke Grenade Lineups to Command the Battlefield
Attackers: A site push
When attacking the A site on Abyss, it’s important to consider the key defensive positions at A Tower and A Bridge. Strategically placing smokes can help your team gain control and cover for the plant. One effective smoke lineup is to block off the ground entrance to A site. This prevents the defenders at A Tower from having vision on you as you push in and clear the right side of A Bridge. Eliminating that angle of attack gives you safer space to plant the spike. Alternatively, you can opt to smoke off A Bridge itself. Placing a smoke next to the crates discourages defenders from pushing through that choke point, as the limited space makes them vulnerable. This smoke can help isolate and cut off rotations to A site. Whether you choose to smoke the entry or the bridge, utilizing these strategic smoke placements can be the difference maker in successfully capturing the A bombsite. Carefully considering your smoke lineups to counter the defenders’ positions is crucial for Abyss attacks. On the flip side, when defending the A site, Controllers have their own set of crucial smoke lineups to master. Placing a smoke on the right side of A Bridge can block off a common attacking angle, forcing the offense to either push through the smoke at risk or look for alternate routes. This buys time for your team to rotate and set up. Additionally, a smoke on the left side of A Bridge, near the elevated position, can cut off vision and crossfires from the A Lamps area. This makes it harder for attackers to safely push up the bridge or gain map control in that region.
Combining these A Bridge smokes with one blocking the ground floor entrance can create a formidable defensive setup. The attackers are funneled into a kill box, with limited options to safely advance. Your team can then focus fire and abilities on the chokepoints, maximizing the defensive advantage. Beyond A site, there are other essential smoke placements on Abyss that Controllers should have in their arsenal. On the B site, a smoke on the left side of the B Hallway entrance can shut down a common attacking path. Coupled with a smoke on the right side of B Heaven, this creates a protective screen for your team to hold the site. For the middle area, a smoke on the elevated C Platform can isolate that angle and prevent the offense from gaining map control. Combining this with a smoke on the C Long entrance keeps the middle area locked down, forcing the attackers to choose riskier flanking routes. These are just a few examples of the impactful smoke placements that can swing the balance of an Abyss match. Mastering the key smoke lineups, both on attack and defense, is crucial for Controllers looking to dominate this challenging new Valorant map.
However, executing these smokes effectively requires practice and an understanding of the map’s layout and flow. Factors like timing, coordination with your team, and adaptability to the evolving battlefield all play a role in maximizing the impact of your smoke grenade usage. For instance, on attack, you may need to adjust your smoke placements if the defenders show a tendency to quickly reposition or flank around your initial setups. Being able to quickly identify threats and respond with new smoke placements can keep the offense unpredictable and disrupt the defenders’ plans. Likewise, on defense, you’ll need to adapt your smoke locations based on the attackers’ tendencies and strategies. If they repeatedly attempt to push through a certain chokepoint, doubling down on those critical smoke lineups can shut them down. Anticipating the offense’s movements and countering them with well-placed smokes is key to a successful defensive effort on Abyss. Ultimately, mastering Abyss smoke placements, both for attack and defense, requires a deep understanding of the map’s geography, the flow of combat, and the ability to think several steps ahead of your opponents. With practice and the right strategic mindset, Controllers can leverage these essential smoke lineups to decisively influence the outcome of Abyss matches.
B site push
When defending the B site on Abyss, there are a couple of key angles that Controllers should focus on smoking off to create the optimal defensive setup. The first crucial smoke is on the B Tower entry point. This directly blocks the line of sight from one of the primary attacking routes into the site. Denying the attackers clear vision from this angle makes it much more challenging for them to push in and overwhelm your team’s position. Additionally, you’ll want to smoke just below the B Tower, covering the entrance from B Link. Placing the smoke near the crates on the ground can help maximize the cover it provides. This forces the attacking team to either push blindly through the smoke or find an alternate path, both of which play into your defensive advantage. However, you don’t necessarily want to completely seal off B Link with the smoke. Leaving a small gap can create an opportunity to catch any overaggressive attackers who try to exploit that opening. They may assume your team has fully committed to holding the B Tower angle and attempt to sneak through the B Link smoke, only to run into your awaiting crossfire. By carefully positioning these B site smokes, you can effectively channel the attackers into your team’s killing zones, while also maintaining some flexibility to punish over-eager pushes. This balanced approach to smoke placement allows your team to lock down the B site area and increase your chances of a successful defensive hold. Of course, the specifics of your smoke lineups may need to adapt based on your team’s composition, the attackers’ tendencies, and the evolving flow of the match. But mastering these core B site smoke placements is a great starting point for Controllers looking to fortify their Abyss defense.
Beyond the B site, there are other crucial smoke locations on Abyss that Controllers should have in their arsenal. In the middle area, a well-placed smoke on the elevated C Platform can cut off a common angle of attack, forcing the offense to find riskier flanking routes. Combining this with a smoke on the C Long entrance creates a protective barrier that makes it difficult for the attackers to gain a foothold in the middle. On the A site, in addition to the smokes mentioned earlier, a smoke on the right side of A Lamps can be extremely valuable. This blocks off a common angle that defenders often hold, making it harder for the attackers to safely push up that pathway. Coupled with the smokes on A Bridge and the ground entrance, this comprehensive A site smoke setup can funnel the offense into your team’s crosshairs.
Mastering these essential smoke placements across the different regions of Abyss is crucial for Controllers looking to excel on this map. However, it’s not enough to simply know the lineups – you also need to understand the situational nuances and adaptability required to maximize their impact. For example, on attack, your smoke lineups may need to evolve based on the defenders’ tendencies. If they show a tendency to quickly reposition or flank around your initial smokes, you’ll need to adjust your placements accordingly. Being able to identify threats and respond with new smoke setups can keep the offense unpredictable and disrupt the defenders’ plans. Similarly, on defense, you’ll need to adapt your smoke locations based on the attackers’ strategies. If they repeatedly attempt to push through a certain chokepoint, doubling down on those critical smoke lineups can shut them down. Anticipating the offense’s movements and countering them with well-placed smokes is key to a successful defensive effort on Abyss.
Ultimately, excelling at Abyss smoke placements, both for attack and defense, requires a deep understanding of the map’s geography, the flow of combat, and the ability to think several steps ahead of your opponents. With practice and the right strategic mindset, Controllers can leverage these essential smoke lineups to decisively influence the outcome of Abyss matches. Beyond just the technical execution of the smoke lineups, effective communication and coordination with your team are also crucial. Calling out your smoke placements, timing them to support your team’s pushes or rotations, and working in tandem with your Sentinel and Duelist players can amplify the impact of your smoke control. For instance, on defense, synchronizing your smoke placements with your team’s abilities can create lethal setups. Placing a smoke on B Link to block off that avenue of approach, and then having your Sentinel lock down that space with a Cypher Cage or your Duelist flash the area, can catch the attackers in a deadly crossfire. Similarly, on attack, coordinating your smoke placements with your team’s positioning and abilities can help you break through stubborn defensive setups. Smoking off a key angle to isolate defenders, while your Duelist or Initiator follows up with a coordinated push or ability usage, can tip the scales in your favor. Mastering the art of Abyss smoke placements, both in terms of the technical lineups and the strategic synergy with your team, is a hallmark of skilled Controllers. It requires a deep understanding of the map, adaptability to the evolving battlefield, and the ability to think several steps ahead of your opponents. By investing the time and effort to perfect your Abyss smoke control, you can become a invaluable asset to your team, shaping the flow of the map and creating decisive advantages. Whether you’re attacking or defending, these essential smoke lineups can make all the difference in securing victory on this challenging new Valorant battleground.
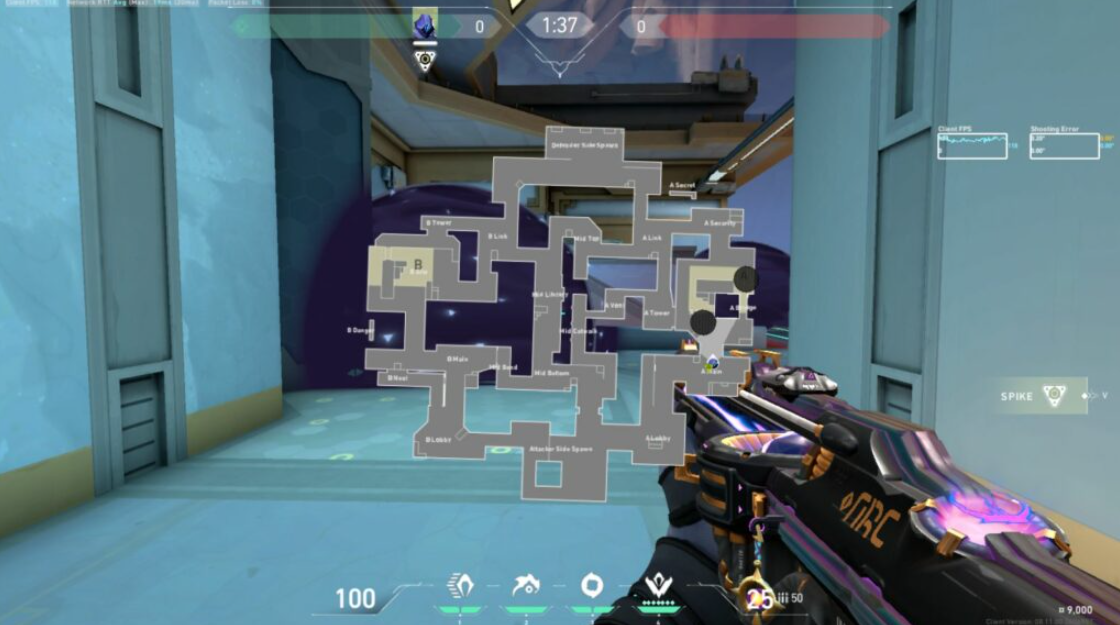
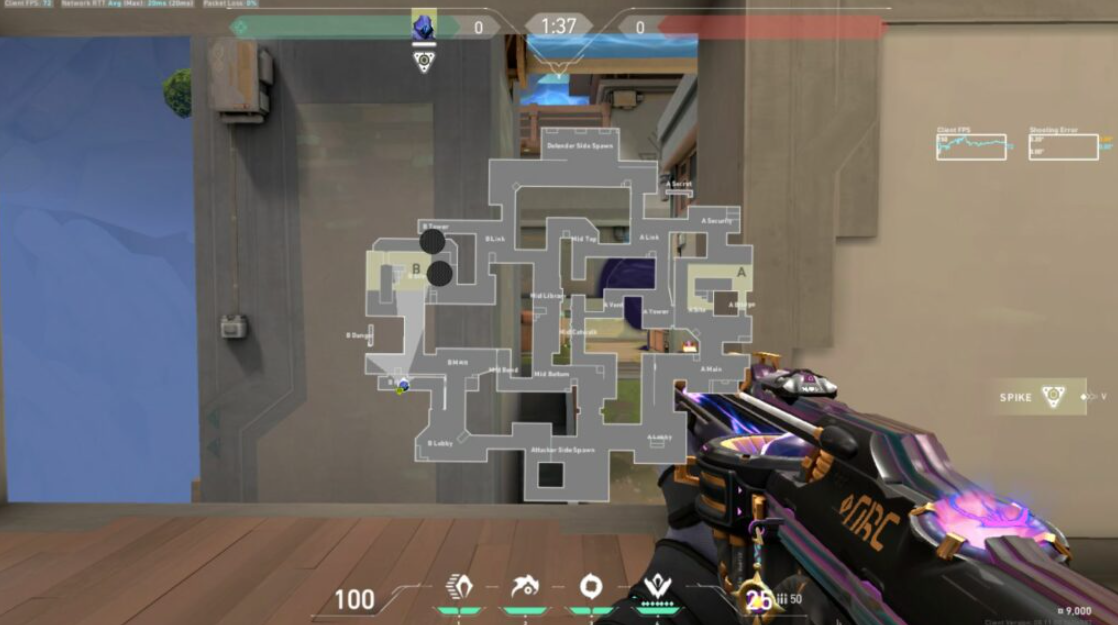
Mid push
The first crucial smoke is on the B Tower entry point. This directly blocks the line of sight from one of the primary attacking routes into the site. Denying the attackers clear vision from this angle makes it much more challenging for them to push in and overwhelm your team’s position. Additionally, you’ll want to smoke just below the B Tower, covering the entrance from B Link. Placing the smoke near the crates on the ground can help maximize the cover it provides. This forces the attacking team to either push blindly through the smoke or find an alternate path, both of which play into your defensive advantage. However, you don’t necessarily want to completely seal off B Link with the smoke. Leaving a small gap can create an opportunity to catch any overaggressive attackers who try to exploit that opening. They may assume your team has fully committed to holding the B Tower angle and attempt to sneak through the B Link smoke, only to run into your awaiting crossfire. By carefully positioning these B site smokes, you can effectively channel the attackers into your team’s killing zones, while also maintaining some flexibility to punish over-eager pushes. This balanced approach to smoke placement allows your team to lock down the B site area and increase your chances of a successful defensive hold. Of course, the specifics of your smoke lineups may need to adapt based on your team’s composition, the attackers’ tendencies, and the evolving flow of the match. But mastering these core B site smoke placements is a great starting point for Controllers looking to fortify their Abyss defense. Beyond the B site, there are other crucial smoke locations on Abyss that Controllers should have in their arsenal. In the middle area, a well-placed smoke on the elevated C Platform can cut off a common angle of attack, forcing the offense to find riskier flanking routes. Combining this with a smoke on the C Long entrance creates a protective barrier that makes it difficult for the attackers to gain a foothold in the middle. On the A site, in addition to the smokes mentioned earlier, a smoke on the right side of A Lamps can be extremely valuable. This blocks off a common angle that defenders often hold, making it harder for the attackers to safely push up that pathway. Coupled with the smokes on A Bridge and the ground entrance, this comprehensive A site smoke setup can funnel the offense into your team’s crosshairs.
Mastering these essential smoke placements across the different regions of Abyss is crucial for Controllers looking to excel on this map. However, it’s not enough to simply know the lineups – you also need to understand the situational nuances and adaptability required to maximize their impact. For example, on attack, your smoke lineups may need to evolve based on the defenders’ tendencies. If they show a tendency to quickly reposition or flank around your initial smokes, you’ll need to adjust your placements accordingly. Being able to identify threats and respond with new smoke setups can keep the offense unpredictable and disrupt the defenders’ plans. Similarly, on defense, you’ll need to adapt your smoke locations based on the attackers’ strategies. If they repeatedly attempt to push through a certain chokepoint, doubling down on those critical smoke lineups can shut them down. Anticipating the offense’s movements and countering them with well-placed smokes is key to a successful defensive effort on Abyss. Ultimately, excelling at Abyss smoke placements, both for attack and defense, requires a deep understanding of the map’s geography, the flow of combat, and the ability to think several steps ahead of your opponents. With practice and the right strategic mindset, Controllers can leverage these essential smoke lineups to decisively influence the outcome of Abyss matches. Beyond just the technical execution of the smoke lineups, effective communication and coordination with your team are also crucial. Calling out your smoke placements, timing them to support your team’s pushes or rotations, and working in tandem with your Sentinel and Duelist players can amplify the impact of your smoke control. For instance, on defense, synchronizing your smoke placements with your team’s abilities can create lethal setups. Placing a smoke on B Link to block off that avenue of approach, and then having your Sentinel lock down that space with a Cypher Cage or your Duelist flash the area, can catch the attackers in a deadly crossfire. Similarly, on attack, coordinating your smoke placements with your team’s positioning and abilities can help you break through stubborn defensive setups. Smoking off a key angle to isolate defenders, while your Duelist or Initiator follows up with a coordinated push or ability usage, can tip the scales in your favor.
Mastering the art of Abyss smoke placements, both in terms of the technical lineups and the strategic synergy with your team, is a hallmark of skilled Controllers. It requires a deep understanding of the map, adaptability to the evolving battlefield, and the ability to think several steps ahead of your opponents. By investing the time and effort to perfect your Abyss smoke control, you can become a invaluable asset to your team, shaping the flow of the map and creating decisive advantages. Whether you’re attacking or defending, these essential smoke lineups can make all the difference in securing victory on this challenging new Valorant battleground. When it comes to the mid area on Abyss, smoke placement can be crucial for controlling that critical choke point. As a Controller, you have a few different options to consider when deciding how to best utilize your smoke abilities. One effective approach is to smoke off the elevated Mid Top position. This denies long-range sightlines for the enemy team, preventing them from setting up with powerful scoped weapons like the Marshal, Outlaw, or Operator. Blocking this high ground vantage point can make it much harder for the opposition to hold mid control. Alternatively, you can opt to place your smoke in the space between B Link and Mid Library. This covers another common angle that snipers like to watch, further restricting the enemy’s ability to dominate the mid area. If you only have a single smoke available, focusing it in the B Link – Mid Library gap can be a solid choice. This allows you to cut off a key entry point while also obscuring vision for long-range weapons. While it may not be as comprehensive as splitting your smokes, this singular placement can still go a long way in disrupting the enemy’s mid control. Of course, the specific smoke placements you choose will depend on the flow of the match and your team’s overall strategy. But understanding these core mid smoke spots and their impact is crucial for Controllers looking to excel on Abyss. It’s also worth noting that having one or two teammates accompany you on a mid push can significantly increase your chances of success, even with limited smoke coverage. Their presence and abilities can help compensate for the lack of full smoke control, allowing your team to aggressively challenge for mid dominance.
By combining well-placed smokes with coordinated team support, Controllers can tip the scales in their favor when it comes to the crucial mid area on Abyss. Mastering these smoke lineups and adapting them to the evolving situation can make all the difference in securing and maintaining that all-important mid control. Another key consideration for Controllers on Abyss is how to utilize their smoke abilities on the A site. While the B site and mid area are certainly critical, the A site also requires a well-thought-out smoke strategy to successfully defend or attack. On the defensive side, one crucial smoke is on the A Bridge entry point. This blocks off a common avenue of approach, forcing the attackers to either push through the smoke or find an alternative route. Combining this with a smoke on the ground-level A site entrance creates a sturdy barrier that makes it challenging for the offense to gain a foothold. Additionally, a smoke on the right side of A Lamps can be extremely valuable. This obscures a common angle that defenders often hold, making it harder for the attackers to safely push up that pathway. Pairing this with the smokes on A Bridge and the ground, you can funnel the offense into your team’s crosshairs, maximizing your defensive potential. When it comes to attacking the A site, your smoke placements can be just as crucial. A well-placed smoke on A Bridge can deny the defenders their sightlines and create an opening for your team to push forward. Combining this with a smoke on the ground entrance can force the defenders to reposition or get caught in the open. Furthermore, a strategic smoke on the right side of A Lamps can cut off a key angle that the defenders often use to lock down that area. This can allow your team to advance more safely and set up for a more coordinated assault on the site. As with the other areas of Abyss, the specific smoke placements you choose for the A site will depend on the flow of the match, your team’s composition, and the tendencies of the opposing squad. Adaptability and a deep understanding of the map’s geography are crucial in order to maximize the impact of your smoke control.
Defenders: A site defense
Smoking at the A Main entrance is a crucial defensive tactic to deny easy access for attackers trying to breach the site. By obscuring their vision and movement, the smoke screen creates an effective barrier that forces the enemy team to approach more cautiously and carefully. This buys valuable time for your team to set up and prepare their defenses. Additionally, the space between the A Main entrance and A Tower can be leveraged as an ambush position. Positioning your team strategically in this area allows you to catch unsuspecting attackers in a deadly crossfire as they attempt to push through the smoke. This sort of coordinated defensive setup can completely shut down an enemy advance and turn the tides of the round in your favor.
To truly maximize the effectiveness of this defensive position, pairing the smoke screen with an Initiator agent like Sova is highly recommended. Sova’s suite of recon abilities, such as his Owl Drone and Shock Darts, can provide critical information on enemy positioning and movement patterns within the smoke. By combining this intel with the controlled chaos of the smoke, your team can get the jump on the attackers and swiftly eliminate them before they can gain a foothold on the site. The synergy between the smoke screen, the ambush location, and the Initiator agent’s utility creates a formidable defensive fortress that is difficult for the attacking team to overcome. This strategic setup not only denies the enemy’s access but also allows your team to take a proactive stance and dictate the flow of the engagement on your own terms. With careful coordination and execution, this defensive position can prove to be a major roadblock for any would-be attackers attempting to breach the A Main entrance.
B site defense
When it comes to solidifying your team’s control over the B site, establishing a strong defensive presence in the B Nest and at the B Main entryway is absolutely crucial. By covering these key angles, you’re able to gain a much clearer and more comprehensive view of any opponents attempting to push into the site. Having that visual awareness is half the battle – it allows your team to track enemy movements and react accordingly. But you can take this defensive setup a step further by trying to funnel the attacking team into the B Danger area. This treacherous choke point introduces an additional layer of risk and unpredictability for the opponents, as they have to navigate the dangerous drop-offs while also contending with your team’s crossfires. Carefully coordinating your utility usage, such as smoke grenades and incendiary devices, can help guide the enemies straight toward this hazardous area. Once they’ve committed to that path, your team can then unleash a devastating ambush, catching them in a lethal crossfire from multiple angles. The combination of limited visibility, environmental dangers, and your team’s superior positioning makes it incredibly difficult for the attackers to emerge unscathed.
Beyond just the tactical benefits, forcing the opponents through B Danger also introduces an element of psychological pressure. The constant threat of falling off the map creates a sense of unease and urgency, causing them to second-guess their movements and decisions. This can lead to increased mistakes, hesitation, and an overall degradation of the attacking team’s cohesion and confidence. Ultimately, the key to a successful B site defense lies in your ability to control the flow of the engagement. By dominating the B Nest and B Main choke points, you gain the initiative and can then manipulate the enemies into unfavorable situations. With careful map control, creative utility usage, and coordinated crossfires, you can transform the B site into an impenetrable fortress that strikes fear into the hearts of any would-be attackers. This level of defensive mastery requires a deep understanding of the map geometry, a keen tactical mind, and flawless teamwork. But when executed to perfection, it can swing the momentum of the entire match in your favor, putting you on the path to a decisive victory.
Mid defense
Securing mid control is absolutely essential for any well-rounded defensive strategy, and the strategic placement of your smoke grenades can be a game-changing factor in achieving that. When it comes to shoring up your mid defense, you’ve got a couple of particularly effective smoke options to consider. The first is to place a smoke at the entryway to Mid Catwalk. This effectively cuts off one of the primary avenues of approach for the attacking team, forcing them to either find an alternate route or attempt to push through the limited visibility. Either way, it puts them at a distinct disadvantage and gives your team the initiative. Alternatively, you could opt to smoke off the corner between Mid Bend and Mid Bottom. This location allows you to essentially lock down two key chokepoints simultaneously – the entrance to Mid Catwalk and the pathway leading up from Mid Bottom.
Again, this funnels the opponents into a more constricted area where your team can better coordinate their crossfires and defensive setup. Both of these smoke placements offer unique strategic benefits, and the optimal choice will often depend on the specific map layout, your team’s composition, and the tendencies of your opponents. Mastering the nuances of when and where to deploy these mid smokes is a hallmark of truly skilled tactical play. Beyond just the immediate positional advantages, these smoke lineups also enable your lurker players to thrive. With the enemies forced into predictable choke points, your lurkers can position themselves to catch the opponents off-guard as they attempt to push through the obscured vision. This synergy between the smoke screen and your team’s individual roles is what truly elevates the mid defense to the next level.
Imagine a scenario where your Sova player uses his Recon Bolt to gather intel on the enemies’ mid push, while your Viper player blankets the area with a strategic mix of smoke and venom. As the opponents try to navigate this minefield of limited visibility and environmental hazards, your patient lurker springs the trap, unleashing a devastating flurry of shots that decimates the advancing team. This kind of coordinated defensive setup doesn’t just create chokepoints – it actively funnels the opponents into killing zones where your team can maximize their utility and firing angles. It’s a masterclass in map control and denial, transforming the mid area into an impenetrable fortress that the attacking team simply cannot crack. Of course, executing this level of mid defense requires flawless communication, positioning, and timing from your entire team. It’s not enough to simply throw a few smokes and expect the enemies to crumble. You need to be constantly adjusting your utility usage, readjusting your team’s angles, and anticipating the opponents’ movements and adaptations.
But when you’ve got that level of defensive synergy and coordination dialed in, the mid area can become an absolute nightmare for the attacking team to navigate. They’ll find themselves constantly second-guessing their decisions, hesitating at crucial moments, and ultimately crumbling under the relentless pressure of your team’s mid control. Ultimately, mastering the art of mid defense through strategic smoke placement is a hallmark of elite-level tactical play. It requires a deep understanding of map geography, opponent tendencies, and team synergy. But when executed to perfection, it can be the lynchpin that holds your entire defensive strategy together, paving the way for a decisive victory.